
User guide


Protecting Workstations and Servers | 135
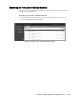
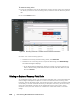
To view a specific recovery point
1. In the left navigation area of the AppAssure Core Console, select the machine for
which you want to view recovery points, and then click the Recovery Points tab.
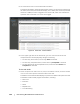
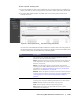
2. Click the right angle bracket > symbol next to a recovery point in the list to
expand the view.
Figure 21. Recovery Points tab selected recovery point details
You can view more detailed information about the contents of the recovery point for
the selected machine, as well as access a variety of operations that can be performed
on the recovery point, as described in the following table.
Info Description
Actions The Actions menu includes the following operations you can
perform on the selected recovery point:
Mount. Select this option to mount the selected recovery point. For
more information, see “Mounting a Recovery Point for a Windows
Machine” on page 136.
Export. From the Export option, you can export the selected
recovery point to ESXi, VMware workstation, or HyperV. For more
information, see “Exporting Backup Information for your Windows
Machine to a Virtual Machine” on page 144.
Rollback. Select this option to perform a restore from the selected
recovery point to a volume you specify. For more information, see
“Selecting a Recovery Point and Initiating Rollback for BMR” on
page 165.
Contents The Contents area includes a row for each volume in the expanded
recovery point, listing the following information for each volume:
Status. Indicates current status of the recovery point.
Title. Lists the specific volume in the recovery point.
Size. Displays the amount of space that the recovery point
consumes in the repository.