
User guide


96 | Protecting Workstations and Servers
The Deploy Agent dialog box closes. There may be a slight delay before you see the
selected agent appear in the list of protected machines as the Agent software is
deployed.
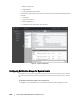
Creating Custom Schedules for Volumes
Complete the steps in this procedure to create custom schedules for volumes on a
machine.
To create custom schedules for volumes
1. In the Protect Machine dialog box (see the section, “Protecting a Machine” on
page 92, for information about accessing this dialog box), under Volume Groups,
select a volume for protection, and then click Edit.
The Protection Schedule dialog box displays.
2. In the Protection Schedule dialog box, select one of the following schedule
options for protecting your data as described in the following table.
If you want to apply these custom settings to all the volumes on this machine, select
Apply to All Volumes.
3. When you have made all necessary changes, click OK.
4. Repeat Step 2 and Step 3 for any additional volumes you want to customize.
5. In the Protect Machine dialog box, click Protect.
You must reboot the agent machine after installing the Agent software. This ensures that the
drivers load properly, allowing the AppAssure 5 Core to monitor file activity on the agent and
ensure successful backups. If you cannot reboot at the time of installation, schedule a reboot later
in the day to ensure AppAssure 5 is able to fully protect your data.
Text Box Description
Interval You can choose from:
Weekday. To protect data on a specific interval, select Interval, and
then:
To customize when to protect data during peak times, you can
specify a Start Time, End Time, and an Interval from the drop-down
menus.
To protect data during off-peak times, select Protection interval
during off-peak times, and then select an interval for protection
from the Time drop-down menu.
Weekends. To protect data during weekends as well, select Protection
interval during weekends, and then select an interval from the drop-
down menu.
Daily To protect data on a daily basis, select the Daily protection option, and
then, in the Time drop-down menu, select a time to start protecting data.
No Protection To remove protection from this volume, select the No Protection option.