
Installation guide
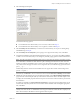
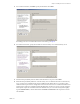


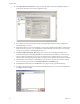
Table Of Contents
- Installation Guide
- Contents
- About This Book
- Getting Started
- Introduction
- Installation
- vCenter Server Heartbeat Implementation
- Installing vCenter Server Heartbeat
- Unattended Installation of vCenter Server Heartbeat
- Appendix - Setup Error Messages
- Glossary

Installation Guide
38 VMware, Inc.
If the Secondary server is physical, go to Step 2
1 Before powering on the Secondary (cloned) image, right-click the server image and select Edit Settings.
a Select the Principal (Public) virtual network adapter and clear the Connected and Connect at power
on check boxes.
b Repeat the process on the VMware Channel virtual network adapter.
c Power on the Secondary (previously cloned) server image.
d On the Secondary server, open Network Connections, right-click the VMware Channel network
connection, and select Properties. Select Internet Protocol (TCP/IP) and click Properties.
e Configure the appropriate VMware Channel IP address and Subnet Mask. Click Advanced
fClick the WINS tab, select Disable NetBIOS over TCP/IP and Click OK three times to close the
dialogs.
g Right-click the Principal (Public) network connection and select Properties. Select Internet Protocol
(TCP/IP) and click Properties. Configure the Principal (Public) IP address (same as the Primary
server), Subnet Mask, and Default Gateway.
hClick OK three times to close the dialogs.
i Right-click the Secondary (cloned) server image and select Edit Settings.
j Select the VMware Channel virtual network adapter and select the Connected and Connect at power
on check boxes. IP communications with the Secondary server go through the VMware Channel.
2 To install the vCenter Server Heartbeat on the Secondary server, download vCenter Server Heartbeat to
the Secondary server (either physical or virtual) to a suitable location. Execute the self-extracting file to
start the installation process.
The Setup Introduction dialog appears. Review the information and click
OK.
3The WinZip Self-Extractor dialog appears. Click Setup to continue.
4The Setup Type page appears. As with the installation on the Primary server, select Install VMware
vCenter Server Heartbeat and click Next.
5 Select the identity of the server on the Physical Hardware Identity page. Select Secondary as the server
identity and click Next.
6 Identify the location of the folder containing the backup file from the Primary server. Manually type the
location path in the text box. Click Next.
N
OTE Do not connect the Principal (Public) virtual network adapter at this time to prevent an IP
address conflict on the network.
N
OTE If you click Exit after Setup has started, you are prompted to save your settings. When you run the
self-extracting file again later, you will be asked if you want to use the previously saved configuration.
N
OTE The left pane of each page in the setup wizard provides information about the setup process.
N
OTE If .Net 2.0 SP2 is not currently installed on the server, vCenter Server Heartbeat Setup installs this
required component, taking some additional time during the installation process.
N
OTE For Windows Server 2003 installations you can alternatively click Browse and locate the folder. On
Windows Server 2008 installations, you must use the UNC path.