Managing vRealize Automation 12 April 2018 vRealize Automation 7.
Managing vRealize Automation You can find the most up-to-date technical documentation on the VMware website at: https://docs.vmware.com/ If you have comments about this documentation, submit your feedback to docfeedback@vmware.com VMware, Inc. 3401 Hillview Ave. Palo Alto, CA 94304 www.vmware.com Copyright © 2015–2018 VMware, Inc. All rights reserved. Copyright and trademark information. VMware, Inc.
Contents 1 Managing vRealize Automation 5 2 Maintaining and Customizing vRealize Automation Components and Options 6 Broadcast a Message on the Message Board Portlet Create a Message Board Portlet URL Whitelist 6 8 Starting Up and Shutting Down vRealize Automation Start Up vRealize Automation 9 Restart vRealize Automation 10 Shut Down vRealize Automation 8 11 Updating vRealize Automation Certificates 12 Extracting Certificates and Private Keys 13 Replace Certificates in the vRealize Automation
Managing vRealize Automation Monitoring vRealize Automation Health 52 Configure System Tests for vRealize Automation 53 Configure Tenant Tests For vRealize Automation 55 Configure Tests For vRealize Orchestrator Custom Test Suite 57 58 View the vRealize Automation Health Service Test Suite Results Troubleshooting the Health Service Monitoring and Managing Resources 61 Choosing a Resource Monitoring Scenario Resource Usage Terminology 61 65 Connecting to a Cloud Machine 66 Reducing Reservati
Managing vRealize Automation 1 Managing vRealize Automation provides information about maintaining VMware vRealize ™ Automation, including how to start and stop a deployment, as well as manage certificates and the appliance database. In addition, it contains information on backing up and restoring vRealize Automation. Intended Audience This information is intended for anyone who wants to manage a vRealize Automation deployment.
Maintaining and Customizing vRealize Automation Components and Options 2 You can manage provisioned machines and other aspects of your vRealize Automation deployment.
Managing vRealize Automation Table 2‑1. Message Board Portlet Limitations Option Limitations URL message limitations n The target URL must be included in the message board whitelist. See Create a Message Board Portlet URL Whitelist. n You can only publish content that is hosted on an https site. n You cannot use self-signed certificates. The option to accept the certificate does not appear in the message board. n The message board URL is embedded in an iframe.
Managing vRealize Automation 7 8 Configure one of the following options. Option Description URL Enter the page URL. Custom Message Enter the plain text message. Click Publish. The message is broadcast to any tenant users who added the message board portlet to their Home tab. To change or remove the message, you must be logged in as the tenant administrator. To change the message, repeat the same steps. To remove the message, remove the URL or text and publish the blank message.
Managing vRealize Automation You can also use a controlled shutdown and startup to resolve performance or product behavior issues that can result from an incorrect initial startup. Use the restart procedure when only some components of your deployment fail. Start Up vRealize Automation When you start vRealize Automation from the beginning, such as after a power outage, a controlled shutdown or after recovery, you must start its components in a specified order.
Managing vRealize Automation 12 If you disabled health checks for your load balancers, reenable them. 13 Verify that the startup succeeded. a Open a Web browser to the vRealize Automation appliance management interface URL. b Click the Services tab. c Click the Refresh tab to monitor the progress of service startup. When all services are listed as registered, the system is ready to use.
Managing vRealize Automation 7 Restart Manager Service nodes and wait for startup to finish. If running automatic Manager Service failover, and you want to keep the active and passive nodes the same, restart in the following order: 8 a Stop the passive Manager Service nodes without restarting them. b Completely restart the active Manager Service node. c Start the passive Manager Service nodes.
Managing vRealize Automation You shut down your vRealize Automation deployment. Updating vRealize Automation Certificates A system administrator can update or replace certificates for vRealize Automation components. vRealize Automation contains three main components that use SSL certificates in order to facilitate secure communication with each other.
Managing vRealize Automation Certificates for the vRealize Automation appliance management site do not have registration requirements. Note If your certificate uses a passphrase for encryption and you fail to enter it when replacing your certificate on the virtual appliance, the certificate replacement fails and the message Unable to load private key appears.
Managing vRealize Automation Procedure 1 Open a Web browser to the vRealize Automation appliance management interface URL. 2 Log in with user name root and the password you specified when deploying the vRealize Automation appliance. 3 Select vRA Settings > Host Settings. 4 Select the certificate type from the Certificate Action menu. If you are using a PEM-encoded certificate, for example for a distributed environment, select Import.
Managing vRealize Automation Option Generate Signing Request Import Action a Select Generate Signing Request. b Review the entries in the Organization, Organization Unit, Country Code, and Common Name text boxes. These entries are populated from the existing certificate. You can edit these entries if needed.
Managing vRealize Automation 7 Confirm that you can log in to vRealize Automation console. a Open a browser and navigate to https://vcac-hostname.domain.name/vcac/. If you are using a load balancer, the host name must be the fully qualified domain name of the load balancer. b If prompted, continue past the certificate warnings. c Log in with administrator@vsphere.local and the password you specified when configuring Directories Management.
Managing vRealize Automation 6 Select the certificate replacement option from the Certificate Action menu. If you are using a PEM-encoded certificate, for example for a distributed environment, select Import. Certificates that you import must be trusted and must also be applicable to all instances of vRealize Automation appliance and any load balancer through the use of Subject Alternative Name (SAN) certificates.
Managing vRealize Automation Replace the IaaS Manager Service Certificate A system administrator can replace an expired certificate or a self-signed certificate with one from a certificate authority to ensure security in a distributed deployment environment. You can use a Subject Alternative Name (SAN) certificate on multiple machines.
Managing vRealize Automation Option Description Import a Copy the certificate values from BEGIN PRIVATE KEY to END PRIVATE KEY, including the header and footer, and paste them in the RSA Private Key text box. b Copy the certificate values from BEGIN CERTIFICATE to END CERTIFICATE, including the header and footer, and paste them in the Certificate Chain text box. For multiple certificate values, include a BEGIN CERTIFICATE header and END CERTIFICATE footer for each certificate.
Managing vRealize Automation See the vRealize Orchestrator documentation for information about updating and replacing vRealize Orchestrator certificates. If you replace or update vRealize Automation certificates without completing this procedure, the vRealize Orchestrator Control Center may be inaccessible, and errors may appear in the vco-server and vco-configurator log files.
Managing vRealize Automation 4 You may need to run the following commands to trust the certificate: /var/lib/vco/tools/configuration-cli/bin/vro-configure.sh trust --uri https://vra.domain.com /var/lib/vco/tools/configuration-cli/bin/vro-configure.sh trust --registry-certificate --uri https://vra.domain.com 5 Ensure that the vRealize Automation certificate is now injected into the vRealize Orchestrator trust store using the following command: /var/lib/vco/tools/configuration-cli/bin/vro-configure.
Managing vRealize Automation 2 Reset the vRealize Orchestrator authentication provider. /var/lib/vco/tools/configuration-cli/bin/vro-configure.sh reset-authentication 3 Start the vRealize Orchestrator Control Center service. service vco-configurator start 4 Log in to the Control Center using virtual appliance management interface root credentials. 5 Unregister and re-register the authentication provider.
Managing vRealize Automation 2 Record the value from the id attribute of the agentConfiguration element. Replace the vRealize Automation Appliance Management Site Certificate If the SSL certificate of the management site service expires, or you started with a self-signed certificate and site policies require a different one, you can replace the certificate.
Managing vRealize Automation What to do next Update all management agents to recognize the new certificate. For distributed deployments, you can update management agents manually or automatically. For minimal installations, you must update agents manually. n For information about automatic update, see Automatically Update Management Agents in a Distributed Environment to Recognize a vRealize Automation Appliance Management Site Certificate.
Managing vRealize Automation Procedure 1 Stop the VMware vCloud Automation Center Management Agent service. 2 Navigate to the Management Agent configuration file located at [vcac_installation_folder]\Management Agent\VMware.IaaS.Management.Agent.exe.Config, typically C:\Program Files (x86)\VMware\vCAC\Management Agent\VMware.IaaS.Management.Agent.exe.Config. 3 Open the file for editing and locate the endpoint configuration setting for the old management site certificate.
Managing vRealize Automation Procedure 1 When Management Agents are running, replace the certificate on a single vRealize Automation appliance management site in your deployment. 2 Wait fifteen minutes for the management agent to synchronize with the new vRealize Automation appliance management site certificate. 3 Replace certificates on other vRealize Automation appliance management sites in your deployment. Management agents are automatically updated with the new certificate information.
Managing vRealize Automation 3 c Select Certificates and click Add. d Select Computer account and click Next. e Select Local computer: (the computer this console is running on). f Click OK. g Expand Certificates (Local Computer) on the left side of the console. h Expand Personal and select the Certificates folder. i Select the current Management Agent certificate and click Delete. j Click Yes to confirm the delete action. Import the newly generated certificate into the local computer.
Managing vRealize Automation 4 Register the Management Agent certificate with the vRealize Automation appliance management site. a Open a command prompt as an administrator and navigate to the Cafe directory on the machine on which the Management Agent is installed at \Management Agent\Tools\Cafe, typically C:\Program Files (x86)\VMware\vCAC\Management Agent\Tools\Cafe. b Enter the Vcac-Config.
Managing vRealize Automation Example: Command to Register a Management Agent Certificate Vcac-Config.exe RegisterNode -v -vamih "vra-va.eng.mycompany:5480" -cu "root" -cp "secret" -hn "iaas.eng.mycompany" -nd "C816CFBX-4830-4FD2-8951-C17429CEA291" -tp "70928851D5B72B206E4B1CF9F6ED953EE1103DED" Change the Polling Method for Certificates If there are commas in the OU section of the IaaS certificate, you might encounter STOMP WebSocket errors in the Manager Service log files.
Managing vRealize Automation You can configure the database as a single node or with multiple nodes to facilitate high availability through failover. The vRealize Automation installer includes a database node on each vRealize Automation appliance installation. So if you install three instances of a vRealize Automation appliance, you have three database nodes. Automatic failover is implemented on applicable deployments.
Managing vRealize Automation Appliance Database Failover In a high availability configuration, the master constantly streams transactions to the replica servers. If the master fails, the active and working replica is ready to proceed with read-only requests. When the new master is promoted, either manually or automatically, all of the upcoming requests are moved to it.
Managing vRealize Automation Prerequisites n Install and configure vRealize Automation according to appropriate instructions in Installing vRealize Automation. n Log in to vRealize Automation Appliance Management as root using the password you entered when you deployed the vRealize Automation appliance. n Configure an appropriate embedded Postgres appliance database cluster as part of your vRealize Automation deployment.
Managing vRealize Automation 3 Click vRA Settings > Database. 4 From the list of database nodes, locate the replica node with the lowest priority. Replica nodes appear in ascending priority order. 5 Click Promote and wait for the operation to finish. When finished, the replica node is listed as the new master node. 6 Correct issues with the former master node and add it back to the cluster: a Isolate the former master node.
Managing vRealize Automation Scenario: Perform a Maintenance Database Failover As a vRealize Automation system administrator, you must perform an appliance database maintenance failover operation. This scenario assumes that the current master node is up and running normally. There are two database failover maintenance steps: maintenance of the master and maintenance of a replica node.
Managing vRealize Automation 7 8 When the maintenance is complete, ensure that the virtual appliance is running with network connectivity and that its HAProxy service is running. a Log in to the vRealize Automation management console as root. b Ensure that the replica node can be pinged, resolved by name, and has a recent status in the Virtual Appliance Management Console Database tab. Click Reset for the replica node.
Managing vRealize Automation 2 If the procedure in step 1 fails, start a shell session and try to determine the node with the most recent state. Start a shell session to all the available cluster nodes and try to start their databases by running the following shell command: service vpostgres start 3 Use the following procedure for each node that has a running local database to determine the node with the most recent state. a Run the following command to determine the node with the most recent state.
Managing vRealize Automation 9 Open the Virtual Appliance Management Interface database page for the most recent node. This node should appear as the master node with the other nodes as invalid replicas. In addition, the Reset button for the replicas is enabled. 10 Click Reset and Refresh for each replica in succession until the cluster state is repaired.
Managing vRealize Automation 4 Click Save Settings. Configure Data Collection Time You can set the day and time when the Customer Experience Improvement Program (CEIP) sends data to VMware. Procedure 1 Log in to a console session on the vRealize Automation appliance as root. 2 Open the following file in a text editor. /etc/telemetry/telemetry-collector-vami.properties 3 Edit the properties for day of week (dow) and hour of day (hod). Property Description frequency.
Managing vRealize Automation Procedure 1 2 Set the VCAC variable in the terminal session for the cURL commands. Operating System Command Linux/Mac export VCAC= Windows set VCAC= Retrieve the authentication token for the system administrator user.
Managing vRealize Automation Operating System Command Linux/Mac curl https://$VCAC/catalog-service/api/icons/cafe_default_icon_genericAllServices -insecure -H "Authorization: $AUTH" --request DELETE Windows curl https://%VCAC%/catalog-service/api/icons/cafe_default_icon_genericAllServices -insecure -H "Authorization: %AUTH%" --request DELETE Customize Data Rollover Settings You can enable and configure vRealize Automation data rollover settings to control how your system retains, archives, or deletes
Managing vRealize Automation If DataRollover IsArchiveEnabled is set to True, data older than that specified in the DataRollover MaximumAgeInDays is moved to the archive tables. If DataRollover IsArchiveEnabled is set to False, data is permanently deleted and no data archiving occurs. Deleted data is not recoverable. Note Consider existing system data and the potential impact on system performance before enabling data rollover.
Managing vRealize Automation You can use the following managerService.exe.config file settings to control various aspects of machine deployments. Default values are shown.
Managing vRealize Automation n Any limit within the virtualization platform or cloud service account on the number of vRealize Automation work items (resource-intensive or not) that can be executed concurrently. For example, the default limit in vCenter Server is four, with work items beyond this limit being queued. By default, vRealize Automation limits concurrent virtual provisioning activities for hypervisors that use proxy agents to eight per endpoint.
Managing vRealize Automation If you do increase the configured per-agent limit, you might have to adjust the default execution timeout intervals for the different types of data collection that use a proxy agent—inventory, performance, state, and WMI. If the time required to execute one of these activities exceeds the configured timeout intervals, the activity is canceled and restarted. To prevent cancellation of the activity, increase one or more of these execution timeout intervals.
Managing vRealize Automation 7 (Optional) If vRealize Automation is running in High Availability mode, any changes made to the ManagerService.exe.config file after installation must be made on both the primary and failover servers. Adjust Execution Frequency of Machine Callbacks You can change the frequency of several callback procedures, including the frequency that the vRealize Automation callback procedure is run for changed machine leases.
Managing vRealize Automation Adjust IaaS Log Settings You can adjust vRealize Automation to log only the information you want to see in the Manager Service log. If vRealize Automation is running in high availability mode, and you make changes to the ManagerService.exe.config file after installation, you must make the changes on the primary and the failover vRealize Automation servers. Procedure 1 Log in to the vRealize Automation server by using credentials with administrative access.
Managing vRealize Automation Table 2‑5. Monitoring and Log Display Options Objective Role Menu Sequence and Description Display information about actions that have occurred, such as the action type, date and time of the action, and so on. IaaS administrator Display default log information or control display content using column and filter options. Select Infrastructure > Monitoring > Audit Log.
Managing vRealize Automation Table 2‑6. Identity Service Group Service Description management-service Identity Service Group sts-service Single Sign-on Appliance authorization Authorization Service authentication Authentication eventlog-service Event log service licensing-service Licensing service Table 2‑7.
Managing vRealize Automation Currently, vRealize Automation supports audit logging as an extension of event logging. This functionality provides basic auditing information, and retention settings are configurable only using the appropriate vRealize Automation REST API event broker service calls. Audit logging is currently available to tenant administrators and system administrators who can log on to tenants. It provides search and filter capabilities for events.
Managing vRealize Automation 4 Enter the Host machine name for the Log Insight server under the Log Insight Agent Configuration heading. a Enter the Host machine name for the Log Insight agent. b Enter the Port to be used for communication with the Log Insight agent. c Select the appropriate communication protocol. d Use the SSL Enabled check box to indicate whether SSL will be used for communication between the Log Insight agent and server.
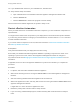
Managing vRealize Automation Figure 2‑1. Distributed Deployment Information table You can use this table to monitor activity in your deployment. For example, if the Last Connected column indicates a host has not connected recently, that can be an indication of a problem with the host server. Log Collection You can create a zip file that contains log files for all hosts in your deployment. For more information, see Collect Logs for Clusters and Distributed Deployments.
Managing vRealize Automation Remove a Node from the Distributed Deployment Information Table You delete the entry for a node from the Distributed Deployment Information table when the node is removed from your deployment cluster or when you are replacing a Management Agent certificate. Procedure 1 Log in to the vRealize Automation appliance by using the user name root and the password you specified when you deployed the appliance. 2 Click vRA Settings. 3 Click the Cluster tab.
Managing vRealize Automation Health Service Test Suites System tests for vRealize Automation Tenant tests for vRealize Automation Tests for vRealize Orchestrator Example Tests n SSO/Identity VA Connection Test n vRealize Automation License Check - Is License Expired? n vRealize Automation Virtual Appliance Root Password Check - Is Password Expiring Soon? n Check vSphere Reservation Storage Paths n Check Reservation Policy to Reservation Assignments n Check the Portal Service Status n Check
Managing vRealize Automation 3 On the Configuration Details page, provide the requested information. Option Description Name Your title for this configuration. This title appears on the test card. Description A description of the test suite. Product Select vRealize Automation. Schedule Select how often the test suite runs. 4 Click Next. 5 On the Select Test Suites page, select System Tests for vRealize Automation. 6 Click Next.
Managing vRealize Automation 10 Click Finish. Tests run according to the selected schedule. What to do next View the vRealize Automation Health Service Test Suite Results Configure Tenant Tests For vRealize Automation An IaaS administrator configures the Health Service to run tenant tests on a selected vRealize Automation virtual appliance.
Managing vRealize Automation 7 On the Configure Parameters page, provide the requested information. Table 2‑14. vRealize Automation Virtual Appliance Option Description vRealize Automation Web Address n For a minimal deployment, the base URL for the vRealize Automation appliance host. For example, https://va-host.domain/. n For a high-availability deployment, the base URL for the vRealize Automation load balancer. For example, https://load-balancer-host.domain/.
Managing vRealize Automation What to do next View the vRealize Automation Health Service Test Suite Results Configure Tests For vRealize Orchestrator An IaaS administrator configures the health service to run tests for vRealize Orchestrator on the vRealize Orchestrator host. These tests confirm that components, such as the vro-server service, are registered and necessary resources, such as sufficient Java memory heap, are available are available on the host machine.
Managing vRealize Automation Table 2‑18. vRealize Orchestrator Host/Load Balancer (Continued) Option Description SSH Console Password The root password. Heap Utilization Threshold Acceptable percent of heap space that is used before the warning test fails. Table 2‑19. vRealize Orchestrator Instances Behind Load Balancer Option Description SSH Console Address IP address or URL of the vRealize Orchestrator instance behind the load balancer.
Managing vRealize Automation Procedure 1 Click Administration > Health. 2 In the upper right, click the gear icon and select Extensibility. 3 Click New Asset. 4 In the Add Asset dialog box, provide the requested information. 5 Option Description Asset Title The name and version number of the test suite you are running, for example, Infoblox 1.0. Asset Description A description of the tests contained in the Python wheel. Asset Version Test suite version number.
Managing vRealize Automation 3 On the Configuration Details page, provide the requested information. Option Description Name Your title for this configuration. This title appears on the test card. Description A description of the test suite. Product Select the product you want to test from the Product dropdown menu. Schedule Select how often you want to run this test suite. 4 Click Next. 5 On the Select Test Suites page, select the custom test suite, and click Next.
Managing vRealize Automation Troubleshooting the Health Service The Health Service troubleshooting topics provide solutions to problems you might experience when you use the Health Service. Service Status Test Fails You can fix a failed service test by changing the test schedule setting. Problem If a service status test fails and you click Cause, you see this message: Cannot establish SSH connection ; Exception message:[Auth fail].
Managing vRealize Automation For example, a fabric administrator is concerned with monitoring the resource consumption of reservations and compute resources, whereas a tenant administrator is concerned with the resource usage of the provisioning groups within a tenant. Depending on your role and the specific resource usage you want to monitor, vRealize Automation allows you different ways to track resource consumption. Table 2‑20.
Managing vRealize Automation Procedure 1 Navigate to the Home page. 2 Click the Edit menu. 3 Click Add for each report to add to your Home page. icon in the upper-right corner of the page and click Add Portlets in the drop-down A disabled Add button indicates an already added report. 4 Click Close. What to do next Configure the Report Layout. Configure the Report Layout You can configure your Home page to display reports in one, two, three, or four columns.
Managing vRealize Automation Prerequisites n Log in to vRealize Automation. n Add Reports to the Home Page. Procedure 1 Navigate to the Home page. 2 Click Export as CSV in the report to save. Some browsers save the file immediately. With Firefox, a dialog box appears with selections for opening or saving the report with Microsoft Excel or another application. 3 (Optional) Select whether to open or save the report data, and which application to use.
Managing vRealize Automation Name Description My Trips Displays a sample consumer report. Add the Business Groups Resource Allocation Portlet to the Home Tab The Business Group Resource Allocation Portlet is a dashboard portlet that you add to your Home tab to monitor resources for business groups. If you are a tenant administrator, the portlet displays the resource allocations for all the tenant business groups.
Managing vRealize Automation Table 2‑21. Resource Usage Terminology (Continued) Term Description Managed Indicates that the machine is provisioned and currently under vRealize Automation management. Allocated Indicates the machine quota, memory, or storage resources actively being consumed by provisioned machines. For example, consider a reservation with a machine quota of 10.
Managing vRealize Automation 2 Select the Amazon machine in the list of machines. You can click View Details on the Actions drop-down menu to display details such as machine type. 3 Select Edit in the Actions drop-down menu. 4 Click Show Administrator Password to obtain the administrator password of the machine. Alternatively, you can obtain the password using an external Amazon procedure. 5 Click Connect Using RDP from the Actions drop-down menu.
Managing vRealize Automation n RDP or SSH is active on the vCloud Air or vCloud Director machine image that will be used for provisioning n The machines are in a security group in which the correct ports are open. Procedure 1 Navigate to the Items page and filter on the groups you manage or a specific group. 2 Select the vCloud Air or vCloud Director machine in the list of machines. You can click View Details on the Actions drop-down menu to display details such as machine type.
Managing vRealize Automation You can reduce the reserved machine quota, memory, and storage of a virtual reservation below the amount currently allocated. This allows management of existing machines to continue without change while preventing provisioning of new machines until allocation falls below the new reserved amount.
Managing vRealize Automation 6 Select the check box in the Disabled column to disable this storage path. 7 Click the Save icon ( 8 Click OK. 9 Repeat this procedure for all reservations that use the storage path you are decommissioning. ). Data Collection vRealize Automation collects data from infrastructure source endpoints and their compute resources. Data collection occurs at regular intervals. Each type of data collection has a default interval that you can override or modify.
Managing vRealize Automation Table 2‑22. Data Collection Types (Continued) Data Collection Type Description Network and security inventory data collection (vSphere compute resources only) Updates the record of network and security data related to vCloud Networking and Security and NSX, particularly information about security groups and load balancing, for each machine following inventory data collection.
Managing vRealize Automation 3 4 Configure Compute Resource data collection specifications. n Select On to enable data collection. n Select Off to disable data collection. Configure Inventory data collection. n Select On to enable data collection. n Select Off to disable data collection. n Enter a number in the Frequency text box to configure the time interval (in hours) between inventory data collections. n 5 6 Click Request Now to manually start data collection.
Managing vRealize Automation Prerequisites Log in to vRealize Automation as a fabric administrator. Procedure 1 Select Infrastructure > Compute Resources > Compute Resources. 2 Click Update Cost. 3 Click Request Now. When the cost update is complete, the status changes to successful. Understanding vSwap Allocation Checking for vCenter Server Endpoints You can use vSwap to determine swap space availability for the maximum size swap file on a target machine.
Managing vRealize Automation n You must re-run data collection to capture any changes made to the vSphere endpoint relative to vSwap. Removing Datacenter Locations To remove a datacenter location from a user menu, a system administrator must remove the location information from the locations file and a fabric administrator must remove location information from the compute resource.
Managing vRealize Automation You can execute the Bulk Imports feature commands using either the vRealize Automation console or the CloudUtil command-line interface. For more information about using the CloudUtil command-line interface, see the Life Cycle Extensibility documentation. Prerequisites n Log in to vRealize Automation as a fabric administrator and as a business group manager. n If you are importing virtual machines that use static IP addresses, prepare a properly configured address pool.
Managing vRealize Automation g Select the Component machine default value from the drop-down menu. If you select a value for Business group and Blueprint, you might see the following results in the CSV data file: n Host Reservation (Name or ID) = INVALID_RESERVATION n Host To Storage (Name or ID) = INVALID_HOST_RESERVATION_TO_STORAGE These messages appear if you do not have a reservation in the selected business group for the host virtual machine that also hosts the unmanaged virtual machine.
Managing vRealize Automation 2 Edit your virtual machine CSV data file. a Open the CSV file, and edit the data categories to match existing categories in the target vRealize Automation environment.
Managing vRealize Automation ,Custom.Property.Name, Value, FLAGS FLAGS are three characters that describe how the property is treated by vRealize Automation. In their order of use, the flags are: 1 H or N = Hidden or Not Hidden 2 E or O = Encrypted or Not Encrypted 3 R or P = Runtime or Not Runtime For example, you can append a custom property to configure a static IP address for a machine.
Managing vRealize Automation e Select import options. Option Description Start time Schedule a future start date. The chosen start time is the local server time and not the local time of the user workstation. Now Begin the import process immediately. Delay (seconds) If you are importing many virtual machines, select the number of seconds to delay each virtual machine registration. Selecting this menu item slows the import process. Leave blank to select no delay.
Managing vRealize Automation 2 e Select the name of the virtual machine resource from the Name drop-down menu. f (Optional) Select Include custom properties if you want to migrate the virtual machine custom properties. g Click OK. Edit your virtual machine CSV data file. a Open the CSV file with a text editor and edit the data categories that you want to change globally.
Managing vRealize Automation c Enter a unique name for this task in the Name text box, for example, managed global update 10. d Enter the CSV file name in the CSV file text box by browsing to the CSV file name. e Select import options. f Option Description Start time Schedule a future start date. The specified start time is the local server time and not the local time of the user workstation. Now Begin the import process immediately.
Managing vRealize Automation d Select one of the available resource types from the Resource drop-down menu. Option Description Endpoint Information required to access a virtualization host. Compute Resource Information required to access a group of virtual machines performing a similar function. e Select the name of the virtual machine resource from the Name drop-down menu. f (Optional) Select Include custom properties.
Managing vRealize Automation 2 Edit your virtual machine CSV data file. Whether you must edit the CSV data file depends on the similarity of the source and target environments. If the configuration values in the source environment do not match the values in the target environment, you must edit the CSV data file so that the values match before you begin migration. a Open the CSV file, and edit the data categories to match existing categories in the target vRealize Automation environment.
Managing vRealize Automation Example of a complete, properly formatted CSV line: Yes, MyMachine, a6e05812-0b06-4d4ea84a-fed242340426, DevReservation, ce-san-1:custom-nfs-2, Imported Deployment 0001, ImportBlueprint, ImportedMachine, user@tenant b If you are migrating a virtual machine with a static IP address, append a command in the following form to the CSV file. ,VirtualMachine.Network#.Address, w.x.y.z, HOP Configure the command with the appropriate information for your virtual machine.
Managing vRealize Automation e Select import options. Option Description Start time Schedule a future start date. The chosen start time is the local server time and not the local time of the user workstation. Now Begin the migration process immediately. Delay (seconds) If you are migrating many virtual machines, select the number of seconds to delay each virtual machine registration. Selecting this option slows the migration process. Leave blank to select no delay.