
User's Manual


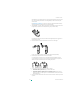
Table Of Contents
- Vocera Badge User Guide
- Contents
- Welcome to Vocera
- Badge Features
- Commands
- Basic Calling
- Advanced Commands
- Blocking and Accepting Calls
- Broadcasting to a Group
- Calling Telephone Numbers
- Calling an Address Book Entry or Buddy
- Forwarding Your Calls
- Getting Other Information
- Issuing Urgent Commands
- Joining or Leaving a Group
- Locating a Vocera User or Group Member
- Navigating IVR Phone Trees with a Badge
- Placing a Three-Way Conference Call
- Redialing Phone Numbers
- Sending and Receiving Numeric Pages
- Using Instant Conferences
- Optional Commands
- Special Features
- Communicating with Multiple Sites
- Commands for Group Managers
- Sending Text Messages to Vocera Devices
- Using Vocera Access Anywhere
- The User Console
- Maintaining Your Badge
- Notification Prompts
- Reference
- Frequently Asked Questions
- Why does the Genie have trouble understanding me?
- Why is my device chirping or beeping?
- Why does my device beep when I'm talking to someone?
- Why does my device display say "Searching for Server"?
- Why does the Genie ask me to wait when I press Call?
- Why can't I receive calls or messages?
- Why do some text messages begin with strange characters?
- Why does my badge beep and then restart?
- What can I do if badge buttons are not working?
- How can I stop getting logged out when I charge my badge?
- Agreements, Specifications, and Notices
- Important Safety Instructions
- Command Reference
- Block and Accept Calls
- Broadcast to a Group
- Call a User or Group Member
- Dial a Telephone Number
- Environmental Services
- Forward a Call
- Getting Help
- Locate Users and Groups
- Log In and Log Out
- Manage Groups
- Miscellaneous
- Place a Three-Way Conference Call
- Play Messages
- Record Your Name and Greeting
- Send and Receive Numeric Pages
- Send Messages
- Summon and Dismiss the Genie
- Transfer a Call
- Use Instant Conferences
- Work With Your Groups
- Work with Sites
- Frequently Asked Questions

WELCOME TO VOCERA
10 VOCERA BADGE USERGUIDE
New batteries must be charged before use. If the badge has already been used by someone
else, check the battery level indicator on the badge display to make sure the battery has
sufficient power.
See Maintaining Your Badge on page 81 for other ways to determine whether the battery
needs charging and for instructions on how to charge the battery.
2. Install the battery. To do this, slide the pegs at the top of the battery into the two holes in the
badge's battery compartment, and then press down gently to seat the battery.
The badge will begin a startup sequence. Wait until the badge display reads Logged Out or
shows someone's name.
3. Choose the lanyard or universal clip attachment, and connect it to the badge.
You also can connect the lanyard or clip to the badge before installing the battery.
4. Put the badge on, and make sure it is in the proper position.
For optimal speech recognition, the top of the badge should be approximately 6 inches
(15 centimeters) from your chin. Any sound coming from another direction or beyond that
distance is reduced or eliminated by the noise canceling microphones.
5. Log in: Press the Call button and wait for the Genie to answer.
• If the Genie asks for your name, say your first and last names.
• If the Genie answers by saying "Vocera" or by playing a tone, another user may
already be logged in. If so, say "Log me out," wait for the chime, and then press the Call
button again to log in.
6. Record your name: Press the Call button, wait for the Genie to answer, and then say "Record
my name."