THE SINGER'S ULTIMATE CHOICE OPEN/CLOSE DISC POWER TUNER AV1 1 AV2 2 3 5 6 4 PRESET 7 8 9 0 +10 PROG TITLE l SETUP ENTER RETURN MENU STOP/AM/FM PLAY/AUTO PAUSE/ST/MC = F.SCAN PREV -SEARCH+ NEXT -PRESET+ SUBTITLE ANGLE SLOW STEP REPEAT A-B L/R P/N TIME ZOOM RESUME MUTE MODE CLEAR Digital Key Control # b V/P MUSIC MIC n V/C G I G - S TA R OSD PBC u LANG o w n e r ’ s a B.
Table Of Contents Safety instructions FCC information Welcome Listening for a lifetime Features & Specifications Getting Connected AV Inputs .......................................................................................... 1 Audio Outputs ................................................................................... 1 Video Outputs ................................................................................... 1 Microphone/Instrument Inputs .................................................
Safety Instructions CAUTION RISK OF SHOCK CAUTION: To reduce the risk of electric shock, do not remove cover (or back). No userserviceable parts inside. Only refer servicing to qualified service personnel. Explanation of Graphical Symbols The lightning flash & arrowhead symbol, within an equilateral triangle, is intended to alert you to the presence of danger. The exclamation point within an equilateral triangle is intended to alert you to the presence of important operating and servicing instructions.
FCC INFORMATION (U.S.A.) 1. IMPORTANT NOTICE: DO NOT MODIFY THIS UNIT!: This product, when installed as indicated in the instructions contained in this manual, meets FCC requirements. Modifications not expressly approved by Vocopro may void your authority, granted by the FCC, to use this product. 2. IMPORTANT: When connecting this product to accessories and/or another product use only high quality shielded cables. Cable(s) supplied with this product MUST be used. Follow all installation instructions.
Welcome. And Thank you for purchasing the GIG STAR from VocoPro, your ultimate choice in Karaoke entertainment! With years of experience in the music entertainment business, VocoPro is a leading manufacturer of Karaoke equipment, and has been providing patrons of bars, churches, schools, clubs and individual consumers the opportunity to sound like a star with full-scale club models, in-home systems and mobile units.
Listening For A Lifetime Selecting fine audio equipment such as the unit you’ve just purchased is only the start of your musical enjoyment. Now it’s time to consider how you can maximize the fun and excitement your equipment offers. VocoPro and the Electronic Industries Association’s Consumer Electronics Group want you to get the most out of your equipment by playing it at a safe level.
Features & Specifications Features • Efficient 4-speaker cabinet design pumps 100W total power (peak to peak) • All-in-one system design, perfect for live gigs, portable use and DVD home entertainment • Multi-Format player with Direct Track Access Supports DVD, VCD, CD+G, MP3, Photo-CD, CD, CD-R, CD-RW Formats • AM/FM Tuner lets you sing along to your favorite popular hits • 1/4” Guitar and Keyboard inputs with Individual Volume controls • Two 1/4” / XLR Microphone inputs with Bass, Treble and Individual Volu
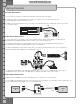
OPEN/CLOSE DISC POWER TUNER AV1 1 2 4 5 AV2 3 6 PRESET 7 8 9 0 +10 PROG TITLE SETUP Getting Connected ENTER RETURN MENU STOP/AM/FM PLAY/AUTO F.SCAN PREV -SEARCH+ OPEN/CLOSE NEXT -PRESET+ LANG SUBTITLE ANGLE SLOW STEP REPEAT L/R P/N TIME POWER OSD RESUME MUTE AV Input Connections PAUSE/ST/MC = B.
Getting Connected Microphone/Instrument Input Connection After making your main system connections, it is time to get your microphones and instruments connected and ready for performing. Before you get started with your connections we recommend that you take the following tips into consideration: • When connecting instruments, refrain from using defective cables as they can cause significant noise and loud pops, posing a threat to system speakers.
Getting Connected Speaker Connection The GIG STAR has a set of speaker connectors for connection to external speakers. Remember that only speakers with an impedance rating of 8 ohms should be connected. To connect speakers: 1. Unlock the plastic fasteners on each speaker connector by pushing downward on them. 2. Strip approximately a 1 /2” (1.27cm) of insulation from the speaker wire ends and twist the strands so that they can easily slide through the holes. 3.
Operations Preparing a Disc for Playback Turn the power on by pressing the POWER button on the front panel. Press the OPEN/CLOSE button to open the disc tray. Insert a disc into the round recess in the tray with the label side up. Playing a Disc Press the PLAY/PAUSE button on the front panel or the remote control to begin disc playback. Press the PREV/NEXT buttons to skip to the beginning of the previous or next track. Press the STOP button to cease playback of the disc.
Operations cont. Displaying the Remaining Time While the disc is playing, pressing the OSD button on the remote control will display the disc’s playback status. Press the OSD button to cycle through Track Time remaining, Track time elapsed, Chapter Time Remaining and Chapter Time Elapsed. Programming a Playback Sequence • Use the arrow buttons on the remote to navigate through the PROGRAM menu. • Use the number buttons (0-10, +10) on the remote or front panel to enter the track numbers. 1.
Recording Device POWERED STAGE MONITORS AM/FM Tuner Operations AUDIENCE TV STAGE TV To Video In To Video In See the AM/FM Tuner Controls and Functions section of this manual for locating the buttons. Turning on the Radio 1. Make sure that the GIG STAR’s power is on. 2. Either use the TUNER button on the remote or the INPUT SELECT button on the front panel to turn on the radio. Make sure the LED light next to TUNER is lit. This means the radio is on.
AM/FM Tuner Operations cont. Setting Preset Stations With the GIG STAR you can store up to 20 stations, in each band (AM and FM), as presets for instant access using the DIRECT TRACK ACCESS number keys. To Audio In To Audio In Speakers External Amplifier To set a preset for a station Recording Device WERED STAGE Hold down the desired number key for 3 seconds while the radio is set to that station. MONITORS SPEAKER 8 Example: To set 106.7 FM as preset 1: *Set to EXT for External Speaker 1.
Mp3 Functions and Operations The GIG STAR can play back MP3’s files recorded to CD-ROM, CD-R or CD-RW discs. Notes on MP3 Discs An MP3 file stores audio data that has been compressed using the MPEG1 encoding scheme. Although PC terminology uses “files” and “folders” regarding MP3s and storage, in this manual we refer to them as “tracks and albums”. Notes on Playing MP3s • An MP3 track must be recorded on a disc in the format compliant with ISO9660. Track order may differ from MP3 player to MP3 player.
Mp3 Functions and Operations cont. MP3 Glossary File Extension - A 3-character string added to a file name under the Windows or DOS environment is called a “file extension”. A file extension is used mainly to identify types of files. The file extension for MP3 files is “.mp3”. ISO 9660 - ISO stands for the “International Organization for Standardization”. ISO 9660 determines the file structure for CD-ROMs. This unit can play MP3 files recorded in the format compliant with ISO 9660.
Karaoke Functions and Operations Notes on Karaoke Media There are various types of Karaoke media available for playback with the GIG STAR. You can perform Karaoke with Mp3, CD+G and VCD formats. The thing to remember is how each type differs as far as audio channels and video support. CD+G CD+G has been the most commonly used format of Karaoke media for the last 7 years. It is very similar to a standard CD, except it has video graphics that are decoded by your Karaoke player and displayed onscreen.
Viewing CDs Viewing VCD’s There are two types of VCD’s: VCD 1/1.1 Format This format of VCD has no menu, track search and other video features available, as this format does not support PBC. The same as with audio CD’s, these discs will auto-play with full motion-picture audio and video, but with no support for menus and custom track selection. VCD 2.0 Format 2.0 formatted VCD’s are equipped with PBC support.
Viewing CDs cont. Slow Playback To enter SLOW MODE during playback: 1. Press SLOW. Each time SLOW is pressed, the play speed changes NOTE: There is no audio during SLOW playback. To return to normal playback: 1. Press PLAY Viewing a Photo-CD 1. Insert a PHOTO-CD into the disc tray and the photo file menu will appear on the TV screen. 2. Use the arrow buttons on the remote to navigate through the different image files. 3. Press ENTER to view the full sized image.
TITLE SETUP ENTER RETURN MENU STOP/AM/FM PLAY/AUTO PAUSE/ST/MC = B.SCAN F.
+10 0 TITLE SETUP ENTER RETURN MENU STOP/AM/FM PLAY/AUTO PAUSE/ST/MC = B.SCAN F.SCAN PREV -SEARCH+ NEXT -PRESET+ LANG SUBTITLE ANGLE SLOW STEP REPEAT A-B TIME ZOOM Front Panel Descriptions cont.
MUSIC EQ POWER +12dB 60Hz 200Hz 400Hz 1KHz 3KHz 6KHz 16KHz +12dB 0dB INPUT BASS TUNER 1 -12dB ECHO REPEAT DELAY 2 3 4 5 6 7 8 9 10 +10 -12dB 60Hz AV1 TREBLE 0dB DISC 200Hz 400Hz 1KHz 3KHz 6KHz 16KHz MIC EFFECTS TRACK / PRESET AV2 PLAY MUSIC VOLUME Rear Panel Descriptions AUTO STOP PBC V O C A L CANCEL MULTI-FORMAT EQ ON AM/FM MIC VOLUME EJECT PAUSE V I D E O PRESET SEARCH ST/MO EQ OFF VO C A L PARTNER 1 2 FM/ANT INPUT/ENTRÉE AV2 INPUT HEADPHONES
Remote Control Descriptions 1. OPEN/CLOSE - Opens and closes the disc tray. NOTE: The GIG STAR input must be set to DISC mode. The OPEN/CLOSE button will not open the disc tray if the input is set to AV1, AV2 or TUNER. 2. POWER - Turns the GIG STAR’s power on and off. 3. INPUT SELECT buttons - Select the active input source using these buttons. • DISC to use the disc tray for playing DVD, CD+G, CD, etc. • TUNER to use the AM/FM radio. • AV1 to use an additional player (CD/DVD player, Mp3 player, etc.
Remote Control Descriptions cont. 20. PBC - The PBC (play back control) button toggles the PBC mode ON/OFF. When in PBC mode, you can use direct access to tracks/scenes by using the NUMBER PAD on the REMOTE CONTROL. This feature is used primarily with VCD, MP3 and PHOTO-CD discs. NOTE: Not all discs have PBC support coding. Check to make sure a disc has PBC support before trying to use the feature. Pressing the PBC button during the playback of a track/scene will cause the playback to stop and restart.
1 2 3 5 6 4 PRESET 7 8 9 0 +10 PROG TITLE SETUP ENTER RETURN MENU STOP/AM/FM PLAY/AUTO PAUSE/ST/MC = AM/FM Tuner Descriptions B.SCAN F.
Setting the Preferences SYSTEM SETUP MENU To access your preferences settings, use the SETUP button on your remote. Use the DIRECTION keys to navigate within this menu for the specific subdirectory desired and press ENTER. The icon file tabs at the top of the screen indicate which menu is highlighted. SYSTEM SETUP TV SYSTEM SCREENSAVER VIDEO TV TYPE PASSWORD RATING DEFAULT EXIT SETUP SYSTEM SETUP SCREEN 1.
Setting the Preferences cont. LANGUAGE SETUP Use this menu to set language preferences for each of these functions. Use the DIRECTION keys to make a selection and press ENTER to confirm your choice. LANGUAGE SETUP OSD LANGUAGE AUDIO LANGUAGE SUBTITLE LANGUAGE MENU LANGUAGE EXIT SETUP LANGUAGE SETUP SCREEN 1. OSD (On Screen Display) LANGUAGE for remote functions, etc. Choose between English or Chinese. 2. AUDIO LANGUAGE. This feature is dependent on the options included with each individual disc.
Setting the Preferences cont. VIDEO SETUP Use the DIRECTION keys to locate the virtual fader and raise/lower the fader bar for each of the following video preference settings: VIDEO SETUP BRIGHTNESS CONTRAST HUE SATURATION VIDEO SETUP 1. BRIGHTNESS 2. CONTRAST 3. HUE 4. SATURATION SPEAKER SETUP SPEAKER SETUP DOWNMIX SPEAKER SETUP 1. DOWNMIX LT / RT: When connecting to a Dolby Digital amplifier. STEREO: When connecting to a stereo TV or amplifier and using a disc that supports 2-channel output.
Setting the Preferences cont. DIGITAL SETUP DIGITAL SETUP OP MODE DYNAMIC RANGE DUAL MODE DIGITAL SETUP 1. OP MODE LINE OUT: Compresses the input signal and lowers the volume for use in quieter settings, for example at night time. RF REMOD: Increases the volume for regular usage. 2. DYNAMIC RANGE When the OP MODE is set to LINE OUT, use this to select the ratio of signal compression. Select FULL for the lowest maximum signal and OFF for the highest maximum signal. 3.
Troubleshooting The input selector is not set to the channel that the active source player is connected to. Check the source player input channel and ensure the input selector is set to that channel. The speaker selector is not set correctly. If external speakers are connected, set the speaker selector to EXT. If no external speakers are connected, select INT. Faulty connection within external components or external component failure. Check overall cabling and viability of external equipment.
Vocopro 2005 V 1.1 W WW.VOCOPRO.