
Owner's manual

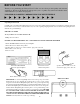


ASSEMBLY
Assembling the Twister II
After fully unscrewing the Phillips head screw from the top back of the
carpeted road case carefully insert the Twister II amplifier/player by
sliding the unit into the space provided for the unit as far forward as it will
go. (See diagram) Once the Twister II amplifier/player unit is in place
in the Twister II road case, re-screw the Phillips head screw as far into
the case as it will go so that it extends into Twister II amplifier/player
compartment, behind the inserted unit. With the screw fully extended Twister
II amplifier/player compartment a “stop” is created for the Twister II
amplifier/player and secures the unit in place. This prevents the Twister II
amplifier/player unit from accidentally falling out of the road case. Damage
to the unit by not following the manufacturer’s specific assembly
instructions may not be covered by the warranty.
CONNECTING A TELEVISION MONITOR
If you will be connecting your Twister II to a television monitor use the
RCA video connector wire included with you Twister II. On the back of the
Twister II amplifier/player, locate the RCA connector jack labeled “VIDEO
OUTPUT”, it is color coded in yellow. Connect either end of the RCA
connector wire to the “VIDEO OUTPUT” jack and the other end to your
television monitor. There should be an RCA connector jack, just like the one
on the back of the Twister II amplifier/player, labeled video input.
Connecting this wire will enable you television monitor to display the
graphics that are encoded on CDG Karaoke discs. NOTE: If your
television does not have an RCA type connector you may use a VCR or
an RF Modulator (not included) to connect you monitor.
(See“Connection Diagram” and “Trouble Shooting Guide” for options.)
CONNECTING THE SPEAKERS
Once the Twister II amplifier/player unit is in place in it’s designated
compartment, locate the four speaker jacks on the rear of the Twister II
player/amplifier. There are two red jacks and two black jacks. Viewing the
speaker cable included with the Twister II note that there is a colored wire
visible on each prong of the banana plug end of the speaker cable. The red
wire is positive (+) and the white wire is negative (-). NOTE: WITH
SOME UNITS A GREEN WIRE MAY BE SUBSTITUTED FOR A
RED ONE, THIS WIRE WILL STILL BE POSITIVE (+). Match up
the color-coded wires on the “banana” plug end of the speaker cable (see
diagram) to the speaker jacks on the back of the Twister II player/amplifier.
Always connect the red (or green) wire(s) to the red speaker jacks and
the white wire(s) to the black speaker jacks.
IMPORTANT: If the wires are connected to the jacks in reverse the sound of the unit will be adversely effected when played.
Next connect the ¼” jack at the other end of the speaker cable to the ¼” jack receptacles below the Twister II amplifier/player
compartment on the back of the Twister II road case.
3