
User's Manual


12
13
Descriptions and Functions
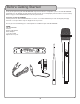
1 2 3 4 5
Front Panel
1. BNC Antenna Connector - Connect the antenna here. To attach, press and twist clockwise until the connector latches.
To detach, press and twist counter-clockwise.
2. RF Indicator LED - This LED will turn on when the UHF-18 DIAMOND receiver detects a wireless signal from the wireless
microphone. (When the wireless microphone is switched on)
3. AF Indicator LED - This LED will turn on when the UHF-18 DIAMOND receiver detects an audio signal from the wireless
microphone.
(When the wireless microphone is spoken or sung into)
4. Power Indicator LED - This LED will turn on when the UHF-18 DIAMOND receiver is powered on.
5. Power/Volume Dial - This dial will turn on the UHF-18 DIAMOND receiver. Turn the dial clockwise, it will click, turning
the unit on. When the UHF-18 DIAMOND is on, this dial is used to adjust the volume of the wireless mics. Turn the dial
clockwise to increase the volume and counter-clockwise to decrease the volume. To turn the UHF-18 DIAMOND off, turn
the dial completely counter-clockwise until it clicks.
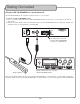
1 2 3
Rear Panel
1. Power Connector - When using the UHF-18 DIAMOND as a stand-alone unit, connect the power adapter here. When
using the UHF-18 DIAMOND as a plug-in module, this plug is not used.
NOTE: Plugging in the power adapter when using the UHF-18 DIAMOND as a plug-in module may result in damage to the
UHF-18 DIAMOND.
2. 1/4” MIC OUT Jack - When using the UHF-18 DIAMOND as a stand-alone unit, connect a cable from this jack to the
mic input on your mixer or other device. When using the UHF-18 DIAMOND as a plug-in module, this plug is not used.
3. Multi-Purpose Plug - When using the UHF-18 DIAMOND as a plug-in module, connect the multi-purpose cable from the
plug-in slot to this plug. When using the UHF-18 DIAMOND as a stand-alone unit, this plug is not used.