
User guide


86
Connecting to the Nearby TV (TV1)
Chapter 11
CONNECTING TO THE NEARBY TV (TV1)
This section describes how to connect receiver TV1 output ports to a nearby TV. Select
one of the following methods.
Note: If you would like to put the receiver in a remote location (closet, cabinet, etc.), be
sure to get the replacement remote control that uses UHF Pro signals to control TV1. Call
your DISH Network retailer or go to www.dishnetwork.com
, select Shop, and then click on
Accessories.
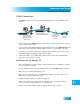
HDMI Connections
The HDMI connection provides high-quality audio and video to your HDTV or HD Monitor
in one cable. If your HDTV or monitor has an HDMI connection available, this is the
recommended connection.
Note: Connecting your TV directly to the audio/video outputs of your receiver will assure a
more vivid picture and enhance your viewing enjoyment.
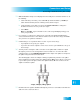
1 Connect an HDMI cable between the HDMI connection on the receiver and HDTV set or
monitor.
2 Turn on your receiver and TV using the front panel buttons.
3 Confirm that you are getting a picture from the receiver. Consult your HDTV user’s guide if
you need to change your HDTV to display from the Digital Audio/Video input.
4 If you do not see a picture, see No Picture on the Nearby TV on page 87.
Note: In most cases connecting the HDMI cable will provide plug-and-play control of the
monitor’s display resolution and other settings. However, your HDTV may require
selecting a different format to display from the receiver during setup.
5 Turn up the volume on your HDTV and confirm you have sound. If you don’t have sound,
your system may require you to connect audio (red and white) RCA-type cables between
the receiver audio outputs and audio input connections.
HDMI
1
2-4
5
Connect receiver
and monitor with
HDMI cable
Turn monitor
and receiver on
and confirm picture
Confirm
sound and
volume