Mountaineer™ Woodstove Model VG650ELG Owners Manual (save this manual for future reference) This stove meets U.S. Test Standard: READ ALL INSTRUCTIONS CAREFULLY BEFORE Installing OR OPERATING This STOVE. Failure to follow instructions may result in property damage, bodily injury, or even death. Refer to markings on STOVE labels for additional information. UL 1482-1996 NOTE: It is recommended Installation be completed by a qualified Heating Equipment Installer! Do NOT install in a mobile home.
SAFETY INSTRUCTIONS – Read All Instructions carefully. 1. The installation of this stove must comply with your local building code rulings. Please observe the clearances to combustibles (see reference figures 7– 9). Do not place furniture or other objects within the clearance area. 2. Verify that the stove is properly assembled and installed before firing the stove for the first time.
SAFETY INSTRUCTIONS continued… 17. DO NOT ELEVATE THE FIRE. Build fire directly on the bottom of the firebox. This stove has not been tested with the use of grates, andirons or other means of elevating the fire and must not be used. 18. Clean stove frequently as soot, creosote and ash may accumulate. Clean exterior with soap and warm water when stove is not hot. Do not use any acids or scouring soap, as these solvents wear and dull the finish. 19.
Assembly Instructions NOTICE: Vogelzang International Corp. grants no warranty, stated or implied, for the installation or maintenance of your wood stove and assumes no responsibility of any incidental or consequential damages. Tools and Materials Required for Installation • • • • • • • • • tools Pencil 6 foot Folding Rule or Tape Measure Tin Snips Drill: Hand or Electric 1/8” dia.
Assembly Instructions continued CAUTION: Stove body is HEAVY. Make sure you have adequate help to lift stove body and pedestal and use proper lifting techniques. 7. Place flattened carton on floor and carefully tip the stove box assembly (#1) onto it’s back. Prop up the bottom edge with additional packing material or wood pieces. 8.
Locating Stove 1. The stove must be placed on solid concrete, mum standard gauge) black or 26 MSG blue solid masonry, or when installed on a combussteel stove pipe. DO NOT use galvanized stove tible floor, on a listed UL 1618 Type 2 floor pipe. Secure pipe/elbow sections with three protector, such as Hy-C or Imperial Model sheet metal screws at each joint to make the UL4848BK or equivalent with 1.0 R-factor. piping rigid.
Locating Stove continued… CAUTION: Keep furnishings and other combustible materials away from the stove. CORNER CLEARANCES 18-1/2" NOTE: Before firing woodstove slide firebricks towards the rear so no gaps remain between bricks. 18-1/2" Fig. 8 – Top View Minimum Corner Clearances from Combustible Surfaces Fig. 9a – Front View Minimum Clearance Dimensions from Combustible Surfaces VGZ-025 | 20120424.0 Vogelzang International Corp. Fig.
Pipe connector Installation NOTE: Stove pipe is NOT INCLUDED. To purchase, Visit your local hardware, home or building center. Use round 6” dia., minimum 24 MSG (minimum standard gauge) black or 26 MSG blue steel stove pipe. DO NOT use galvanized stove pipe. 1. The crimped end of the stovepipe fits inside the stove flue collar. Install additional pipe and elbow with the crimped end towards the stove. This will allow any condensation in the flue to run back into the firebox.
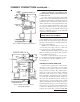
Chimney connections The stove must be connected to either a masonry or manufactured metal chimney built and tested to the specifications listed on the previous pages. Chimneys perform two functions: 1). As a means of exhausting smoke and flue gases which are the result of fuel combustion. 2). The chimney provides “draft” which allows oxygen to be continuously introduced into the appliance, so that proper combustion is possible. This stove relies on natural draft to operate.
Chimney connections continued … Manufactured Chimney Refer to chimney and chimney connector maker’s instructions for installation and use. Use only 6” diameter listed chimney UL 103 HT. Chimney made to this listing is High Temperature rated to 2100 degrees Fahrenheit. Use chimney from only one manufacturer. Never mix brands. Carefully follow the chimney manufacturer’s stated requirements and clearances.
Chimney connections continued … use a chimney that is unlined or damaged!) If you have any question regarding the condition of the chimney, consult a qualified licensed contractor, qualified engineer, competent mason, certified Chimney Sweep, or a knowledgeable inspector. Consult your insurance company if you cannot find a qualified expert. CAUTION: Not all fireplace chimneys are suitable for conversion to accommodate connection to a wood stove. Check with a qualified expert.
Chimney Connector Systems & Clearances A. Brick Masonry Minimum 3.5˝/89mm thick brick masonry all framed into combustible wall with a minimum of 12˝/305mm brick separation from clay liner to combustibles. The fireclay liner shall run from outer surface of brick wall to, but not beyond, the inner surface of chimney flue liner and shall be firmly cemented in place. B. Insulated Sleeve Solid-insulated, listed factory-built chimney length of the same inside diameter as the chimney connector and having 1˝/25.
Operating Instructions CAUTION: HOUSE FIRE HAZARDS • Do not store wood on floor protector, underneath stovepipe or anywhere within minimum clearances from combustible surfaces specified for this stove. • Over firing may cause a house fire. You are over firing If a unit or chimney connector glows Red. Operating Safety Precautions 1. Never over fire this stove by building excessively hot fires as a house/ building fire may result.
Operating continued … Service Hints process and less buildup of tars, soot, or creosote CREOSOTE – Formation and Need for Removal will occur in the chimney. 1. Always open draft damper before opening the CAUTION: RISK OF FIRE When wood is feed door. burned slowly, it produces tar and other organic vapors, which combine 2. When adding fuel be careful not to smother the with expelled moisture to form creofire. Do not build fires against glass on models sote. The creosote vapors condense with glass door.
Service Hints continued … 4. Do not attempt to burn (or mix in) green or wet wood. The use of green or wet wood will cause a rapid build up of creosote. Wood that hisses, sizzles and blackens without igniting in five minutes must be considered too wet to burn. 5. Do not attempt to extend the burn time by using wet wood. Not only does burning wet wood rapidly build up creosote, but it reduces the heat output by up to 25 percent. 6.
Service Hints continued 2. Environmental Factors Wind or air deflecting off external objects such as the roof, neighboring structures, trees, or hills. These can cause a pressure change in the air surrounding the chimney. 3. Chimney Temperature The temperature of the chimney is an important factor in how well it drafts. Warm chimneys draft better than cold chimneys. This is based upon the principle that hot air rises while cold air sinks. Hot gases going up a cold chimney will cool rapidly.
Service Hints continued 3. Remove glass from door frame. 4. If glass is broken, carefully remove and discard each broken piece to avoid cuts. Discard window gasket. Replace window and gasket with original factory replacement parts. 5. Replace new gasket starting at the bottom of glass working along edges, being sure to center gasket channel on glass. 6. Trim to length and butt ends together. 7. Perform replacement procedure in reverse order after replacing glass and gasket. 8.
Ordering Parts - VG650ELG mountaineer stove When ordering missing or replacement parts, always give the Model Number of the stove, Part Number, and Part Description. Use the illustrations and part lists provided to identify parts. Part No. Description Qty. 1 Stove Body.................................................... 1 2 Heat Shield.................................................... 1 3 Blower Assembly F-6..................................... 1 4 Flue Collar...................................
Ordering Parts - VG650ELG mountaineer stove When ordering missing or replacement parts, always give the Model Number of the stove, Part Number, and Part Description. Use the illustrations and part lists provided to identify parts. Part No. Description Qty. 7 Door Frame.................................................... 1 9 3/8” dia. Fiberglass Glass Gasket.................. 1 10 High-Temp Ceramic Glass............................. 1 11 Glass Retainer..............................................
Floor Protector Material Calculations This stove has been tested for and must be installed on a floor protector with the proper Thermal Resistance or R-value as stated in the installation instructions on page 6, “Locating Stove” step 1, of this manual. If the floor protector materials listed in the instructions are not available, materials with an equivalent R-value may be substituted.
Chimney & Stove Maintenance Log date of service performed by description VGZ-025 | 20120424.0 Vogelzang International Corp.
This Vogelzang heating appliance is safe when installed properly and will provide you with years of service. However, always exercise good judgement when you are using this stove. You are dealing with FIRE! Fire is inherently dangerous and must be treated with respect.