
Instruction Manual
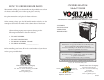


CAUTION:
HOT WHILE IN OPERATION.
KEEP CHILDREN, CLOTHING
AND FURNITURE AWAY.
CONTACT MAY CAUSE
SKIN BURNS.
OPERATING INSTRUCTIONS
FUEL
Hardwood, 18" to 23" should be split and
air dried (seasoned) for 6 months to obtain
maximum burning e ciency.
Wood should be stored in a dry, well venti-
lated area. A Wooden box or crate is ideal
for storage.
NOTE: USE SOLID WOOD MATERIAL
ONLY. DO NOT USE COAL.
DO NOT USE MANUFACTURED OR
CHARCOAL LOGS!
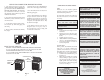
LIGHTING
1. Set the thermostat on "High" for maxi-
mum dra .
2. Open the feed door and place paper
and kindling on the grate for starting
the re.
3. Light re and close feed door.
4. Add fuel a er re is burning briskly. Use
care not to smother the kindling re.
5. Set thermostat higher or lower for
desired temperature.
ADDING FUEL
When possible, add small amounts of fuel
each hour or so instead of adding large
quantities of fresh fuel every 4 to 5 hours.
is will give more complete combustion and
less build-up of tars or soot in the chimney.
1. Set ermostat to HIGH before open-
ing feed door.
2. Empty ash pan regularly. Do not allow
ashes to build up to grate as grate will
warp and burnout will occur, and you
might spill the ashes when removing
the pan. Dispose of hot ashes properly
(see Note 11 on Page 3).
10
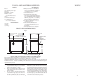
RULES FOR CONNECTOR PIPE INSTALLATION
1. e crimped end of the stovepipe ts
inside the heater ue collar. Install additional
pipe and elbow with the CRIMPED END
TOWARD THE HEATER. is will allow
any condensation in the ue to run back
into the heater. Smoke will not escape when
installed in this manner.
2. Slope any horizontal pipe upward toward
the chimney at least 1/4 inch for each foot
of horizontal run.
3. You must have at least 18 inches of clear-
ance between any horizontal piping and
the ceiling.
4. e pipe cannot extend into the chimney
ue. (Fig. 8)
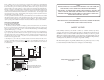
5. Seal each connector pipe joint with furnace
cement. Also seal the pipe at the chimney.
6. Use 3 Sheet Metal screws at each joint to
make the piping rigid.
7. It is recommended that no more than two
90 degree bends be used in the stovepipe
installation as more than two may decrease
the amount of draw and if possible, use only
corrugated (non-adjustable) elbows. ey
are much more airtight.
8. e chimney connector must not pass
through an attic or roof space, closet, or
any concealed space, or oor, ceiling, wall
or combustive construction.
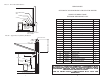
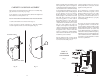
HOW TO LIFT THE TOP
CAUTION - DO NOT OPEN OR CLOSE TOP WHEN HEATER IS HOT!
To open, grasp TOP at front and li all the way, then gently lower the TOP
until the TOP SUPPORT ROD latches to hold the TOP.
To close, li TOP until the TOP SUPPORT ROD is unlatched. Pull the ROD
forward and lower the TOP.
CAUTION: BUILD A FIRE ON THE IN-
TEGRAL GRATE THAT IS PROVIDED
WITH THE HEATER.
CAUTION: NEVER USE GASOLINE,
GASOLINE-TYPE LANTERN FUEL,
KEROSENE, CHARCOAL LIGHTER
FLUID, OR SIMILAR LIQUIDS TO
START OR "FRESHEN UP" A FIRE IN
THE HEATER.
DO NOT BURN GARBAGE OR FLAM-
MABLE FLUIDS.
DO NOT CONNECT TO ANY AIR DIS-
TRIBUTION DUCT OR SYSTEM.
CAUTION: STORING OF WOOD
WITHIN MINIMUM CLEARANCES OF
HEATER MAY CAUSE HOUSE FIRE.
CAUTION: DO NOT OVERFIRE THE
HEATER, AS STATED EARLIER, THIS
CAN PRODUCE A DANGEROUS CON-
DITION AND EVEN CAUSE A HOUSE
FIRE. IF ANY PORTION OF THE
HEATER OR ANY CHIMNEY CONNEC-
TOR GLOWS RED OR DISCOLORS, THE
HEATER IS BEING OVERFIRED.
CAUTION: DO NOT OPERATE THIS
HEATER WITH FEED OR ASH DOOR
OPEN. THIS HEATER IS DESIGNED
FOR THERMOSTATIC OPERATION.
OPERATION WITH EITHER DOOR
OPEN WILL OVERHEAT AND DAMAGE
THE HEATER.
CAUTION: NEVER STORE FLAMMA-
BLE LIQUIDS, ESPECIALLY GASOLINE,
IN THE VICINITY OF THE HEATER.
11
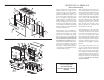
NOTE: BEFORE FIRING HEATER
1. Remove plastic knob from
inside of cabinet door and
install on outside of door.
(See Page 15)
2. Slide rebricks toward the rear so
no gaps remain between them.
GRASP TOP
HERE TO
OPEN
WONDERWOOD
WONDERWOOD
A
TOP
SUPPORT
SEAT
SUPPORT ROD
B
Fig. 9