
Instruction Manual


9
When considering a masonry chimney, round
tiles are preferable to square or rectangular, as
round tiles have much better air ow character-
istics and are far easier to clean. Unfortunately,
most North American chimneys use square or
rectangular tile liners that are really designed
for open replaces, not stoves or furnaces.
Of most importance, second only to overall
chimney height, is the diameter of the ue
liner itself. In most instances, it should be
sized to the appliance; i.e., 6" ue outlet on
the appliance requires a 6" ue. e inner
diameter should never be less than the ue
outlet diameter and should never be greater
than 50% of the appliance ue outlet. For
example, do not expect a wood burning stove
or furnace to function properly if installed into
a chimney with a ue liner greater than 50%
the appliance outlet -- such as a 6" ue outlet
requires a 6" diameter for optimum dra ing,
but can function well with an 8", but becomes
borderline beyond 8" diameter.
Masonry chimneys built of concrete blocks
without ue liners of at least 5/8" reclay do
not meet modern building codes. A
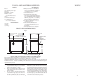
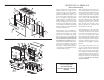
TYPE "A"
FIREPLACE
CONVERSION
Fig. 7
solid fuel appliance must not be joined to a
chimney ue which is connected to another
appliance burning other fuels.
If your chimney has a typically oversized
ue liner of 8x12 inches or greater, or if it is
unlined, it will be necessary for you to reline
the chimney, using many of the modern
approved and economical methods such as
stainless steel, castable refractory, or properly
sized reclay linings.
If you have any question regarding venting
your appliance, feel free to contact the fac-
tory at the address and phone number on this
Owner's Manual. You may also contact NFPA
(National Fire Protection Association) and
request NFPA Standard 211 (1984 Edition).
eir address is Battery March Park, Quincy,
Massachusetts 02269. Another helpful publi-
cation is NFPA Standard 908, available at the
same address. Specify 1984 Edition on either
of the above publications.
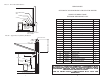
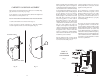
e door knob is mounted inside of the cabinet door to facilitate ship-
ping and must be reversed for proper usage.
To get cabinet door open, place hand under cabinet frame (right hand
side of cabinet door) and push door out.
INSTALL THE CABINET DOOR KNOB USING THE STEPS BELOW:
1. Remove the machine screw and door knob (Fig. 10).
2. Place door knob on outside of cabinet door. en place machine
screw through hole and into door knob and tighten (Fig. 11).
CABINET DOOR KNOB ASSEMBLY
Fig. 10
Fig. 11
MACHINE SCREW
CABINET DOOR KNOB
12