
Repair Manual


Bodywork and fittings 11.13
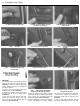
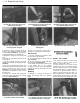
26.11 Glovebox hinge pins
however that they can break quite easily so
replacements should be available. The best
way of releasing such clips without the correct
type of tool, is to use a large flat-bladed
screwdriver. Note in many cases that the
adjacent sealing strip must be prised back to
release a panel.
4 When removing a panel, never use
excessive force or the panel may be
damaged; always check carefully that all
fasteners have been removed or released
before attempting to withdraw a panel.
5 Refitting is the reverse of the removal
procedure; secure the fasteners by pressing
them firmly into place and ensure that all
disturbed components are correctly secured
to prevent rattles.
Carpets
6 The passenger compartment floor carpet is
in one piece and is secured at its edges by
screws or clips, usually the same fasteners
used to secure the various adjoining trim
panels.
7 Carpet removal and refitting is reasonably
straightforward but very time-consuming
because all adjoining trim panels must be
removed first, as must components such as
the seats, the centre console and seat belt
lower anchorages.
Headlining
8 The headlining is clipped to the roof and
can be withdrawn only once all fittings such
as the grab handles, sun visors, sunroof (if
fitted), windscreen and rear quarterwindows
and related trim panels have been removed
27.2 Unclipping the rubber boot
from the centre console
and the door, tailgate and sunroof aperture
sealing strips have been prised clear.
9 Note that headlining removal requires
considerable skill and experience if it is to be
carried out without damage and is therefore
best entrusted to an expert.
Glovebox
10 The glovebox forms part of the facia panel
and it is only possible to remove the lid.
11 Open up the glovebox lid and release the
check stop, then remove the hinge pins and
remove the lid from the facia (see
illustration).
12 Refitting is the reverse of removal.
Removal
1 A centre console is fitted to some models.
First disconnect the battery negative lead.
2 Unclip and remove the rubber boot from
the centre console (see illustration). If
necessary remove the gear lever knob.
3 Remove the screws attaching the front of the
console to the facia panel
(see illustration).
4 Pull the console to the rear so that the
guides are unclipped from the pins on the
floor.
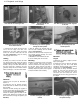
5 Withdraw the console from the passenger
side and recover the seal. If the gear lever
knob was not removed, feed the rubber boot
through the gear lever hole (see illustration).
27.3 Centre console front mounting screw
6 If necessary remove the retaining plate and
the special nut from the facia.
Refitting
7 Refitting is a reversal of removal, but make
sure that the seal is correctly located between
the console and the facia panel.
Removal
1 Disconnect the battery negative terminal.
2 Where fitted, remove the centre console as
described in Section 27.
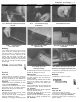
3 Unscrew the mounting screws and remove
the passenger side shelf/trim panel from
beneath the facia panel. Also disconnect the
diagnostic socket wiring plugs. Note that a pin
on the front of the shelf locates in a rubber
grommet (see illustrations).
4 Remove the steering wheel, combination
switches, and steering lock with reference to
Chapter 10, Section 16. It is not necessary to
remove the steering column completely.
5 Remove the instrument panel as described
in Chapter 12.
6 Remove the radio as described in
Chapter 12.
7 Using a screwdriver, carefully prise away
the trim plate covering the heater controls.
8 Unscrew the retaining screws and pull the
heater control assembly together with cables
from the facia panel.
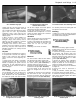
27.5
Feeding the gear lever rubber
through the centre console
boot
28.3a Passenger side shelf/trim panel 28.3b Removing the passenger side
mounting screws
shelf/trim panel