
Instructions

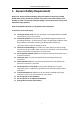

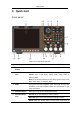

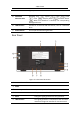

Table Of Contents
- 1.General Safety Requirement
- 2.Safety Terms and Symbols
- 3.Quick start
- 4.Panel Operation
- Channel Setting
- Waveform Setting
- Output the modulated waves
- Hexadecimal frequency shift keying (3FSK)
- Quaternary frequency shift keying (4FSK)
- Binary phase shift keying (BPSK)
- Oscillating keying (OSK)
- Output the sweep frequency (Sweep)
- Output the burst (Burst)
- Counter
- Utility function setting
- Edit the Arbitrary Wave (Edit)
- File system (Store)
- Save/recall instrument settings (Preset)
- Use build-in help (Help)
- 5.Communicate with PC
- 6.Troubleshooting
- 7.Specification
- 8.Appendix

3
.
Quick start
6
7
USB Device Interface
Used to connect a USB type B controller. The PC
can be connected to communicate with the signal
generator through the host computer software.
8
Keyhole
A safety lock (please buy it yourself) can be used
to lock the instrument in a fixed position to secure
the instrument.
9
10MHz
In/Out/Counter(Reference
clock input / output /
frequency meter input)
connector
The default is to receive the frequency meter input
signal. Used to receive a 10MHz clock signal when
the instrument is set to an internal clock source
and Utility → System → CLK output is On; it is
used to receive an external 10MHz clock signal
when the instrument is set to an external clock
source.
10
Mod/FSK/Trig
(modulation/trigger
input) connector
When modulating the waveform, outputting the
sweep frequency, and the burst, the signal
accessed here can be used as an external source.
Note: If one channel turns on AM, FM, PM, PWM
or OSK, and the other channel turns on ASK, FSK,
PSK, sweep or burst, and both channels are set to
external trigger, then the channel that sets the
trigger source can be set later. With an external
trigger, the other channel automatically cancels
the external trigger because of the different
external modulation signal types.
Power On
(1) Connect the instrument to an AC power source using the power cord supplied
with the accessory
Warning:
To prevent electric shock, make sure the instrument is properly
grounded.
(2) Press the power button on the front panel and the screen will display the
booting screen.