
User manual


The target laser is active depending on the default setting during measurement. A warning
symbol (1E) is shown on the display if the measurement button is pressed. Never look into
the measurement or laser hole during a reading.
The target laser is constructed in dual design and marks the
approximate edge area of the measuring surface. With larger
distances, the two laser spots move apart, analogue to the meas-
uring surface.
You can activate or deactivate the target laser as follows:
Press and hold down the measurement button (9) and simultaneously press the “°C” key (3).
The laser symbol (1E) is displayed and the laser activated. The function remains active also
after switching off. To deactivate it, proceed in the same order. The laser symbol disappears
again.
Direct the measuring hole (7) perpendicular to the object to be measured. Make sure the
object to be measured is not smaller than the IR-measuring surface of the device.
Press the measurement button (9) and hold it down. The measured value (1B) is shown in
the display. The displayed value corresponds with the average surface temperature of the
IR-measuring surface. During the reading “HOLD” (1C) disappears.
After releasing the measurement button (9), the last measured value will be displayed for
approx. 1 minute for a better readability. “HOLD” (1C) will also be displayed.
About 1 minute after releasing the measurement button (9), the device turns off automatically.
“OFF” is shown briey on the display and then device switches off.
If the temperature measuring range is exceeded, “Hi” is displayed, if the values are
below the temperature measuring range, “Lo” is displayed.
To determine the warmest spot on the object to be measured, move the measuring device
over the surfaces of the object covering all areas and pressing and holding down the meas-
urement button (9).
Shiny surfaces affect the measured result. To compensate, the shiny part of the
surface can be covered with adhesive tape or matt black paint. The device cannot
take measurements through transparent surfaces such as glass. Instead, it measures
the surface temperature of the glass.
Longer measurements of high temperatures, with close measuring distance, lead to self-
heating of the measuring device and thus to inaccurate measurements. In order to obtain
exact measured values, remember the following rule of thumb: The higher the temperature,
the greater the measuring distance and the shorter the measuring time.
Some functions can be turned on/off or switched on the IR thermometer during its operation.
The device must be turned on to be able to select the functions. To do this, press and hold the
measurement button for about 1 second.
Press the “°C/°F” button (3). Every time you press the button, you switch the (1G/1H) indica-
tion on the display.
Press the “LOCK” button (4). If “LOCK” (1I) is shown on the display, the continuous measure-
ment function is active. Every time you press the button, you switch the (1I) indication on the
display. After approx. 60 minutes the continuous measurement function switches off automati-
cally in order to save the batteries.
Press and hold down the measurement button (9) and simultaneously press the “LOCK” key
(4). The lighting symbol (1F) is shown and the display illuminated. The function remains active
also after switching off. To deactivate it, proceed in the same order. The symbol disappears
again.
Using the “MENU” key (2), you can set and display more functions via the additional display
(1J). Each keystroke switches the menu function (1A) one step further. The menu is as follows:
E Display of the current emission level
“E„ Setting menu for the emission level. With the two arrow
keys (3 + 4) you can change the value.
MAX Display of the maximum measured value
MIN Display of the minimum measured value
dIF Display of the difference between MAX and MIN
AVG Display of the arithmetic average calculated from MAX and
MIN
HAL Setting the Hi alarm value. With the two arrow keys (3 + 4)
you can change the value. If the alarm value is exceeded, a
beep signal tone is emitted.
LAL Setting the Lo alarm value. With the two arrow keys (3 +
4) you can change the value. If the measured value falls
below the alarm value, a beep signal tone is emitted.
The last measured value will be saved internally. If you press the “MENU” key (2) while the
device is switched off, the last measured value can be displayed again.
1 Display with backlight 1A function display (menu)
2 MODE key for function setting 1B measuring display
3 Selector switch for temperature unit (°C/°F), 1C HOLD measurement pause
Value setting, descending and 1D symbol for battery charge level
Laser activation laser is active 1E Laser warning symbol
4 LOCK key for continuous measurement, 1F lighting symbol
Value setting, ascending and activation display lighting is active
of display lighting 1G
temperature unit degrees Centigrade
5 Eye to secure the device 1H
temperature unit degrees Fahrenheit
6 Laser warning label 1I LOCK continuous measurement
function is active
7 Measurement hole 1J
additional display for menu functions
8 Target laser
9 Measurement button
10 Bolted battery compartment
When using the product for the rst time, the batteries enclosed
must be inserted. Unfasten the screw on the battery
compartment (10) using a Phillips head screwdriver. The screw
is non-detachable and mounted onto the battery compartment
lid. Fold the battery compartment lid forwards opening the
battery compartment (10).
To replace the batteries, remove the at batteries and insert two
new batteries of the same type paying attention to correct polar-
ity. Observe the polarity markings in the battery compartment.
Close the battery compartment by closing the battery compart-
ment lid (10) and screw it down carefully. Make sure the rubber
gasket is clean to ensure dust and splash-water projection
(IP54).
The battery symbol (1D) indicates the status of the batteries.
Batteries are full.
The batteries are almost at and should be replaced as soon as possible. It is still
possible to carry out measurements.
Display ashes. The batteries are spent and have to be replaced. It is no longer
possible to carry out measurements.
Infrared thermometers (IR thermometers) measure the surface temperature of an object. The
sensor on the product records the heat radiation emitted, reected and transmitted through
the object, and converts this information into a temperature value.
The emission level is a value used to describe the energy radiation characteristics of a mate-
rial. The higher the value, the more capable the material is of emitting radiation. Many organic
materials and surfaces have an emission level of approx. 0.95. Metallic surfaces or shiny
materials have a lower emission level. This will cause an inaccurate reading. For this reason,
a matt black layer of paint or matt adhesive tape should be applied to metallic shiny surfaces.
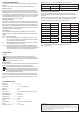
(D:S = measuring distance:measuring surface)
In order to obtain precise measured results, the object to be measured must be larger than
the measuring IR spot of the IR thermometer. The temperature recorded is the average
temperature of the area measured. The smaller the object to be measured, the shorter the
distance must be to the infrared thermometer.
The precise size of the measuring spot
is shown in the following diagram. It is
also printed on the device. For precise
measurements, the object to be
measured should be at least twice the
size of the measuring spot.