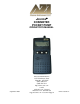
Jerome DOSIMETER POCKET PUMP OPERATOR’S MANUAL September 2011 Arizona Instrument LLC 3375 N Delaware Street Chandler, AZ 85225 (602) 470-1414 (800) 528-7411 http://www.azic.com e-mail: azi@azic.com - General intl@azic.com - International support@azic.
Table of Contents INTRODUCTION ..........................................................................................................2 OPERATING SPECIFICATIONS .....................................................................................2 OPERATING TERMS AND DISPLAYS ............................................................................3 PUMP OPERATING STATES ..........................................................................................5 OPERATION ..............................
. OPERATING TERMS AND DISPLAYS • • • • • FLOW: VOLUME: PRESSURE: Hg. TEMP: RUN-TIME: Flow rate in milliliters per minute (mL/min). Total volume of air in milliliters (mL) or liters (L) since reset. Pump back pressure measured in inches (ins) of water or millimeters (mm) Temperature of incoming air in ºC or ºF. Time in minutes (min) since reset. Interpreting the LCD • PROG: Available only to programming software. • HOLD: Active when the Pocket Pump is in the HOLD state.
Pocket Pump Operation Control Switches The Pocket Pump operation is controlled by pressing one or more of the switches located beneath the sliding cover. • To turn the Pocket Pump ON: Press any keypad button. The LCD will show the pump's serial number for two seconds followed by an internal software revision number. • Press any button to activate the display and control switches. • Pressing both the up and down arrow buttons simultaneously places a running pump in HOLD or a holding pump in RUN.
4. PUMP OPERATING STATES SLEEP • The display is off and the electronic circuitry are in a minimum power use state. • The pump automatically enters SLEEP mode after five minutes in HOLD unless the battery charger is plugged in or a keypad button is pressed. • To change the pump from SLEEP to HOLD press any button HOLD • The pump is off and run-time data is stored. • Temperature and back pressure readings are still active and shown on the LCD.
5. OPERATION NOTES: • Buttons shown in parentheses must be pressed simultaneously. For example, () indicates to press the up and down arrows at the same time. • When entering a sequence of commands, each subsequent command must be entered within ten seconds of completing the previous command. If the subsequent command is not entered within ten seconds, it will be necessary to restart the sequence.
• • • letters “ins” or “mm.” Place the pump in HOLD mode; if necessary press () until the word “HOLD” appears, press the security code , then press . The display should now show the FLOW mode. If desired, repeat this sequence to switch back to PRESSURE mode. NOTE: The pump must be in FLOW mode to operate the dosimeters properly. The display may be placed in Standard or Enhanced mode. In standard mode, the display features are: Flow, Volume, and Run Time.
6. CARE AND MAINTENANCE The Pocket Pump has been carefully designed, manufactured, and tested to give excellent performance. Proper care and maintenance include: • Avoid dropping the pump or subjecting it to strong impacts. • Keep the pump dry. • Do not clean the pump with harsh cleaning solvents or detergents. • Store the pump in a cool, dry, dust-free location. • Discharge and recharge the battery pack once a month to maximize battery life.
7. CHARGING THE BATTERY PACK • When the battery loses all of its charge, the battery icon displays as a flashing outline with no bars. • To charge the battery, plug the charger’s power cube into a standard wall outlet. Insert the plug at the end of the charger cord into the jack on the bottom of the pump. The fast charging function of the battery pack will completely recharge the battery in approximately 6 hours or less.
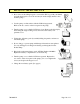
8. REPLACING THE BATTERY PACK • Press down on the sliding keypad cover near the SKC logo with your thumb, and push the keypad cover down and away from the display until it is free from the pump. • Lay the pump on a flat surface with the LCD facing upwards. Remove the two screws on the front panel of the pump. • Turn the pump over so that the LCD faces down. Remove the belt clip by unscrewing the single locking screw, and remove the battery compartment cover.
PROPRIETARY RIGHTS NOTICE This manual contains valuable information and material developed by Arizona Instrument LLC for use with the Jerome® Analyzers. No part of this manual can be reproduced or transmitted in any form or by any means, electronic, mechanical or otherwise. This includes photocopying and recording or in connection with any information storage or retrieval system without the express written permission of Arizona Instrument LLC.