
User Manual


EN
7
WWW.VONROC.COM
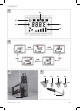
DESCRIPTION
The numbers in the text refer to the diagrams on
pages 2 - 3
Fig. A-E
1. Switch (0/I/II)
2. Ventilations slots
3. Nozzle outlet
4. LCD digital display
4.1 Pre-set input
4.2 Flasher
4.3 Pre-set mode indication
4.4 Temperature indication
4.5 Air flow indication
5. Storage button
6. Mode Selection button
7. Adjustment button for temperature-
8. Adjustment button for temperature+
9. Adjustment button for air flow +
10. Adjustment button for air flow -
11. Flat rear side
12. Fishtail nozzle
13. Reduction nozzle
14. Glass protection nozzle
15. Spoon reflector nozzle
16. Scraper
3. OPERATION
The Hot air gun can be used for:
• Plumbing work like tube connections, solder,
bowing tubes;
• Removing paint, varnish and lacquer without
firerisk;
• Quickly drying of appliances which have beco-
me wet;
• Drying surfaces for quick repairing;
• Removing self-adhesive labels in a clean way
placing PVC labels;
• Blistering after sticking PVC materials can be
smoothed after heating;
• Easy removing of vinyl carpeting:
• Forming all synthetics with a low temperature
(400 degrees) among which polyethylene and
PVC;
•
Forming all synthetics with a high temperature
(600 degrees) among which acryl and plexiglass;
• Smelting synthetics, among which matters and
foils with PVC layer;
• Applying heat shrinking tubes;
• Shrinkwrappers;
• Thawing tubes and engines;
• Repairing finishing layers: enamel of bath and
household appliances; applying epoxypowder
coverlayers;
• Repairing of ski’s, surf-boards and other sports
goods;
•
Unscrewing too fast fixed screws and connections.
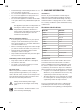
Operation (Fig. A)
You can work manually with this hot air gun or you
can put it in a vertical position.
• Check if the mains switch is on position “0”
before you connect the apparatus;
• Keep the main lead always away from the hot
air stream and the mouth piece;
• Put the mains switch in position ‘I or II’ to let
your hot air gun operate:
"I" = 50 degrees, air flow 250-500 l/min.
“II” = 50-650 degrees, air flow 250-500 l/min.
“0” = Off
Temperature and airflow settings (Fig. B)
• Turn switch to I or II, and the heat gun will start.
• Turn switch to II.
- Select the desired temperature range using
the adjustment buttons (7, 8).
- The temperature can be adjusted in 10°C
increments from 50°C - 650°C.
- The flasher (4.2) will keep flashing before
the output temperature reaches the desired
temperature.
- Select the desired air flow level using the
adjustment buttons (9, 10).
• Turn switch to I, the temperature is fixed at
50°C for cooling down.
Pre-set mode selection (Fig. B, C, D)
•
4 pre-set modes are available for quick selection
of temperature and airflow setting for most
frequent and defined applications.
- Turn on the tool.
- Click the mode selection button (6) to select
one of available pre-sets.
Pre-set mode input (Fig. B, C, D)
• Select one pre-set mode (see pre-set mode
selection)
• Set desired temperature and airflow by clicking
buttons (7, 8, 9, 10)(see temperature and
airflow settings).