
User Manual


EN
10
WWW.VONROC.COM
20. Mode selector I / O / II
21. Controle panel + / “PSI/BAR/KPA” / -
22. Inflator connection machine
23. Nubs
24. Notches
25. Deflate connection machine
26. Switch worklight
27. Battery indication button
28. Display
29. 12V Cigarette lighter plug
30. storage for cigarette lighter plug
31. Battery LED indicators
32. Battery LED indicators button
3. OPERATION
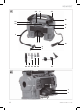
First use (Fig. A)
Do not operate the device in dusty
environments. Doing so poses a fire hazard
and could damage the device.
To prevent overheating while inflating, keep
the air intake and vents clear of obstructi-
ons. Always wear EN-approved eye
protection during use.
Place the product on a even, nonflammable surfa-
ce. Depending on the inflatable or the tyre you can
use high or low pressure. High pressure setting is
best to be used when pre-set is needed; preset the
desired pressure and the machine will automatical-
ly stop at the set pressure.
Low pressure setting is best to be used for inflating
and deflating larger inflatables.
• Depending on the tyres you can use the high
pressure connection valve (8) directly or along
with one of the included valve adapters (16, 17,
18)
• For balls (high pressure) use valve adapater for
balls (15)
• For high pressure inflatables with a small valve
use the extra small valve adapter (14)
• Depending on the inflatable you can use the
Low pressure connection (11) directly or along
with one of the included hose adapters (13)
For inflatables with counterpressure (e.g.
partly filled car tyre): Switch on the product
before connecting the High pressure
connection valve (8) to the tyre.
This product is not suitable for continuous opera-
tion. It was developed to produce air pressure, not
air volume. Do not use the product for longer than
10 minutes without interruption to prevent overhe-
ating and damage to the device. Afterwards allow
to cool for a minimum of 10 minutes.
When device is not in use for 3 min, it will automa-
tically go in to sleep mode. While in sleep mode the
LED light can not be used.
The battery must be charged before first
use.
for 20V battery use:
Removing the battery from the machine (Fig. B1)
• Push the battery unlock button (3) and pull the
battery out of the machine.
Inserting the battery into the machine (Fig. B1)
Ensure that the exterior of the battery is
clean and dry before connecting to the
charger or machine.
•
Insert the battery (2) into the base of the machine.
• Push the battery toward the battery connector
until it clicks into place.
When the machine is not being used over a
longer period of time it is best to store the
battery in charged condition.
The appliance vibrates during operation.
During operation, always makes sure the
machines is placed on its rubber feet.
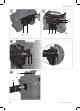
Checking the battery charging status (Fig. B2)
• To check the battery charge status, push the
button (32) on battery shortly.
•
The battery has 3 lights indicating the charge
level, the more lights that burn, the more charge
the battery has left.
•
When the lights are not burning it means the bat-
tery is empty and must be charged immediately.
Charging the battery with the charger (Fig. B2)
1. Take the battery (2) from the machine.
2. Turn the battery (2) to upside down position and
slide it onto the charger (5) as shown in Fig. B2.
3. Push the battery until it is fully pushed into the
slot.