
User manual


8/16-CH DVR Quick Start Guide
7
delete the selected schedule;
Step 3: You can also double-click the grid to pop up a week schedule window.
Select day and then click „Add‟ button to setup the start time and end time. Then
select other days and click „Copy‟ button to save the setting to other days. Finally,
click „OK‟ button to save week schedule.
Step 4: Select other channels and set timeline for them or select „Apply Settings
To All Channel and click “Copy” button to set the same settings for all channels.
7.3 Motion Based Recording
Motion detection based recording: when there is a motion event detected, the
camera will be triggered to record.
To Setup Motion Based Recording:
Step 1: Enter into MenuSetupScheduleMotion tab. The setup steps for
schedule for motion based recording are similar to normal schedule setup. You
can refer to 7.2 Schedule Recording for details.
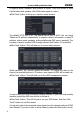
Step 2: Enter into MenuSetupAlarmMotionMotion tab as shown below.
Step3: Enable motion alarm (Please specify to channel) and click „Apply‟ to save
settings.
Step4: Click „Setting‟ button under the Area to set Sensitivity and Detection area.
Left click the grid and drag to delete the area. Drag again to add area. You can
drag slide bar to set the sensitivity value (1-8). The higher the value is the more
sensitive it is to motion. Since the sensitivity is influenced by color and time (day
or night), you can adjust its value according to the practical conditions. Click
icon to set the whole area as detection area. Click icon to clear the set
VOOK