
Manual


P/N: 4GH020-010
©2003 Vortech Engineering, LLC
All Rights Reserved, Intl. Copr. Secured
05NOV01 v1.2
(4GH V1.2)
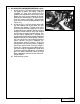
2. OIL COOLER LINE MODIFICATIONS
A. Remove the engine oil filter.
B. With both coolant lines disconnected from
the radiator and water pump, remove the
clamp securing the cooler line assembly to
the oil pan. Spreading the clamp slightly may
be necessary.
C. Remove the bolt securing the oil cooler line
assembly to the oil filter base. Carefully
remove the entire oil cooler line assembly
by pulling them through toward the front or
the rear of the engine. Use caution not to
lose or damage the sealing washers.
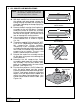
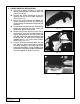
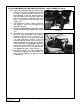
D. Using a tubing cutter or hacksaw, carefully
cut the coolant lines as shown in
Figures
2-a, 2-b
.
E. Thread the supplied 5/8" barb and 3/8" NPT
x 5/8" or 1/2" (depending on model year) x
90° compression fittings together.
Temporarily install a compression fitting
assembly onto the end of each of the cooler
lines to aid in installation later. Remove the
compression assembly. The nuts and
ferrules should remain on the tubes.
F. Reinstall the cooler line assembly onto the
oil filter base using care not to damage the
sealing washers.
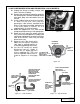
G. Remount the 90° compression fitting
assemblies back onto the installed cooler
line assembly. The 5/8" brass barbs must
point up in approximately the two o'clock
position.
(See Figure 2-C
.)
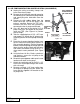
H. For clearance purposes, the 5/8" elbow that
exits the water pump must be rotated
carefully upward to the two o'clock position.
Using a small piece of pipe or cylindrical
object, insert the object into the elbow and
rotate the elbow counterclockwise. Use
caution not to distort or kink the tube. (See
Figure 2-d
.)
2
Figure: 2-d
Figure: 2-a
1995-97 Models
Figure: 2-b
1993-94 Models
Figure: 2-c
NOTE: On vehicles not equipped with external
oil cooler lines, skip the steps below and
move onto steps 2-H, 2-J and 2-K.
ROTATE TO
TWO O'CLOCK
14"
13"
13"
14"
TO
RADIATOR
TO
WATER
PUMP