
User's Manual
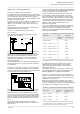


Issue 2.0
TimeLord Master Clocks
Operating and Installation Instructions
D-1
Appendix D - NTP Synchronisation option
(TimeLord-Net-Client versions only)
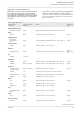
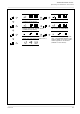
elbaTsgnitteSkrowteNPTN
yalpsiD
edoC
gnitteS
PIsserddAPIsserddAPI
sserddAPI
sserddAPIsserddAPI
ehttahtsserddalocotorPtenretnIehtsisihT
TimeLord-Net uses on the computer network.
bSksaMtenbuSksaMtenbuS
ksaMtenbuS
ksaMtenbuSksaMtenbuS
PIehthtiwdenibmocnehwksamtenbusehT
reggibehtfotrap(tenbusehtsefitnedisserdda
e TimeLord-Net is connected to.httaht)krowten
tGsserddAyawetaGsserddAyawetaG
sserddAyawetaG
sserddAyawetaGsserddAyawetaG
nehwten0684ehtybdesusisserddayawetagehT
dnasretupmocotnoitamrofnidnesotsdeenti
skrowtenrehtootdetcennocerahcihwsecived
.stenbusdna
tnsserddAPIrevreSPTNsserddAPIrevreSPTN
sserddAPIrevreSPTN
sserddAPIrevreSPTNsserddAPIrevreSPTN
PTNehtfosserddalocotorPtenretnIehtsisihT
e TimeLord-Net-Client uses as its Timehttahtrevresemit
.ecruoS
Operation
The Network Time Protocol (NTP) synchronisation option
enables the TimeLord-Net-Client to synchronise to an NTP time
source on a TCP/IP Computer network. The quick setup procedure
should be followed to get the TimeLord-Net-Client up and running
quickly. With NTP selected as the synchronisation source, a
reduced set of options will appear in the Network Setting
menu as detailed in the NTP Network Settings Table below.
Please refer to chapter 9 for further information regarding TCP/
IP concepts and NTP. Please note that the TimeLord-Net-Client
cannot operate as a Network Time Server.
The TimLord-Net Client has a 10Base-T Ethernet
interface and must be connected either to a dedicated 10Base-
T port or a switchable 10Base-T / 100Base-T port on your
network.
Quick Setup
Install the TimeLord-Net-Client as detailed in section 3 of this manual.
Attention: If you are unsure of the following network
settings please contact your network administrator.
Incorrect settings can adversely affect the
performance of your network.
1) Select ntP (NTP - Network Time Protocol) as the
synchronisation source in the ‘Synchronisation Mode’
menu. Please refer to chapter 5 for further details.
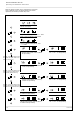
2) In the Network Setting menu, program the IP address
of the TimeLord-Net-Client in dotted-decimal notation. (e.g.
192.168.0.41) Use the plus and minus buttons to
increment and decrement each value. The up arrow will
move on to the next value, the down arrow will return
to the previous value. This procedure is shown
graphically on pages D-3 & D-4. Please refer to the
NTP Network Settings Table below and chapter 9 for
further information.
3) In the Network Setting menu, program the Subnet
Mask of the TimeLord-Net-Client in dotted-decimal notation.
(e.g. 255.255.255.0) Use the plus and minus buttons to
increment and decrement each value. The up arrow will
move on to the next value, the down arrow will return
to the previous value. This procedure is shown
graphically on pages D-3 & D-4. Please refer to the
NTP Network Settings Table below and chapter 9 for
further information.
4) In the Network Setting menu, program the default
Gateway of TimeLord-Net-Client in dotted-decimal notation.
(e.g. 192.168.0.1). Use the plus and minus buttons to
increment and decrement each value. The up arrow will
move on to the next value, the down arrow will return
to the previous value. This procedure is shown
graphically on pages D-3 & D-4. Please refer to the
NTP Network Settings Table below and chapter 9 for
further information.
5) In the Network Setting menu, program the IP address
of the NTP time server in dotted-decimal notation. (e.g.
192.168.0.41) Use the plus and minus buttons to
increment and decrement each value. The up arrow will
move on to the next value, the down arrow will return
to the previous value. This procedure is shown
graphically on pages D-3 & D-4. Please refer to the
NTP Network Settings Table below and chapter 9 for
further information.
6) Having returned to the time screen, cycle the power on
the TimeLord-Net-Client Master Clock.
7) Manually set on the time on the TimeLord-Net-Client Master
Clock to within half an hour of the real time (please
refer to page 2-4 for further details of this procedure).
8) Use the CAT5 patch cable (supplied) to connect the
TimeLord-Net-Client to your computer network. Ensure that
the network connection used is compatible with
10Base-T. Check the green link led illuminates,
confirming that correct connection has been made to
the network.
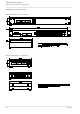
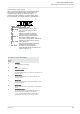
Net Update
Link
Data
xx xx xx xx xx xx
MAC Address
10Base-T
TimeLord Network Interface
RJ45 10Base-T Ethernet Connector
DB9 Network software update port
Link Link LED indicating connection to network
Data Data LED indicating data on the network