GV6200 User’s Guide Rev.A _______________________________________________________________________ ी 2008 Vosonic Technology Corporation. All right reserved.
Part Number: 845550002001 Dear Customer Thank you for purchasing Vosonic GV6200. 1.Before using Vosonic GV6200, you will have to ---------------------------------------------------------------------1-1. Make sure the memory card has already partition or re-format again. 1-2. Check www.vosonic.com to download the update firmware that we offer new functions and improved features.
CAUTION Under no circumstances should you try to repair the system yourself, as this will invalidate the warranty. Do not open the system as there is risk of electrical shock. FCC Certifications This equipment has been tested and found to comply with the limits for a Class B digital device, pursuant to Part 15 of the FCC Rules. These limits are designed to provide reasonable protection against harmful interference in a residential installation.
IMPORTANT WARRANTY INFORMATION y y y y y y y To reduce the risk of fire or shock hazard, do not expose this equipment to rain, any liquid or moisture. Vosonic shall have no obligation to repair, replace or refund until the customer returns the defective product to Vosonic. The repairs and replacement service will not apply to PRODUCT units that were misused, repaired without authorization ort by other reasons beyond the range of intended use.
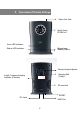
Specifications Camera Recording mode 1/3” color CMOS 1.
2.
keypad Function Description A short press places the recording into loop mode. Loop/Clear Continuous-loop recording Will disable to loop while recording A long press will clear all the recording files. ( Data written to memory card will be all lost) (See 5.4 Stop/Set ) A short press will stop the recording and put the unit in standby. (Data written to memory card will not be lost) Enter/Time Camera Angle Adjuster A long press allows you to set the type of your television broadcast standard.
3. Timer Setting 1. 2. 3. 4. Plug the GV6200 power adapter into a working electrical outlet. Long press the [ Enter / Time ] button for timer setting. Set the value for the timer by using [ Loop/Clear ] button. To change between year,month,hours, minutes,seconds,short press the [ Timer] button.
4.
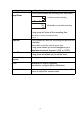
5.How to configure Motion Detection: The motion detection feature is used to generate an alarm whenever movement occurs in the image. 1. Adjust Parameter (see table below for details). Parameter Object Size History H : High Sensitivity continuous-loop recording ensures that no critical shot is ever missed *The counter will not count up in this mode.
Camera Head : The camera head can be adjusted up and down max.
6. Assembling the bracket Assemble the bracket and fix it to the optional stand as shown. Use the screws provided to fix the optional stand (mounting bracket) to a wall The optional stand can be adjusted to allow camera a 950 of rotation and a pan and tilt action. Warning The camera is not waterproof and should not be mounted outside or in a position where it could become wet. For indoor use only.
7. USB connection z Connect the GV6200 and PC with the provided USB cable z Double Click the " My computer" icon , the operating system will display GV6200 as removable disk . z You can then read ,write,copy ,delete and remove data on the PC. Computer connection Windows XP or higher Windows Me and Windows XP HomeEdition and Professional Edition, Win2000 Professional Service Pack 3 above users do not need to install any drivers .Windows will automatically detect GV6200 as following figure.
During file transfer in the PC mode DO NOT : 1. Plug out the USB cable 2. Remove memory card(s) from the card slot, otherwise, there may be a chance of lost or corrupt data. *Do not use USB ports repeated through peripherals (such as keyboards) or with un-powered USB hubs. Note: For Windows XP users, to safely disconnect the GV6200 from computer, click on the system tray remove icon and wait until you get a message saying that you can safely unplug the device before disconnecting the USB cable. 8.
9. General information z A new recording file is created if the file size is about 200MB or the recording time is up to 30 minutes. z It’s best to mount this device from 0 to 30 ft. to result in better image quality. z To stop the recording, short press the stop button, then you change the memory card or switch off the device. z Built-in light sensor automatically turns on high power LEDs for night vision up to 10ft. z It is normal for the night vision LEDs to flash for brightness adjustment.
z To keep your SD card in better operating performance , we recommend to periodically run Scan Disk and Disk Defragmenter . NOTE : If the SD card already contain data, please backup the data first, because when you partition and format a SD card , all the data on the partition is permanently deleted z Please carefully insert and remove the memory card from slot . Do not drop, jar, bump, shock the unit, or expose to severe vibration while unit is recording.
1) Error Code : The error detection method may include producing a warning sound and displaying an error message on the 4-digital 7-segment display indicator. : SD Card Lock : SD Card Error : CMOS (camera) Error 2) If any shut down caused by erroneous operation, you can depress the [ reset] button located on the bottom to switch off the main unit .
11. Troubleshooting WARNING Under no circumstances should you try to repair the system yourself, as this will invalidate the warranty. Do not open the system as there is a risk of electrical shock. If a fault occurs, first check the points listed below before taking the system for repair. If you are unable to remedy a Problem Solution Problem USB Connection issues If using a USB port in the front of your computer, try a USB port in the back. Front USB ports are often from non-powered.
Frequently Asked Questions Problem The status indicator LED is not lit Lower frame rate than expected. Faulty power adapter Image too dark or too light The system does not react when buttons are press. Motion Detection triggers unexpectedly Solution It may be caused by faulty power adaptor or hardware failure. It may be caused by e.g kind of SD card and its manufacturer.
How to update the firmware for my Vosonic • VISIT VOSONIC ON THE WEB Go to http://www.vosonic.com to download the latest firmware The latest version of this manual may be available on Vosonic's Web site • CONTACT VOSONIC To process a request for Technical Service, please mail the following information to service@vosonic.com.tw 1. Model Number : 2. Serial Number : 3. Firmware version : 4. Memory card capacity and brand : 5. A description of the problem : 6.
THANK YOU FOR CHOOSING THIS PRODUCT We hope it will provide you with years of trouble-free enjoyment. Please look after your Vosonic. If you experience problems and cannot find solutions in the previous sections, please contact your dealer or check for updated firmware at www.vosonic.com or email to service@vosonic.com.