KVM08 Keyboard, Mouse & Monitor Switch
COPYRIGHT © This document is a copyright of the original manufacturer, 2000. The original manufacturer reserves the right to make improvements to the product(s) described in this manual at any time without notice. This manual may not, in whole or in part, be photocopied, reproduced, transcribed, translated, or transmitted in whatever form without the written consent of the manufacturer, except for copies retained by the purchaser for backup purposes. All rights are reserved.
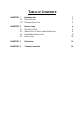
TABLE OF CONTENTS CHAPTER 1 1.1 1.2 INTRODUCTION SPECIFICATION PACKING CHECK LIST 1 2 3 CHAPTER 2 2.1 2.2 2.3 2.
CHAPTER 1. INTRODUCTION The KVM08 gives you the ultimate in control of 8 PCs from one keyboard, mouse and monitor. To expand control ability, the DB-25 Daisy-Chain allows sixteen KVM 08 stack up for control 128 PCs from one keyboard, mouse and monitor. OSD (On-Screen Display) menu provides human friendly interface for naming each PCs and selecting one of them.
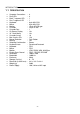
INTRODUCTION 1.1 SPECIFICATION q q q q q q q q q q q q q q q q q q q q q q q q q q q q Computer Connections Port LEDs Bank 7-segment LED Port 7-segment LED Keyboard Mouse Monitor Cascade Cascade Port On Screen Display 19” Rack Mount Cascade (Level) Max.
INTRODUCTION 1.2 PACKING CHECK LIST Before you begin to install your KVM08, please make sure that you received the following materials as listed below: Item KVM08 Power cord User’s Manual Rack mount bracket Screw Rubber foot Qty 1 pcs. 1 pcs. 1 pcs. 2 pcs. 10 pcs. 4 pcs.
INSTALLATION CHAPTER 2. INSTALLATION 2.
INSTALLATION 2.2 SINGLE UNIT OR DAISY-CHAIN OPERATION KVM08 has the capability to be Daisy-Chained to 15 more units (for a total of 16), giving the user control over a maximum of 128 computers. Each KVM 08 unit is defined as a “BANK”. See the following diagram for more information. BANK numbers range from 0 to F (Hexadecimal), for a total of 16 banks. BANK 0 is the MASTER bank while BANK 1 through F are SLAVE banks. The MASTER bank is the unit that connects to the console keyboard, mouse and monitor.
INSTALLATION 2.3 HARDWARE INSTALLATION WARNING! Before attempting to connect anything to the KVM08 or the computers, make sure everything is powered off. Otherwise, plugging and unplugging cables may cause irreversible damage to your computers and the KVM08. Step 1 Set the DIP-switch for Auto-scan Interval and BANK Address. If you have only one KVM08, use the MASTER bank setting. If the KVM-08 you are using will be Daisy-Chained off another unit, use a unique slave setting.
INSTALLATION Step 2 Find a convenient place to put your KVM08. Its 19” rack mount form factor makes it ideal mountable on 19” rack. When mounting to a rack, attach the included brackets to the sides of the KVM08. Take note of the length of your cables so that your computers, KVM08, keyboard, mouse and monitor are distanced properly. Step 3 Connect the monitor to the KVM08.
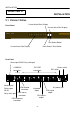
INSTALLATION Step 5 Connect the mouse to the KVM 08. Master Input S / lave Input ON/OFF PC1 Console PC2 PC3 PC4 PC5 PC6 PC7 PC8 SW AC LINE 90-240VAC Slave Input Step 6 Connect the first computer’s VGA cable to the KVM 08. Using the VGA cable connect the male end of the cable to the VGA port on the computer, and the female end on the PC1 VGA port at the back of KVM08.
INSTALLATION Step 8 Connect the first computer’s keyboard cable to the KVM 08. Using another PS/2 cable connect one end to PS/2 keyboard port on the computer, and the other end to the PC1 keyboard port on the back of KVM08. If your computer has an AT type keyboard port, you will need a PS/2 to AT keyboard adapter. Back of PC Master Input S / lave Input ON/OFF Console PC1 PC2 PC3 PC4 PC5 PC6 PC7 PC8 SW AC LINE 90-240VAC Slave Input Step 9 Double-check all of the connections.
INSTALLATION 2.4 DAISY-CHAIN The KVM08 can be daisy-chained with additional KVM08 units through the DB-25 daisy-chain ports. The daisy-chain cable is required (not included) for proper operation. Please refer to the example below. Here, four KVM 08 units are cascaded together for control over 32 computers. Recall that a maximum of 16 KVM08 units can be cascaded together for control over 128 computers.
INSTALLATION l RESET the MASTER unit by pressing the Bank/SCAN and Channel buttons simultaneously. This is necessary for the MASTER unit to detect the newly added slave unit. l Verify that the MASTER unit has detected the new slave by pressing the Bank/SCAN button. If it detected the new slave properly, the LED display on the MASTER will register the slave unit’s bank address.
OPERATION CHAPTER 3. OPERATION Selecting which computer to operate can be done either by On-Screen Display, the select button, or through keyboard “Hot Key” commands. You will notice that after the KVM 08 switches to another computer, the mouse will be inoperative for about 1-2 seconds. This is normal operation and ensures that proper mouse synchronization is established. Pressing the “Channel” button cycles you through all the ports, including inactive ports.
OPERATION You can switch directly to any channel by giving the KVM08 the BANK and Channel numbers. For instance, if you press SCROLL LOCK, SCROLL LOCK, 2, 5, the computer on channel 5 of KVM 08 set to BANK 2 will be selected. In the following diagram, that is PC 21. Hence, if you only have one KVM08, the first key (X) must be “0”.
OPERATION On-Screen Display Menu Control SCROLL LOCK SCROLL LOCK Enable On-Screen Display Menu Space Bar To get into the On-Screen Display (OSD) menu, press SCROLL LOCK, SCROLL LOCK, SPACE BAR. Immediately, the OSD overlay screen appears. This screen is generated by the KVM08, and does not affect your computers or running software in any way. The main OSD screen menu is shown on the right. It shows the currently selected BANK. If you have only one KVM08, it will say “BANK 0”.
OPERATION ˙Pressing the ESC key exits the current screen. ˙To view a different BANK, pressing the PAGE UP key goes to a previous BANK, while the PAGE DOWN key brings you to the next BANK. ˙Once you have selected a computer on the menu, press ENTER to switch to that port. ˙Pressing the TAB key opens up the Function menu. In this menu, you can select the SCAN TIME and DISPLAY TIME.
CHAPTER 4. TROUBLE SHOOTING General Problems Q : The OSD menu does not display a “*” on a channel where a computer is connected and powered up. What do I do? A : ˙ Reset the KVM08 by simultaneously pressing the Bank/SCAN and Channel buttons on the front panel. Access the OSD menu again and it should have re-detected all the active channels. Q : When cascading the MASTER unit does not see the slave unit(s).
˙Do not press any keys on the keyboard while the selected computer is booting up. This is true for any PC, whether stand -alone or connected to a KVM08. Q : The computers boot up fine, but the keyboard does not work. A : ˙Check the cables and make sure they are inserted properly in the correct ports. ˙Make sure the keyboard works when directly plugged into the computers. ˙Try a different keyboard, but use only 101,102 or 104-key keyboards.
˙ Reset the KVM08 by simultaneously pressing the Bank/SCAN and Channel buttons on the front panel. Access the OSD menu again and it should have re-detected all the active ports. Q : When I switch from one port to another, mouse movement is completely erratic. What do I do? A : ˙ Reset the KVM 08 by simultaneously pressing the Bank/SCAN and Channel buttons on the front panel. Access the OSD menu again and it should have re-detected all the active ports. ˙Make sure you do not have more than one mouse driver.
˙Try a different PS/2 mouse at the console. ˙Make sure the mouse (at the console) is a true PS/2 mouse. A combo mouse will not work just as long as it is set for PS/2 mode with the correct adapter. A serial-only mouse with a combo mouse adapter WILL NOT work. ˙Check to make sure that the power cord is plugged in and its working properly. Make sure the power switch is on. ˙ Reset the KVM08 by simultaneously pressing the Bank/SCAN and Channel buttons on the front panel.