
User Manual


- 2 -
VOX amPlug 2 Owner’s Manual
Thank you for purchasing the VOX amPlug 2 Headphone
Guitar
Amplier. To take full advantage of this product and to
ensure trouble-free operation, please read this owner’s manual
carefully and use the product as directed.
Installing Batteries
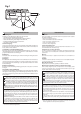
Remove the battery compartment
cover. Insert two AAA batteries as
shown in the figure to the left. Be
sure to observe the correct polarity
when installing the batteries. If
you’ll be using amPlug 2 for an ex-
tended period of time, we recom-
mend that you use alkaline baeries.
Replace the baeries when the indi-
cator becomes dark.
NOTE: Depleted baeries must be removed from the amPlug
2 immediately. If you leave them in, malfunctions such as bat-
tery leakage may occur. You should also remove the baeries
if you will not be using the amPlug 2 for an extended period
of time.
Auto Power-O Function
amPlug 2 is equipped with an auto power-o function. If no
buons or controls are used or there is no user input for ap-
proximately 30 minutes, the amPlug 2 automatically turns o.
NOTE: When the input level is extremely low or there is very
little change in the sound, the amPlug 2 may conclude that
there is no input. In addition, depending on the seings and
environment, the amPlug 2 may interpret noise as input, even
if the guitar is not being played.
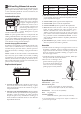
Guided Panel Tour
1
2
34 567
8
1. Input plug: This is where you would connect your guitar.
Swivel the plug as shown in Fig. 1 (
¬
p.4). Adjust the plug
angle according to the guitar being used.
2. STANDBY/ON/MODEbuon,indicator: Hold down this
buon for approximately one second to turn the amPlug 2
on or o. Pressing this buon after the amPlug 2 has been
turned on switches the mode. The indicator lights up in a
dierent color depending on the mode.
Mode 1 (green) Mode 2 (orange) Mode 3 (red)
Clean Pure Clean Twin Clean Boutique OD
Blues Clean Crunch Lead
Lead Boost 1 Boost 2 Boost 3
3. AUXjack(stereo): This is where you would connect an
external audio device. Adjust the playback volume on the
connected player accordingly.
4. GAINcontrol: This adjusts the amp gain.
5. TONEcontrol: This adjusts the tone.
6. VOLUMEcontrol: This adjusts the overall volume of
the amplier.
7. FXbuon: This selects an eect. Each press of this but-
ton switches the seing in the following order: Chorus
¬
Delay
¬
Reverb
¬
Eect o
¬
Chorus ... In addition,
one of three variations for the selected effect can be
selected by holding down the FX buon and pressing
the STANDBY/ON/MODE button. The variation is
indicated by the number of beeps produced when the
buon is pressed.
8. PHONESjack: This is where you would connect
headphones, portable speakers, a mixer or a recording
device.
Caution
• When connecting amPlug 2 to external equipment
such as a mixer or recorder, turn down the volume to
the minimum position on your external equipment
before you connect amPlug 2 to it. After connecting it,
power-on amPlug 2 and then adjust the volume of your
external equipment accordingly.
• When disconnecting amPlug 2 from your guitar, you
must grasp amPlug 2 near the base of its Input plug. If
you grasp it at the end, you risk breaking amPlug 2.
• Disconnect amPlug 2 from
your guitar before leaning
your guitar against a wall or
laying it on the oor. If you
fail to do so, amPlug 2 or
your guitar may strike the
oor and be damaged.
Specications
Powersupply: two AAA baeries
Baerylife:
11 hours / 17 hours (FX on / FX o, alkaline)
4 hours / 9 hours (FX on / FX o, zinc-carbon)
Dimensions(WxDxH):
86 x 38 x 31 (mm) / 3.39” x 1.50” x 1.22”
(minimum)
Weight:
40 g / 1.41 oz. (Not including baeries)
Includeditems:
Owner’s Manual
two AAA baeries (zinc-carbon)
* Specifications and appearance are subject to change
without notice for improvement.