
User Manual


EN-02
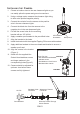
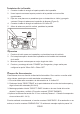
INSTALLING THE MONITOR
1. Plug power cable into the back of the monitor.
2. Attach the suction cup bracket to the rear of the monitor with the supplied screw.
3. Locate fl at section of glass on your windshield (that does not block your vision)
and apply suction cup. Snap the lever into the locked position (Figure 5).
4. Connect the power cord to a 12 Volt DC outlet.
5. Align the antenna to its upright position, parallel to the monitor.
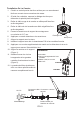
PAIRING PROCESS
This system has Auto-Pairing function. If your monitor is not receiving a signal from
the camera; the two may not be paired correctly.
1. Monitor must be connected to 12 Volt DC power supply.
2. Press the SELECT/PAIR button on the front of the monitor expected mode & select the
appropriate AV source (AV1-AV4)
3. Press and hold the "SELECT/PAIR" button on the front of the monitor for 5 seconds and
release. (Monitor will display "PAIRING START")
4. Apply 12 Volt DC power to the camera.(Camera 1 - Camera 4 corresponding to
Monitor's AV1 - AV4)
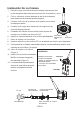
OPERATION
1. Press the power button on the monitor and turn on your vehicle's parking lights.
2. In the top right corner of the monitor, you will see the signal strength meter.
3. Adjust the suction cup bracket to provide the best viewing angle.
4. Press and hold the "POWER" button for 5 seconds and release to
setup monitor " Mirror ON" or "Mirror OFF"
If done correctly, monitor will display "SAVE DATA". If pairing is not successful, the
monitor will display "PAIRING FAIL". if you receive this message, repeat steps 3-4.