
Installation Instructions


Install & Maint. Wall Base 15: 02-03-15
Note: The next two steps must be completed before continuing to
Step 5.
- Use a hot air blower to heat the shaved area. Apply heat
carefully because excessive heat will blister or deform the base.
- Fold base with face out where corner will occur and roll with
hand roller (Figure 3).
(Figure 3)
4. Pull up on the toe and turn it inside out. Position the base after
applying adhesive and set into place allowing the toe to drop
down to form a perfect corner.
5. Roll thoroughly or firmly press corner against wall.
6. Cool by placing a wet cloth against corner. Wipe dry.
7. Remove excess adhesive.
Inside Corners (Suggested Method)
1. Draw a line on the back of base where corner will occur.
2. Using a straight edge as a guide, lightly cut along line from top
to bottom of base to a depth of approximately 20% of the base
thickness.
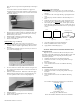
3. Cut a small 90° triangular wedge (45° off center) to remove toe
of cove base at line (Figure 4).
(Figure 4)
4. Use a hot air blower to heat the back of the base along the score
line. Apply heat carefully because excessive heat will blister or
deform the base.
5. Fold base at mark with face in. While base is still warm apply
adhesive and press base into corner. Carefully push the toe of
cove base against the wall to close the triangle (Figure 5).
(Figure 5)
6. Promptly roll base.
7. Cool by placing a wet cloth against corner. Wipe dry.
8. Remove excess adhesive.
Inside Corners (Optional Method)
1. When you come to an inside corner, use a scribe to mark the
base using the corner as the pattern to get the exact curvature of
the wall.
2. Cut the base to the exact length allowing a good, tight fit to the
wall.
3. Apply the proper amount of adhesive and install this piece of
base.
4. Using the same procedure as above, scribe and cut the second
piece for the corner. (DO NOT install the second piece yet.)
5. After cutting the second piece of base, turn the piece front side
down and make a back angle cut in the toe, starting at the top of
the toe and cutting down to the bottom of the toe. (See Figure 6:
Cut #1)
6. Check the fit with the previously installed piece.
7. Make any additional cuts to ensure a snug fit.
8. Apply adhesive and install (Figure 7).
VPI WALL BASE AND ACCESSORIES MAINTENANCE
Initial Maintenance
Wipe off any excess amounts of adhesive that may have come
through the seams with a damp cloth. Allow the adhesive on the wall
base to thoroughly dry before completing the following initial
maintenance procedure.
1. Wall Base and Accessories are maintained by hand.
2. Wash with a wet cloth or wet mop using neutral cleaner per
directions.
3. Rinse with clear water.
4. Clean wall base and accessories as conditions and soiling
dictates.
Routine Maintenance
1. Wall Base and Accessories are maintained by hand.
2. Wash with a wet cloth or wet mop using neutral cleaner per
directions.
3. Rinse with clear water.
4. Clean wall base and accessories as conditions and soiling
dictates.
For resolution of maintenance problems not covered in these
instructions, contact:
VPI Corporation
3123 South 9
th
Street,
Sheboygan, WI 53082-0451 U.S.A.
Phone: 920-458-4664 / 800-874-4240 Fax: 920-458-1368
Cut #1
Piece #2
(Figure 6)
Piece #1
(Figure 7)
Finished Inside Corner
45°