
User Manual

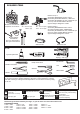


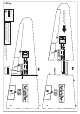

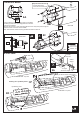
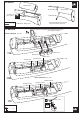
Table Of Contents

Install the push rod connector onto the
outer-most hole of the flap servo arm.
Move the flap servo arm a few times to make sure it move
freely with out any binding.
Connector
........2
Nylon cable tie
(included)
Servo mount
Flap servo
-Turn the center wing over.
-Turn the four screws and move the hatch out of the wing.
-Place the flap servo onto the servo mount with the flap push rod installed
as shown.
-Using the pencil, trace around the servo, where it meets the servo mount.
Connector (included)
Remove the servo out of the wing.
Place the servo onto the adhesive tap as shown.
With the pencil, trace around the servo, where it
meets the adhesive tape.
Adhesive tape
(included)
Adhesive tape
Servo mount
Pencil line.
Adhesive tape
Peel the bottom cover
Peel the top cover
With the scissors, cut along the pencil line
1A
1B
1C
1D
1E
1F
1G
1H
1I
Flap push rod
3mm screw
Do the same way with the flaps on the left and the right wing
1-Wing