
User manual


4 Windows Utility
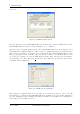
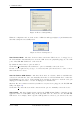
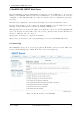
Figure 31: USBIP Device List
In the Device Mapping window (figure 31), all the USB devices connected are shown as a tree under
the USB Server. A USB Hub is not shown, because it is used transparently to connect more devices.
Select any device in Free state and click on Connect to virtualize that USB device onto your PC
as shown in figure 31. You may also right-click on the device and use the Connect option.
To free the device later, select it, and click on Disconnect. Again right-click for Disconnect is also
possible. Both functions are also available via Device Mapping in the Menu bar.
The Device Mapping function is stopped by the red crossed Button for Stop Device Mapping func-
tion. The function has to be stopped before the USBIP Admin Utility can be finished. For example,
this is required when logging off from your Windows account.
4.4 Using Your USB Devices on the Network
In this section, you will learn how to use your USB devices via the NetUSB-400i USB Server.
Note: These instructions are intended to help you connect a USB device (i.e. printer, scanner,
etc.) to the NetUSB-400i USB Server for the very first time. It is highly recommended that you
only connect one USB device at this time. To connect additional devices, repeat these instructions
for each device.
4.4.1 Using Your First USB Device
Connect your USB Device to the USB Server before using the USBIP Admin Utility. Connect your
USB device to any of the USB ports on the NetUSB-400i USB Server.
October 2009 NetUSB-400i User Manual 23