
Installation guide


6 (of 14) ROXY EC installation guide, edition 1
Unpacking
Advice (for IQ) during unpacking of the individual system parts:
● Check the part number, serial number on the s/n label of each unit
and write it down in the IQ document.
● Check the contents of accessory kits etc. using the checklist sup-
plied to assure it is complete and undamaged.
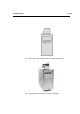
□ Unpack ROXY Potentiostat and follow installation instructions in
user manual and next section of this document.
Never lift the
DECADE II at its front door
, but at its sides.
□ Unpack the syringe pump and follow installation instructions in
user manual. The pump should placed on the top of the ROXY
Potentiostat.
Electrical connections (Mains, RS232 & trigger ca-
ble)
In case it is necessary to use another mains cable then supplied
make sure that the cable meets all relevant safety and EMC require-
ments (CE, CSA and UL). The manufacturer is not liable if power
cords are used which do not meet the relevant safety and EMC re-
quirements.
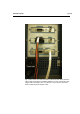
□ Connect the cables provided in the ROXY potentiostat acces-
sory kit: power cable, trigger cable and serial communication
cable to the ROXY Potentiostat as it is shown in the Fig. 3.
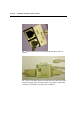
□ Connect the serial cable to the syringe pump as in the Fig. 4.
□ Connect the equipment to the COM ports in the USB-RS232
converter (Fig. 5):
ROXY Potentiostat – Serial 1
Syringe Pump – Serial 2
Do not connect the converter to the computer yet. It is required to
install the driver first. For instruction how to install the driver of th
USB-to-RS232 converter read further section of the manual.
□ Connect 1 m long cell cable (250.0125) inside the potentiostat.