Model No.
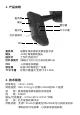
1. 产品说明 麦克风 镜头 复位键 指示灯 TF卡卡槽 红外夜视灯 PIR 麦克风 镜头 指示灯 红外夜视灯 PIR 复位键 TF卡卡槽 采集环境声音和实现语音对讲 200万高清视频镜头 工作状态指示灯 8颗贴片红外灯,红外夜视距离10米 人体移动探测器 长按10秒恢复出厂设置 存储卡槽,最大支持TF卡 128G 2. 技术规格 供电电压:110V~240V 网络连接:802.11 b/g/n 仅限2.4GHz的Wi-Fi连接 音 频:具有噪音消除功能的双向音频 视 频:1080P 镜头/可视角度:3.0mm@F2.
报警检测:支持移动侦测,PIR距离10米 报警声 :≥95dB LED灯 :2组*白光LED(4000-4500K),流明2*800LM 3. 指示灯说明 智能摄像灯状态 指示灯状态 开机 亮灯 等待配网 慢闪 配网状态 快闪 已配网 灭灯 4.
接线端子 安装支架 接线底盒(不包含) 支架螺丝 固定机身螺丝 固定地线螺丝 步骤3:接通电源 打开断路器开关 5. 软件下载 ①扫描二维码下载 ②App Store, 应用宝,华为应用商店等搜索 “Eye4” ③访问【http://www.vstarcam.
6. 注册账号 Android/iOS客户端选择"快速注册"按钮,点击进入注册 页面,输入自定义的用户名、密码后确认即可完成账号注册 7.
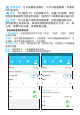
② 当听到智能摄像灯第一次发出提示音“请使用 APP 进行 WIFI 配置”后,点击“已听到语音提示”,输入手机所连接 的WiFi网络的密码,点击“确定”进入下一步。 无线配置 WiFi eye4 ******* 确定 已听到语音提示 ③ 请将手机靠近摄像灯(配置过程中请保持手机与摄像灯在 3 米以内,此时手机音量请调到最大),点击APP上的发送按 钮发出配置信号给到摄像灯。
④ 当 听 到 摄 像 灯 提 示 “ 无 线 连 接 成 功 ” 后 等 待1 0 秒 左 右 A P P软 件 将 会 出 现 “ 立 即 绑 定 ” 界 面 , 输 入 初 始 密 码 : 888888,点击立即绑定完成添加操作 无线配置 名称:智能摄像灯 密码: ****** 立即绑定 请耐心等待,很快会配置成功。 正在设置摄像机的WIFI参数 备注: 若此过程中智能摄像灯有提示无线连接成功而没 有出现绑定界面,请返回到添加智能摄像灯页面选择“其他 添加方式”→“智能摄像灯”→“搜索局域网”或“手动添 加”方式绑定智能摄像灯即可。 方式二:其他添加方式 如果智能摄像灯上找不到二维码,请点击“其他添加方式” 按钮来添加智能摄像灯。 ①登录APP点击“+”去添加设备。点击“其他添加方式”→ “智能摄像灯”。 ②选择无线配置:参考“无线配置说明”和 APP 语音提示进 行操作。 注:接下来请参照方式一“去扫一扫添加”的②③④步进行 操作。
其他添加方式 添加摄像机 无线配置 智能摄像灯 备注: 若此过程中智能摄像灯有提示无线连接成功而没有 出现绑定界面,请返回到智能摄像灯添加页面选 择“搜索局 域网”或“手动添加”方式绑定摄像灯即可。 搜索局域网 ①点击“搜索局域网”可以搜索到 和手机在同一个路由器下的所有摄 像机,若连接成功后有其他用户需 连接此摄像机可以使用此功能添加 (备注 :已经被添加的摄像机,将 不会被再次搜索 )。 添加摄像机 搜索区域网
②点击已听到语音提示,等待10秒左右会弹出现绑定界面, 输入智能摄像灯的密码。点击立即绑定。 无线配置 名称:智能摄像灯 密码: ****** 立即绑定 已听到语音提示 手动添加 点击“手动添加”后,输入15 位 UID 码或者通过扫描智能摄 像灯标签上的二维码,自动提取UID,然后输入智能摄像灯密 码完成绑定。 8.
视频画面: 可以设置夜视模式,水平与垂直镜像,亮度和 对比度调节。 录像: 可以看到 SD 卡的容量状态,设置计划录像、移动 侦测录像和是否选择录制声音。(使用SD卡录像前建议格式化) 报警: 可以设置人体移动侦测报警,设定报警通知方式, 添加报警生效的时段,移动侦测报警灵敏度分为低、中、高 三档。报警闪光设置,报警警笛设置。 移动侦测报警使用说明: 人体侦测报警: 点击后面的文字可以在“开启”“关闭”“定时”三种状 态进行切换。 灵敏度:低代表连续检测到3次,才会报警;中低代表连续检测到2次,才 会报警;高代表连续检测到1次,才会报警 添加定时计划:点击“添加定时计划”选择时间段、日期进行人体侦测报 警定时设置 闪光:开启状态下,人体侦测触发会闪光 警笛:开启状态下,人体侦测触发会发出警笛声 报警 提醒方式 报警 客户端 该设置对所有摄像机有效 开启 人体侦测报警 闪光 警笛 客户端 该设置对所有摄像机有效 定时 人体侦测报警 灵敏度 低 提醒方式 灵敏度 中 高 低 中 高 添加定时计划 若未添加时段,默认为24小时开启 22:00-06:30 闪光 警笛 一二
常见问题 问:智能摄像灯如何恢复出厂设置? 答:请找到设备上的 Reset 孔,插入电源用顶针按住10 秒左 右即可。智能摄像灯默认密码:888888(为提高安全性,保 护用户隐私,强烈建议用户修改摄像机密码)。 问 : 智能摄像灯连接 WIFI 小技巧? 答 : 智能摄像灯仅支持连接 2.4G 频段信号,802.
FC2声明: 该装置符合FC2规则第15部分。操作受下列各项约束 两个条件: (1)本装置不得造成有害干扰 (2)本设备必须接受接收到的任何干扰,包括可能的干扰 导致非正常操作。 警告:未经责任方明确批准的变更或修改 依从性可能使用户丧失操作设备的权力。 注:本设备经检测符合a类B级标准 数字设备,符合FC2规则第15部分。这些限制旨在提供 合理保护住宅设施免受有害干扰。这 设备产生使用并能辐射射频能量,如果不安装的话 并按照说明书使用,可能对无线电造成有害干扰 通信。然而,并不能保证不会发生干扰 特定的安装。如果该设备确实对无线电造成有害干扰或 电视接收,这可以通过关闭和打开设备来确定 鼓励用户尝试纠正以下一种或多种干扰 措施: 重新定位或重新定位接收天线。 增加设备和接收器之间的距离。 将设备连接到与所述电路不同的电路插座上 接收器连接。 向经销商或有经验的广播/电视技术人员寻求帮助。 FC2辐射暴露声明: 该设备符合美国联邦通信委员会(FC2)规定的辐射暴露限值 不受控制的环境。此设备应安装并操作 散热器与您的身体之间至少保持20厘米的距离。
1. Product Layout Mic Lens Reset button Indicator TF card slot IR LED Light PIR sensor Mic: Captures the environmental sound and fulfills twoway audio Lens: 1080P HD video Indicator: Indicates working status IR LED Light: 8pcs SMT IR led lights, IR distance 10m PIR sensor: Human body motion detector Reset button: Press and hold for 10s to restore factory default TF card slot: Supports TF card up to 128GB 2. Technical Specifications Power Supply: 110V~240V Network Connection: 802.11 b/g/n Wi-Fi @2.
Night Vision: Dual filters, auto switch, 8pcs SMT IR led lights, IR distance 10m Storage: Supports TF card up to 128GB,Supports realtime recording, schedule recording and motion detection recording. Alarm Detection: Supports motion detection, PIR detection coverage 10m Siren: ≥95dB LED source: 2 groups of white LED (4000-4500K), Lumen: 2*800LM 3.
Step 2: Installation ①Please refer to the picture below, pass the two power supply wires (110v-240v) and the ground wire through the mounting bracket, and then use the screws to fix the mounting bracket on the junction box ②Use wire nuts to connect power supply wires ③Use screws to fix the floodlight camera on the mounting bracket Wire nuts Camera Screws Bracket Screws Mounting Bracket Junction Box(not include) Fix the screws for the ground wire Step 3: Restore Power Turn on the power at the breaker
5. APP Download ①Scan below QR code to download the APP. ②Search "Eye4" in APP store, Google Play or other mobile phone application store. ③Visit【http://www.vstarcam.com】to download the APP. 6. Register Choose "Faster Register", then enter your account and password to sign in. 7. Adding Devices After sign in the APP, please click "+" in the top right corner, there are two ways to add it, "Scan QR code" and "Others".
Scan QR code ①Sign in the APP, please click "+" in the top right corner to add the device. Click "Scan to add", please scan the QR code on the body of device. (If you could not find the QR code, please click "Others" to add the device. ) Others ②Once heard the prompt "Please use APP for WiFi configuration", please click "There is voice prompt". For the first time, please select the WiFi that your mobile phone connected and enter the password, then click "OK" to next step.
③During the configuration, please keep your cellphone and floodlight camera within 3 meters, at the same time, please adjust the sound to the maximum. Click "send" button on the APP, to send the configuration signal to the floodlight camera. ④A f t e r t h e fl o o d l i g h t c a m e r a p r o m p t s " W i F i configuration success", please wait about 10 seconds, it will show the page "Add it", please enter the initial password: 888888, click "Add it".
Note: During the process, if it prompted that WiFi configuration success but the binding page does not pop up, please return to home page, select "Others"→"Floodlight Cam "→"Search in LAN" or "Manually add" to bind the floodlight camera. 7.2 Others If you could not find the QR code on the body of device, please click "Others" to add the device. ① Sign in the APP, click "+" on the top right corner, select "Others"→"Floodlight Cam".
7.3 Search in LAN Add Device Add Device ① Click "Search in LAN", you can find all the available cameras that share the same router with your mobile phone. If added successfully, the floodlight camera could be added through this way by other users which in different account. Search in LAN Note: If floodlight camera which has been added successfully in this account, will not be searched again.
7.4 Manually Add Click "Manually add", please enter the 15 digits UID that can be find on the label stick to the floodlight camera's body. Or you could scan the QR code on the label, the UID will be filled in automatically, then enter the initial password: 888888, click "Add it". 8.
FAQ Q: How to reset the floodlight camera to factory default setting? A: Press and hold the reset button for about 10 seconds to reset the floodlight camera. It’s default password: 888888 (To improve the security, it is highly recommended to modify the initial password). Q: Any tips for WiFi connection? A : The floodlight camera supports only 2.4G frequency signal,and 802.11b/g/n WiFi network. 1). The WiFi password should be less than 16 digits, and can not contain special characters, such as @ $ etc.
Motion detection alarm instructions: Human detection alarm: Switch among “ON""OFF""Timing" Motion detection sensitivity: "Low" means the floodlight camera will sound an alarm when continuously detects the objects for thrice; "Middle" means the floodlight camera will sound an alarm when continuously detects the objects for twice; "High" means the floodlight camera will sound an alarm when continuously detects the objects for once.
FC2 STATEMENT : This device complies with Part 15 of the FC2 Rules. Operation is subject to the following two conditions: (1) This device may not cause harmful interference, and (2) This device must accept any interference received, including interference that may cause undesired operation. Warning: Changes or modifications not expressly approved by the party responsible for compliance could void the user's authority to operate the equipment.
from that to which the receiver is connected. Consult the dealer or an experienced radio/TV technician for help. FCC Radiation Exposure Statement: This equipment complies with FCC radiation exposure limits set forth for an uncontrolled environment. This equipment should be installed and operated with minimum distance 20cm between the radiator & your body.