
User guide


vSync924 & 1624i User Guide © vSync DVR December 2007
Rev A. December 2007
Specifications and content are subject to change without notice.
40
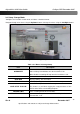
1. Select the option “TIMELINE” and a calendar will appear (Figure 4.2.1).
2. Select the date of the video by using the LEFT, RIGHT, UP, and DOWN buttons to navigate through
the days.
3. Press the SEL button to move to the timeline search window.
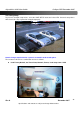
4. Use LEFT/F. REW or RIGHT/F. ADV buttons to select a starting time period on the 24 hour
timetable.
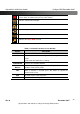
NOTE: The modes used during recording are indicated below.
C: Continuous
M: Motion
S: Sensor
R: Emergency Record
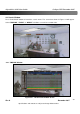
5. Once you have selected the date, press the SEL button to move to the hourly timetable.
6. Select a specific channel or All Channels by using the UP and DOWN arrow buttons.
7. Once you have selected the channel(s), use the LEFT/F. REW or RIGHT/F. ADV buttons to move
the timeline select bar (purple) to the point you wish to start playing the video clip.
8. Press the SEL button to playback the recorded video.
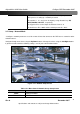
Figure 4.2.1-1. Motion Recording Search Mode Screen