User’s manual TL7710 DECT 6.
Congratulations on your purchase of this AT&T product. Before using this AT&T product, please read the Important safety information section on pages 50-53 of this manual. Please thoroughly read this user’s manual for all the feature operations and troubleshooting information necessary to install and operate your new AT&T product. You can also visit our website at www.telephones.att.com or call 1 (800) 222-3111. In Canada, dial 1 (866) 288-4268. Model number: TL7710 (Headset and headset base) Type: DECT 6.
Parts checklist Check to make sure the headset package includes the following items. Save your sales receipt and original packaging in the event warranty service is necessary. User’s manual Quick start guide TL7710 TL7710 DECT 6.0 cordless headset DECT 6.
Optional accessories In this manual, there are references to TL7100 and TL7700. The TL7100 is a lifter and TL7700 is an expansion headset with charger, purchased separately. For more information about these products, see the user’s manuals. You may also download the manuals at www.telephones.att.com.
User’s manual TL7710 DECT 6.0 cordless headset Table of contents Getting started Quick reference guide headset......................................... 1 Quick reference guide headset base ............................. 2 Installation...................................... 4 Headset base installation........ 5 For calls using the phone line.................................................. 5 For calls using your computer ..................................... 7 Connect your headset to your computer ..........
Multiple headsets/handsets use ................................................. 31 Intercom.......................................... 32 Answer an intercom call..... 32 Answer an incoming call during an intercom call....... 32 End an intercom call............. 32 PC mode ......................................... 33 Turn on PC mode ................... 33 Configure your audio settings........................................ 33 Make or answer a call in PC mode .....................................
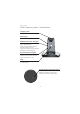
Getting started Quick reference guide - headset (On/off button and light) Press to make, answer and end a call (pages 26-27). On when the headset is charging in the headset base. Flashes once every 10 seconds in red light when the headset is in low battery mode. Flashes twice every three seconds in blue light when the headset is in use. Flashes four times every three seconds in blue light when there is an incoming call. Flashes quickly and alternately in red and blue when the headset is being registered.
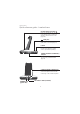
Getting started Quick reference guide - headset base Charging cradle Place the headset here for charging. MUTE (light) On when the mute function is on. PHONE (mode button and light) On when the home or office phone line is chosen for calls. Flashes twice every three seconds when the headset is in use. Flashes four times every three seconds when there is an incoming call. PC (mode button and light) On when the PC is chosen for calls. Flashes twice every three seconds when the headset is in use.
Getting started Quick reference guide - headset base MICROPHONE/ VOLUME Press the volume keys on the side of the headset base to adjust the speaking volume when on a call (page 29). (USB port) Open the port cover to plug in the USB cable when in PC mode (page 33). LIFTER This jack is only used with an AT&T handset lifter (model TL7100 or TL7711, purchased separately). CORDED HANDSET CONNECTED/ YES/NO Choose the setting based on whether you are using a corded handset (page 8).
Getting started Installation You must install and charge the battery before using the headset. STOP! See pages 9-10 for easy instructions. If you subscribe to high-speed Internet service (DSL - digital subscriber line) through your telephone line, you must install a DSL filter between the telephone line cord and telephone wall jack (see pages 5-6). The filter prevents noise and caller ID problems caused by DSL interference.
Getting started Headset base installation For calls using the phone line You can use your DECT cordless headset for calls through your telephone line with or without a telephone. You can also plug the headset directly into a telephone jack without the splitter. If you plug the headset into a telephone line without a telephone connected to the line, you will not be able to make calls.
Getting started Headset base installation Connect your headset to a corded telephone and its corded headset: Use the included corded phone interface cable to connect the headset to your corded telephone. Then plug the curly handset corded into the small box of the cable. You must slide the CORDED HANDSET CONNECTED switch on the headset base to select YES (page 8) for using the headset.
Getting started Headset base installation For calls using your computer You can use your DECT cordless headset for VoIP (Voice over IP) calls through your computer. You can use any software program that supports VoIP (such as Skype or Google Talk) to make and answer calls. Connect your headset to your computer Connect the headset base to your computer using the USB cable as shown below. Wait for your operating system to indicate that it has recognized the headset (a sound or a pop-up window).
Getting started Headset base settings Corded handset connection switch • If you are not using a corded telephone, set the switch to NO. -OR• If you are using a corded telephone, you must set the switch to YES. To change the setting: When the headset is not in use, slide the CORDED HANDSET CONNECTED switch on the headset base to YES or NO.
Getting started Battery installation The battery is permanently attached to the battery compartment cover (known as the battery pack). Do not try to separate them from each other. After installing the battery pack, charge it for at least 15 minutes. You may be able to make and receive short calls. For optimal performance, charge the headset battery for at least three hours before use. When fully charged, the headset battery provides approximately 12 hours of talk time or five days of standby time.
Getting started Battery charging After installing the battery, charge the headset by placing it in the charging cradle as shown below. The headset light turns on when the headset is charging. 1. Insert the headset into the charging cradle. 2. The magnet in the charging cradle holds the top of the headset in place. The light turns on. Magnetic charging mount IMPORTANT INFORMATION Use only the supplied rechargeable battery or replacement battery (model BT191665). To order, visit our website at www.
Getting started Add and register headsets • The TL7710 accommodates up to two cordless headsets. The headset provided with your TL7710 is already registered. You can add a new headset (TL7700, purchased separately) to the headset base at any time. You must register a new headset with the headset base before use (see page 13). -OR• You can register a maximum of two TL7710 headsets to an AT&T DECT 6.0 telephone. The telephone base recognizes and counts a headset the same as a handset.
Getting started Add and register headsets For SynapseTM users Refer to the “Synapse Installation Guide” for installation, registration, and deregistration, and the “Synapse User’s Guide” for how to use the headset with the Synapse system. These manuals are available for free viewing and download at http://www.telephones.att.com/SynapseGuides. For SynJTM users Refer to the user’s manual that came with your SynJ telephone for instructions on cordless headset registration, deregistration, and use.
Getting started Add and register headsets To register a headset to the headset base 1. Make sure the battery is properly installed in the headset (see page 9). The light flashes slowly and alternately in red and blue to indicate the headset is not registered. 2. Place the headset in the headset base and allow it to charge for at least one hour before beginning registration. 3. Remove the headset from the headset base.
Getting started Add and register headsets To register a headset to an AT&T DECT cordless telephone base 1. You must deregister the headset from its headset base (see page 15). 2. Make sure the battery is properly installed in the headset (see page 9). The light on the headset flashes slowly and alternately in blue and red to indicate the headset is not registered. 3. Place the headset in the headset base and allow it to charge for at least one hour before beginning registration. 4.
Getting started Replace a headset You may need to deregister your headsets if: You wish to register your headset to an AT&T DECT telephone or a different headset base. -ORYou have two registered headsets and need to replace one of them. You must first deregister both headsets, and then register each headset you wish to use again, one at a time. Please read carefully through all the instructions on this page before beginning the deregistration process. To deregister all headsets from the headset base 1.
Getting started Replace a headset To deregister the headset(s) from an AT&T DECT cordless telephone base 1. Press and hold /HANDSET LOCATOR on the telephone base for about 10 seconds until the IN USE light starts to flash, then release the button. 2. Immediately press /HANDSET LOCATOR again. You must press /HANDSET LOCATOR while the IN USE light is still flashing. (The light flashes for about five seconds. If the light stops flashing, the deregistration fails.
Getting started Headset attachments Earbud There are three sizes of earbuds provided. The medium-sized earbud is already attached with the headset. To remove the earbud from the headset earpiece: Hold on both sides of the earbud. Twist and pull the earbud until it separates from the earpiece. To attach the earbud to the headset earpiece: 1. Choose an appropriate earbud. 2. Position the earbud on the earpiece as shown below. 3. Press the earbud down on the earpiece until it clicks into place.
Getting started Headset attachments Over-the-ear hook To adjust the headset to wear on the left or right ear: • To wear on the left ear: 1. Make sure the ear hook ring is positioned as shown in Figure 1 before installation. 2. Attach the ear hook ring. See the next page for instructions. Figure 1 • To wear on the right ear: 1. Make sure the ear hook ring is positioned as shown in Figure 2 before installation. 2. Attach the ear hook ring. See the next page for instructions.
Getting started Headset attachments To attach the ear hook to the headset: 1. Remove any headset attachment (earbud excluded) connected to the headset earpiece. 2. Insert the earpiece into the ear hook ring as shown in Figure 1. 3. Press the edge of the ear hook ring towards the earpiece until it clicks into place as shown in Figure 2. 4. Hook the headset onto the desired ear. Adjust the angle of the headset until the microphone is pointing towards your mouth as shown in Figure 3.
Getting started Headset attachments To remove the ear hook from the headset: Hold the headset with one hand. Twist and pull the ear hook with the other hand until it separates from the earpiece.
Getting started Headset attachments Over-the-head band To attach the head band to the headset: 1. Remove any headset attachment (earbud excluded) currently connected to the headset. 2. Insert the earpiece into the head band ring as shown in Figure 1. 3. Push the earpiece towards the head band ring until it clicks into place as shown in Figure 2. 4. Adjust the head band to fit your head. Adjust and rotate the angle of the headset until the microphone is pointing towards your mouth as shown in Figure 3.
Getting started Headset attachments To remove the head band from the headset: Hold the headset with one hand and the head band ring with the other hand. Twist and pull the headset until it separates from the head band ring.
Getting started Headset attachments Behind-the-neck band To attach the neck band to the headset: 1. Remove any headset attachment (earbud excluded) currently connected to the headset. 2. Insert the earpiece into the neck band ring as shown in Figure 1. 3. Push the earpiece towards the neck band ring until it clicks into place as shown in Figure 2. 4. Place the neck band around your neck with the padded neck band rings over your ears. 5.
Getting started Headset attachments To remove the neck band from the headset: Hold the headset with one hand and the neck band ring with the other hand. Twist and pull the headset until it separates from the neck band ring.
Operation Headset operation Power on/off the headset Power on the headset before use. To power on the headset: • Place the headset in the headset base. -OR• Press and hold for two seconds. The light flashes in blue when the headset is being powered on. Power off the headset if it will not be used for a long time. To power off the headset: • Press and hold for two seconds. The light flashes in red when the headset is being powered off.
Operation Phone mode Make a call In order to make and receive calls on your home or office telephone line, make sure the PHONE light on the headset base is on. Press the PHONE button to turn it on. When the headset base is connected to a telephone wall jack: 1. Follow the instructions in your telephone user’s manual for making calls. 2. Press on the headset at any time to join the call. 3. After you join the call on the headset, you can hang up the telephone and continue the call on the headset.
Operation Phone mode Answer a call When the headset base is connected to a telephone wall jack: • Press on the headset. When the headset base is connected to a corded telephone and its corded headset: 1. Lift the corded handset from the telephone base. 2. Press on the headset at any time to switch to the headset. 3. The corded handset must be lifted up until you are ready to end your call.
Operation Phone mode Headset ringer The headset base and headset do not have an external ringer. When you receive calls, the headset earpiece will play a ringer. If you have telephones connected to the same telephone line as the headset base, you can rely on the ringers of those telephones to alert you to incoming calls. To change the volume of the earpiece ringer: Press VOL+ or VOL- when the headset is not in use.
Operation Options while on calls Volume control To adjust the listening volume: • While on a call, press VOL+ or VOL- on the top of the headset to adjust the listening volume. • If you are on a VoIP call, you can also adjust your listening volume through your computer audio settings and in some VoIP calling software. To adjust the speaking volume: • While on a call, press MICROPHONE/ VOLUME on the side of the headset base to adjust the speaking volume.
Operation Options while on calls Mute The mute function allows you to turn off the headset microphone. You can hear the caller, but the caller cannot hear you. To mute a call: • Press MUTE/FLASH on the headset to turn off the headset microphone. The voice prompt "Mute On" plays. When mute is on, the MUTE light on the headset base is on and a short beep plays every 30 seconds. To take a call off mute: • Press MUTE/FLASH on the headset again.
Operation Options while on calls Multiple headsets/handsets use Headset(s) and handset(s) on the same phone line can join an external call in progress. The number of headset(s) and handset(s) that can join may be limited by your telephone system. See your telephone user’s manual for more information. To join a call with a headset, press on the headset. To end the call, press or place the headset in the headset base and hang up all other handsets.
Operation Intercom If you have registered your headset to an AT&T DECT cordless telephone, follow the instructions in your telephone user’s manual for intercom call. Answer an intercom call Press on the headset to answer the intercom call. Answer an incoming call during an intercom call If you receive an incoming outside call during an intercom call, you hear two low beeps. • Press on the headset to end the intercom call. The headset rings after a two-second pause.
Operation PC mode In order to make and receive calls through your computer, connect the headset base to your computer using the USB cable (see page 7). Turn on PC mode In idle mode, press the PC button on the headset base to activate it for use with your computer. The PC light turns on. Configure your audio settings Configure the audio settings in your VoIP software to use your "AT&T DECT Headset".
Operation PC mode Switch between PC mode and PHONE mode You can switch back and forth between PHONE mode and PC mode while on a call by pressing the corresponding mode button on the headset base. The light on the headset base of the selected mode flashes twice every three seconds. While on a call: • You can press the PHONE button on the headset base in PC mode. The PC call is put on hold. • You can press the PC button on the headset in PC mode. The PHONE call is put on hold.
Operation PC mode Conference PHONE and PC calls You can join PHONE and PC calls into a conference call. While on a call, you can: • Create a conference while in PHONE mode, press and hold the PC button on the base until both the PC and PHONE buttons flash together. • Create a conference while in PC mode, press and hold the PHONE button on the base until both the PC and PHONE buttons flash together. • Press to end the conference and hang up both calls.
Appendix Alert tones and lights Headset alert tones One short beep (headset key) tone. One short beep every 30 seconds Muted headset microphone alert tone. Two beeps Error alert tone. The volume reaches its highest or lowest setting. Two low beeps Call waiting alert tone. Two rapid beeps every 20 seconds Low battery warning. Three rising beeps A conference call starts. Three rapid beeps every 10 seconds Out of range while the headset is on a call.
Appendix Alert tones and lights Headset lights light status Red • On when headset is charging in the headset base. • Flashes every 10 seconds to indicate the battery is low. • Flashes three times when the headset is being powered off. • Flashes quickly when the headset needs to be reset. Remove the battery for one minute then install the battery again. Blue • On when a fully charged registered headset is in the headset base. • Flashes three times to indicate the power will be on.
Appendix Alert tones and lights Headset base lights Headset base light status MUTE (Red) • On when headset microphone is muted. • On when you are registering a headset. • Flashes when you are deregistering headset(s) from the headset base. PHONE (Blue) • On when PHONE mode is selected (default mode) on the idle headset base. • Flashes four times every three seconds when there is an incoming call.
Appendix Troubleshooting If you have difficulty with your telephone, please try the suggestions below. For customer service, visit our website at www.telephones.att.com or call 1 (800) 222–3111. In Canada, dial 1 (866) 288-4268. My headset doesn’t work at all. • Make sure the power cord is securely plugged in. • Make sure that the battery is securely installed in the cordless headset. • Make sure the telephone line cord is securely and firmly plugged into the headset base and the telephone wall jack.
Appendix Troubleshooting I cannot get a dial tone. • First, try all the suggestions above. • Move the cordless headset closer to the headset base. You might have moved out of range. • Make sure that the CORDED HANDSET CONNECTED switch is set properly (page 8). • Your telephone line cord may be defective. Try installing a new telephone line cord. • Another phone on the same phone line may be in use.
Appendix Troubleshooting I cannot dial out. • First try all the suggestions above. • You must use a telephone on the same line to dial out. Once you have dialed the number, you can press to join the call. After you join the call, you can hang up the telephone from which you dialed from. • If the other phones in your home or office are having the same problem, the problem is in your wiring or local service. Contact your telephone service provider (charges may apply).
Appendix Troubleshooting I get noise, static, or weak signal even when I’m near the headset base. • If you subscribe to high-speed Internet service (DSL - digital subscriber line) through your telephone line, you must install a DSL filter between the telephone line cord and the telephone wall jack. The filter prevents noise and caller ID problems caused by DSL interference. Contact your DSL service provider for more information about DSL filters.
Appendix Troubleshooting I cannot hear a ring tone from the headset when there is an incoming call. • The headset does not have an external ringer. The ring tone can only be heard through the earpiece. • If you have pressed MUTE/FLASH on the headset when it is ringing, it mutes the ring tone of the headset. The ring tone resumes on the next call. • You may have too many extension phones on your telephone line to allow all of them to ring simultaneously. Try unplugging some of the other phones.
Appendix Troubleshooting I hear other calls while using my headset. • Plug a different telephone into the telephone jack that you are currently using. If you still hear other calls, the problem is probably in your building's wiring or local service. Call your telephone service provider. I cannot hear any audio using my headset in PC mode. • Make sure the two ends of the USB cable are securely plugged into the computer and headset base USB ports. • Make sure PC mode is selected and the PC light is on.
Appendix Troubleshooting • Make sure the headset microphone volume is turned on and set to an audible level through your computer audio settings and in some VoIP calling software. • Make sure your VoIP calling software audio settings are set to use your "AT&T DECT Headset". I used my headset for calls through the computer and now I cannot hear audio through my speakers. • Your computer's default playback device is set to use your "AT&T DECT Headset".
Appendix Troubleshooting 4. Click on the “Properties” button to open the “Speakers Properties” window. Click on the “Levels” tab and adjust the volume slider as necessary. Make sure the speakers are not muted. 5. Click on the “Recording” tab and then select your microphone. 6. Click on the “Properties” button to open the “Mic Properties” window. Then click on the “Levels” tab and adjust the volume slider as necessary. Make sure the microphone is not muted. For Windows 7: 1.
Appendix Troubleshooting 3. Click on the “Input” tab and select your microphone as the “Sound Input” device, and then adjust the “Input volume” slider to the desired level. • If you still cannot hear audio through your speakers, adjust the audio settings of the software program you are using. Refer to the help documentation of your software program for detailed instructions. I want to use my headset with a different headset base.
Appendix Troubleshooting • Do not install this headset near a microwave oven or on the same electrical outlet. You may experience decreased performance while the microwave oven is operating. • If your headset is plugged in with a modem or a surge protector, plug the headset (or modem/surge protector) into a different location. If this doesn't solve the problem, relocate your headset or modem farther apart from one another, or use a different surge protector.
Appendix Troubleshooting Common cure for electronic equipment. If the unit does not seem to be responding normally, try putting the cordless headset in its base. If it does not respond, do the following (in the order listed): • Disconnect the power to the headset base. • Remove the cordless headset battery. • Wait a few minutes. • Connect power to the headset base. • Install the battery again, and then place the cordless headset into the headset base.
Appendix Important safety information This symbol is to alert you to important operating or servicing instructions that may appear in this user’s manual. Always follow basic safety precautions when using this product to reduce the risk of injury, fire, or electric shock. Safety information • Read and understand all instructions in the user’s manual. Observe all markings on the product. • Avoid using a headset during a thunderstorm. There may be a slight chance of electric shock from lightning.
Appendix Important safety information • Replace batteries only as described in your user’s manual. Do not burn or puncture batteries — they contain caustic chemicals. • This power adapter is intended to be correctly oriented in a vertical or floor mount position. The prongs are not designed to hold the plug in place if it is plugged into a ceiling, an under-the-table or a cabinet outlet. Caution: Use only the power adapter provided with this product. To obtain a replacement, visit our website at www.
Appendix Important safety information • Rechargeable batteries: This product contains lithium-ion rechargeable batteries. Exercise care in handling batteries in order not to create a short circuit with conductive material such as rings, bracelets and keys. The battery or conductor may overheat and cause harm. Observe proper polarity between the battery and the battery charger. • Lithium-ion rechargeable batteries: Dispose of these batteries in a safe manner. Do not burn or puncture.
Appendix Important safety information • To prevent fire or shock hazard, do not expose this product to water or any type of moisture. • Observe proper polarity orientation between the battery and metallic contacts. • Do not disassemble your headset. There are no user-serviceable parts inside. Refer to qualified service personnel for servicing.
Appendix Maintenance Taking care of your headset • Your cordless headset contains sophisticated electronic parts, so it must be treated with care. • Avoid rough treatment. • Place the headset down gently. Save the original packing materials to protect your headset if you ever need to ship it. Avoid water • Your headset can be damaged if it gets wet. Do not use the headset outdoors in the rain, or handle it with wet hands. Do not install the headset base near a sink, bathtub or shower.
Appendix FCC Part 68 and ACTA This equipment complies with Part 68 of the FCC rules and with technical requirements adopted by the Administrative Council for Terminal Attachments (ACTA). The label on the back or bottom of this equipment contains, among other things, a product identifier in the format US: AAAEQ##TXXXX. This identifier must be provided to your telephone service provider upon request.
Appendix FCC Part 68 and ACTA If this equipment is causing harm to the telephone network, the telephone service provider may temporarily discontinue your telephone service. The telephone service provider is required to notify you before interrupting service. If advance notice is not practical, you will be notified as soon as possible. You will be given the opportunity to correct the problem and the telephone service provider is required to inform you of your right to file a complaint with the FCC.
Appendix FCC Part 68 and ACTA Industry Canada Operation is subject to the following two conditions: (1) this device may not cause harmful interference, and (2) this device must accept any interference, including interference that may cause undesired operation. The term ‘’IC:‘’ before the certification/registration number only signifies that the Industry Canada technical specifications were met. The Ringer Equivalence Number (REN) for this terminal equipment is 0.1.
Appendix FCC Part 15 This equipment has been tested and found to comply with the requirements for a Class B digital device under Part 15 of the Federal Communications Commission (FCC) rules. These requirements are intended to provide reasonable protection against harmful interference in a residential installation. This equipment generates, uses and can radiate radio frequency energy and, if not installed and used in accordance with the instructions, may cause harmful interference to radio communications.
Appendix FCC Part 15 To ensure safety of users, the FCC has established criteria for the amount of radio frequency energy that can be safely absorbed by a user or bystander according to the intended usage of the product. This product has been tested and found to comply with the FCC criteria. The headset may be safely held against the ear of the user.
Appendix Limited warranty The AT&T brand is used under license - any repair, replacement or warranty service, and all questions about this product should be directed to: In the United States of America, visit www.telephones.att.com or call 1 (800) 222-3111. In Canada, call 1 (866) 288-4268. 1.
Appendix Limited warranty 3. How long is the limited warranty period? The limited warranty period for the PRODUCT extends for ONE (1) YEAR from the date of purchase.
Appendix Limited warranty • PRODUCT returned without a valid proof of purchase (see item 6 below); -or• Charges for installation or setup, adjustment of customer controls, and installation or repair of systems outside the unit. 5. How do you get warranty service? To obtain warranty service in the United States of America, visit www.telephones.att.com or call 1 (800) 222-3111. In Canada, call 1 (866) 288-4268.
Appendix Limited warranty b. Include a “valid proof of purchase” (sales receipt) identifying the PRODUCT purchased (PRODUCT model) and the date of purchase or receipt; and c. Provide your name, complete and correct mailing address, and telephone number. 7. Other limitations This warranty is the complete and exclusive agreement between you and the manufacturer of this AT&T branded PRODUCT. It supersedes all other written or oral communications related to this PRODUCT.
Appendix Technical specifications RF frequency band 1921.536MHz - 1928.448MHz Channels 5 Operating temperature 32°F - 122°F 0°C - 50°C Headset base voltage (AC voltage, 60Hz) 96Vrms - 127Vrms Headset base voltage (AC adapter output) 6VDC @300mA 7VDC @300mA Headset voltage 3.2VDC - 4.2VDC Charger voltage (AC adapter output) 6VDC @400mA Replacement battery 3.
Index Index A AC adapter 5–6, 64 Alert tone 36 Answer a call (in PC mode) 33 a call (in PHONE mode) 27 intercom call 32 B Battery charging 10 Battery installation 9 Behind-the-neck band 23–24 C Call waiting 29 Charging cradle 2 Corded handset connected 3 Corded phone connection 3 D Deregistration 15–16 DSL 4–6, 42 E Earbud 17 Ear hook 18–20 End a call 27 an intercom call 32 F Flash 29 H Headset alert tones 36 attachments 17–24 lights 37–38 operation 25–35 registration 11–14 ringer 28 I Incoming call answe
Index Index N Neck band 23–24 V VoIP (Voice over IP) 7, 33 Volume control listening volume 28–29 ringer 28 speaking volume 29 O Operating range 64 Over-the-ear hook 18–20 Over-the-head band 21–22 P PC mode 33–35 Power off 25 Power on 25 Q Quick reference guide headset 1 headset base 2–3 R Replace a headset 15–16 Ringer 28 S Safety information 50–53 Speaking volume 29 T Technical specifications 64 Temporary ringer silencing 28 Troubleshooting 39–49 U USB port 3, 7 66
www.telephones.att.com © 2010 Advanced American Telephones. All Rights Reserved. AT&T and the AT&T logo are trademarks of AT&T Intellectual Property licensed to Advanced American Telephones, San Antonio, TX 78219. Printed in China.