OWNER'S MANUAL 2.
Important Safety Instructions When using your telephone equipment, basic safety precautions should always be followed to reduce the risk of fire, electric shock and injury, including the following: 1. 2. 3. 4. 5. 6. 7. 8. 9. 10. 11. Read and understand all instructions. Follow all warnings and instructions marked on the product. Unplug this product from the wall outlet before cleaning. Do not use liquid cleaners or aerosol cleaners. Use a damp cloth for cleaning.
Important Safety Instructions 12. Unplug this product from the wall outlet and contact the Supplier under the following conditions: A. When the power supply cord or plug is damaged or frayed. B. If liquid has been spilled into the product. C. If the product has been exposed to rain or water. D. If the product does not operate normally by following the operating instructions.
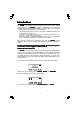
Introduction The 20-2432 is an advanced cordless telephone that operates in the 2.4GHz frequency range. Your 20-2432 is capable of supporting up to a maximum of 8 Handsets. Using additional Handsets, several people can be using the cordless system at the same time. Some examples: • 2 Handsets conferenced on a Line 1 call; while 2 additional Handsets are conferenced on a Line 2 call. • 2 Handsets conferenced on a Line 1 call; while another Handset is in Intercom mode with the Base Unit.
Parts Check List 1. 2. 3. 4. 5. 6. 7. 8. Base Unit Handset AC Power Adapter Telephone Cords Battery Pack (2) Belt Clip Owner's Manual 2.5mm Headset To purchase replacement battery packs, call the Supplier at (800) 651-6791. Belt Clip Base Unit Handset Battery Pack x 2 AC Power Adapter 2.
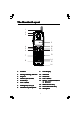
The Handset Layout 1 2 3 9 4 5 6 10 11 12 7 13 8 14 15 16 1. Antenna 9. 2. Message Waiting Indicator 10. Select/OK 3. Earpiece 11. Off (Clear) 4. Headset Jack (2.5mm) 12. Line 2 (Flash) 5. Scroll Keys 6. Line 1 (Flash) 13. Battery Compartment(back of Handset) 7. Dialing Keys (0-9,*,#) 8. Handsfree Speakerphone LCD Display 14. Billed Services Key 15. Intercom/Transfer Key 16.
The Base Unit Layout 15 16 17 18 19 20 21 22 23 24 25 26 27 1 2 3 4 LINE 1/ L1 + L2 LINE 2 ! MODEL : 20-2432 HAC FCC ID: EW780-5001-00 VTECH TELECOMMUNICATIONS LTD. MANUFACTURED IN CHINA COMPLIES WITH 47 CFR PART 68 REGISTRATION NO.: US: EW7 WI00B80-513700 RINGER EQUIVALENCE: 0.0B USOC JACK: RJ11C, RJ14C THIS DEVICE COMPLIES WITH PART 15 OF THE FCC RULES.
! 7V DC LINE 1/ L1 + L2 To telephone socket outlet LINE 2 ! 7V DC To AC outlet MODEL : 20-2432 HAC FCC ID: EW780-5001-00 VTECH TELECOMMUNICATIONS LTD. MANUFACTURED IN CHINA COMPLIES WITH 47 CFR PART 68 REGISTRATION NO.: US: EW7 WI00B80-513700 RINGER EQUIVALENCE: 0.0B USOC JACK: RJ11C, RJ14C THIS DEVICE COMPLIES WITH PART 15 OF THE FCC RULES.
Getting Started Installation of Battery Pack in Handset Follow the steps below: 1. 1 2. 3 3. 4. Remove the battery cover by pressing on the indent and sliding downward. Place the new battery pack in the handset with the metal contacts aligned with the charge contacts in the battery compartment. Replace the battery cover by sliding it upwards. If the new battery pack is not already charged, place the handset in the base unit, or a remote charging stand, and allow it to charge for 12 hours.
Charging Of Handset Battery Pack The Handset of your 20-2432 cordless telephone is powered by a rechargeable battery pack. It charges automatically whenever the Handset is in the Base Unit. You should charge the battery pack for 12 hours when you first receive your phone. You'll know the battery pack needs charging when: • The low battery message is displayed : • The handset seems completely dead, the LCD is completely clear and does not activate when you press the keys. IMPORTANT: 1. 2. 3. 4.
Getting Started Dial Tone Checking for Dial Tone After the battery is charged press a LINE key on the Handset. PHONE ON will appear on the Handset display, and you will hear dial tone. If not, see In Case of Difficulty. Tone/Pulse Selection See SELECT TONE/PULSE AT THE BASE UNIT for details. CAUTION CAUTION: Use only the power supply provided with your cordless phone. IMPORTANT: FOR MAXIMUM PERFORMANCE OF YOUR CORDLESS TELEPHONE SYSTEM: 1. Choose a central location for your Base Unit. 2.
The 20-2432 uses the spare battery charger in the Base Unit to provide operational backup in the event of a power failure. With a fully charged battery pack in the spare battery charger, you will still be able to place and receive calls from the Handset for up to one hour. During Power Backup mode, you will not be able to use the Base Unit. The spare battery pack can also be used to replace a drained handset battery, ensuring uninterrupted use.
Getting Started Registration and Operation Registration And Operation Of The 20-2422 Accessory Handset Your 20-2432 system can operate up to 8 Handsets. The accessory Handset consists of the following: Belt Clip Handset Battery Pack 1 Charger Unit Setup Of The 20-2422 Accessory Handset 1. 2. 3. 3 4. 5. 5 12 Plug the AC power adapter into an electrical outlet. Remove the Handset battery cover by pressing on the indent and sliding downward.
Enter Base ID Code 1. After charging the Handset, remove it from its Charge Cradle; the screen will display: alternating with this screen: 2. If, after charging the Handset, you see: 3. Press NEW. You will now see the ENTER BASE ID screen as described in step 1. 4. Find the BASE ID Code by doing the following: (the Base must be in idle (OFF) mode) A. At the Base Base, press MENU B. Scroll down to DISPLAY BASE-ID C. Press OK. The Base screen will display the 15-digit ID Code.
Handset and Base Indicators Handset and Base Icons Description Icon 1 Basic Operation 2 Line In Use indicator On steady with no number next to it when a parallel set is in use. On steady with one or more numbers next to it, indicating which extensions are using the line. For example, 1 02 indicates that Base (0) and Handset 2 are on a call on Line 1. Intercom indicator On steady with the extension numbers currently on an intercom call.
Handset and Base Indicators LED Description Message Waiting • Flash to indicate that you have new messages in your voicemail. Service must be subscribed to through your local telephone company. Base LEDs LED Description Line 1 Message • Flashes to indicate that you have new messages in your voicemail. Service must be subscribed to through your local Waiting/Line 2 telephone company. Message Waiting Line 1 Line 2 • Lights when line is being used by the 20-2432 system.
Soft Menu Functions The 20-2432 has an advanced design that uses a menu structure and soft keys to access all of the built-in features. Example of the idle mode display: Basic Operation RDL (Redial) Press RDL to display the last 5 telephone numbers dialed. The number on the top line is the most recent number dialed. • Use the scroll keys to select the desired the number. • To dial the number, you can simply press a LINE or the HANDSFREE key.
Call History (Caller ID) Due to regional incompatibilities, Caller ID information may not be available for every call you receive. In addition, the calling party may intentionally block their name and phone number from being sent. Caller ID - Call Waiting ID Your 20-2432 is capable of displaying the name and/or number of the party Caller ID calling before you answer the phone (Caller ID).
Call History (Caller ID) • To dial the displayed number, press the desired LINE key (or HANDSFREE HANDSFREE) on the Handset or SPEAKERPHONE on the Base. Basic Operation • If you need to dial the number differently than how it is displayed, press MENU. DIAL OPTION * is highlighted. Press OK. • Scroll to the desired dialing option, then LINE (or press DIAL or the desired HANDSFREE HANDSFREE) on the Handset or SPEAKERPHONE on the Base to dial .
Handset and Base Settings To save a displayed Caller ID record into the directory, press MENU. Scroll to SAVE TO MEM 7. Press OK. -ORWith the CID record displayed, press 77. The record has been stored in the directory. If the record you wish to save does not have a name (OUT OF AREA, for example), the screen will ask you to PLEASE ENTER A NEW NAME NAME. Use SAVE. A guide to the letters and the keypad to enter the name, then press SAVE characters can be found in the section entitled Memory.
Handset and Base Settings LOW BATT TONE (Handset only) Select this option to turn the Low Battery warning tone On or Off. Press the OFF or ON soft keys, to make your selection. Press OK to confirm your selection and return to the Handset Settings menu. When set to ON ON, the Handset will emit a warning tone when a Low Battery condition is detected. This feature has been preset to ON at the factory.
Handset and Base Settings ENHANCED MODE To select the Enhanced Mode setting: With the Handset in the idle (on hook) mode, press MENU. Scroll to HANDSET SETTINGS SETTINGS, then press OK. Scroll down to ENHANCED MODE, press SET. Select ON to enable Enhanced Mode. When the Handset is in use, an ‘ E ’ icon will appear in the upper left corner of the display, indicating that this feature is active. Select OFF to disable Enhanced Mode.
Handset and Base Settings · · Basic Operation · Scroll to RENAME RENAME, then press SET SET. Using the dialing keys, enter the desired name. A guide to the letters and characters can be found in the section entitled Memory Memory. The softkey will move the cursor to the right. Press MORE to give you the DEL (delete) and SPACE options. Press BACK to return to the previous screen. Press SAVE to confirm your Handset name. You can also name the Base Unit.
Register You can deregister all Handsets at one time. This causes the Base Unit to ‘forget’ that it has any Handsets at all. You may never have to perform this procedure. One possible reason for deregistration is if you have the maximum number of Handsets (8) registered to your Base, and one Handset should require replacement, the Base will not register the ‘new’ Handset, because its eight memory slots are occupied.
Memory Memory The Base and each Handset can store up to 50 names/numbers in memory. Each memory location can hold up to 32 digits and up to 16 characters for the name. Basic Operation When prompted to ENTER NAME NAME, use the digit keys to 'spell' the name. Each press of a particular key causes characters to be displayed in the following order: Number Key 1 2 3 4 5 6 7 8 9 0 *# Characters (in order) & ' , .
Memory • Starting from the idle screen, enter the number you want to store in memory. If you make a mistake, press CLEAR to backspace. • Be sure to include long distance codes and pauses, (using the Pause softkey) if necessary. Press the MEM softkey. • You will then be prompted to NAME. Use the digit ENTER NAME keys to 'spell' the name. If you make a mistake, press the CLR softkey. To enter a space press aa . When finished, press SAVE.
Memory Basic Operation To Search For and Dial a Number/ Name: • Starting from the idle screen, press the MEM softkey to review memory contents. • Using the softkeys scroll through the memory contents in alphabetical order. • Or, you can press the FIND softkey, enter the first few chararcters of the name and then press FIND to search. If you make a mistake, press CLR softkey. The closest match, in alphabetical order, will be displayed.
• Press the DEL softkey. The Handset or the Base will display: • To delete this record, press THIS. • To delete all records, press ALL ALL. To confirm the deletion of ALL records, press YES. To exit without deleting, press NO. Basic Operation Memory To Edit a Number/Name • Using the steps from 1 to 3 in To Search For and Dial a Number/Name Number/Name, locate the entry you want to edit. • Press the EDIT softkey twice twice. The Handset or the Base will display: • Select NAME or NUM NUM.
Handset and Base Operation Making Calls From the Handset • Press a LINE key (or, HANDSFREE to use the Handset Speakerphone feature). • • Dial the phone number. - OR Dial the phone number first; then press a LINE key (or HANDSFREE HANDSFREE). Advanced Operations From the Base Unit • Just like the Handset, you can either access a dial tone first, then dial your number, or you can dial your number first, then access a line.
Handset and Base Operation ERASE Press RDL RDL. Scroll to the desired phone number, press SELECT, then press ERASE ERASE. SAVE Press RDL RDL. Scroll to the desired phone number, press SELECT, then press SAVE SAVE. You'll then be prompted to ENTER NAME NAME. Use the keypad to enter the letters of the name. If you make a mistake, press CLR to backspace. To insert a space, press . When finished, press SAVE SAVE.
Handset and Base Operation If the Base is active on one line when the idle line rings, you will hear a special alert tone, signifying an inbound call. This alert is designed to minimize disruption of the call in progress. You can then: • • Press SPEAKERPHONE (or HEADSET if you are using a Headset connected to the Base) to end the first call, then Press SPEAKERPHONE or HEADSET to answer the new call; -ORPress the HOLD soft key to place the original call on hold.
Handset and Base Operation Adjusting Handset Volume( also applies to the Handset Speakerphone) • Press the VOL key, located directly below the lower left corner of the display. • Use the keys directly below the / / symbols on the display to raise or lower the Handset volume. Notice the change in the display graph as you adjust the volume. An increase in volume will be represented by an increase in shaded area on the graph. A decrease in volume will result in a reduction of the shaded area.
Handset and Base Operation Highlight the desired destination of your intercom then press OK. Your screen will display CALLING HANDSET __ , CALLING BASE BASE, or PERFORMING GLOBAL PAGE. The recipient's screen will display INTERCOM FROM HANDSET_ HANDSET_, HANDSET_, or INTERCOM FROM BASE or GLOBAL CALL FROM HANDSET_ GLOBAL CALL FROM BASE BASE. The recipient presses INTERCOM/TRANSFER on the Handset or Base to engage in conversation with the person initiating the page.
Handset and Base Operation Switching from the Handset Earpiece to Handsfree While on a call using the Handset earpiece, press HANDSFREE on the lower left portion of the Handset. To return to the Handset earpiece, press HANDSFREE again. Base Speakerphone Operation The Base of your 20-2432 is equipped with a duplex Speakerphone. This is a very useful feature for handsfree conversations or conference calls at the base unit. For more information, refer to MAKING CALLS in HANDSET AND BASE OPERATION.
Handset and Base Operation Message Waiting Indication The 20-2432 is compatible with optional voicemail service provided by some local telephone companies. If you subscribe to this service, and you have new, unplayed messages in your voicemail, a Visual Message Waiting Indicator (VMWI) signal is transmitted by your local telephone company. The 20-2432 will detect a VMWI signal and activate the LINE1/LINE2 Message Waiting lights on the Base and the Message Waiting light on the Handset.
Custom Pay-Per-Use(PPU) Features Press BILLED SERVICES on the Handset, or the 3 dedicated keys on the Base Unit to access the following features: AUTO CALLBACK 3-WAY CALLING REPEAT DIALING AUTO CALLBACK dials the last party who called you, whether or not you answer the call. A charge may be added to your phone bill each time you use this feature. From the Handset: In the idle (Off) mode, press BILLED SERVICES SERVICES. With AUTO CALLBACK highlighted, press the desired LINE key.
Additional Services Qwest offers a variety of optional calling services. For information on the prices and availability of these and other services in your area, or for additional instructions on using these services, call the number appropriate number referenced below. Caller ID Lets you know who is calling before you answer the phone. To Block Anonymous Calls 1. Use Anonymous Call Rejection, a free service for Caller ID customers, by accessing dial tone and dialing *77. 2.
Additional Services Voice Messaging Service Voice Messaging Service records your incoming calls when you cannot answer, or when you line is busy. To Establish Your Voice Messaging Service The first time you call your Voice Messaging Retrieval number, follow these five easy steps. Voice instructions will guide you through the process. 1. Call your Voice Messaging Retrieval number provided by your Business Office or Customer Training Center.
Additional Services Priority Call To Use Priority Call 1. You can store up to 15 different numbers. 2. To establish or change your priority, simply dial *61 and follow the recorded instructions. 3. To cancel Priority Calling, press *81. Selective Call Forwarding Selective Call Forwarding transfers calls from specific numbers to another phone number of your choice. To Use Selective Call Forwarding 1. Dial *63 and follow the recorded instructions. 2.
Headset Operation Your 20-2432 Handset is equipped with a 2.5mm Headset Jack for use with an optional accessory Headset for hands-free operation. If you choose to use the Headset option, you must obtain an optional accessory Headset, which is compatible with the 20-2432 20-2432. To purchase a Headset, please call 1-800-651-6791. Once you have a compatible 2.5mm Headset, locate the Headset Jack on the 20-2432 Handset.
Maintenance Taking Care Of Your Telephone Your 20-2432 cordless telephone contains sophisticated electronic parts, so it must be treated with care. Avoid rough treatment Place the Handset down gently. Save the original packing materials to protect your telephone if you ever need to ship it. Avoid water Your telephone can be damaged if it gets wet. Do not use the Handset outdoors in the rain, or handle it with wet hands. Do not install your Base Unit near a sink, bathtub or shower.
In Case Of Difficulty If you have difficulty operating your phone, the suggestions below should solve the problem. If you still have difficulty after trying these suggestions, call the Supplier at (800) 651-6791. The Phone Doesn't Work At All • • • • Make sure the Power Cord is plugged in. Make sure the telephone line cord is plugged firmly into the Base Unit and the telephone wall jack. Make sure the batteries are properly charged. If the 'LOW BATTERY' message is shown, the battery pack needs charging.
In Case Of Difficulty You Hear Other Calls While Using Your Phone • Disconnect your Base Unit from the telephone jack, and plug in a regular telephone. If you still hear other calls, the problem is probably in your wiring or local service. Call your local telephone company. You Hear Noise In The Handset, And None Of The Keys Or Buttons Work • Make sure the power cord is plugged in.
Limited Warranty The Manufacturer's Limited Warranty, to the original purchaser only, the material and workmanship of this product for ONE YEAR from the date of purchase. The Supplier will repair or replace, at our option, this product without charge should it fail due to a defect in material or workmanship within that time period. This warranty does not apply to loss or damage which is the result of accident, misuse or negligence.
FCC, ACTA and IC Regulations This equipment complies with Parts 15 of the Federal Communications Commission (FCC) rules for the United States. It also complies with regulations RSS210 and CS-03 of Industry and Science Canada. Operation is subject to the following two conditions: (1) this device may not cause interference, and (2) this device must accept any interference, including interference that may cause undesired operation of the device.
FCC, ACTA and IC Regulations FCC Part 68 and ACTA If this equipment was approved for connection to the telephone network prior to July 23, 2001, it complies with Part 68 of the Federal Communications Commission (FCC) rules. If the equipment was approved after that date, it complies with the Part 68 rules and with Technical Requirements for Connection of Equipment to the Telephone Network adopted by the Administrative Council for Terminal Attachments (ACTA).
FCC, ACTA and IC Regulations Your telephone company may make changes in its facilities, equipment, operation, or procedures that could affect the proper functioning of this product. The telephone company is required to notify you if such changes are planned. 5. Hearing aid compatibility If this product is equipped with a corded or cordless handset, it is hearing aid compatible. 6.
FCC, ACTA and IC Regulations 47 Additional Information Before installing this equipment, users should ensure that it is permissible to be connected to the facilities of the local telecommunications company. The equipment must also be installed using an acceptable method of connection. The customer should be aware that compliance with the above conditions may not prevent degradation of services in some situations.
Technical Specifications FREQUENCY CONTROL WEIGHT Crystal controlled PLL synthesizer Handset : 122 grams Base: 598 grams (excluding battery pack) TRANSMIT FREQUENCY POWER REQUIREMENTS 2401.056 - 2481.408 MHz Handset : 800mAh NiCd Battery Pack or 1500mAh NiMH Battery Pack RECEIVE FREQUENCY 2401.056 - 2481.408 MHz CHANNELS Base: 94 Channels 7 VDC @ 900mA MEMORY NOMINAL EFFECTIVE RANGE Maximum power allowed by FCC.
91-5598-10-00 ISSUE 0
Table Of Contents 1. Important Safety Instructions 28. Advanced Operations 3. Introduction 7. Getting Started 4. 5. 6. 7. 8. 9. 10. 11. 12. Parts Check List The Handset Layout The Base Unit Layout Setup Installation of Battery Pack in Handset Charging Of Handset Battery Pack Dial Tone Spare Battery Charger/Power Backup Function Registration and Operation 14. Basic Operation 14. 16. 16. 16. 16. 17. 18. 18. 18. 19. 19. 19. 20. 20. 20. 20. 20. 21. 21. 23. 23. 23. 24. 25. 26. 26. 27.