Important Safety Instructions When using your telephone equipment, basic safety precautions should always be followed to reduce the risk of fire, electric shock and injury to persons, including the following: 1. 2. 3. 4. 5. 6. 7. 8. 9. 10. 11. Read and understand all instructions. Follow all warnings and instructions marked on the product. Unplug this product from the wall outlet before cleaning. Do not use liquid cleaners or aerosol cleaners. Use a damp cloth for cleaning.
12. 13. 14. Unplug this product from the wall outlet and contact Vtech customer support under the following conditions: A. When the power supply cord or plug is damaged or frayed. B. If liquid has been spilled into the product. C. If the product has been exposed to rain or water. D. If the product does not operate normally by following the operating instructions.
Introduction The GIGAPHONE is an advanced cordless telephone that operates in the 2.4GHz frequency range. Your GIGAPHONE is capable of supporting up to a maximum of 8 Handsets. Using additional Handsets, several people can be using the cordless system at the same time. Some examples: * 2 Handsets conferenced on a Line 1 call; while 2 additional Handsets are conferenced on a Line 2 call. * 2 Handsets conferenced on a Line 1 call; while another Handset is in Intercom mode with the Base Unit.
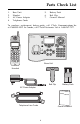
Parts Check List 1. 2. 3. 4. 5. 6. 7. Base Unit Handset AC Power Adapter Telephone Cords Battery Pack Belt Clip Owner's Manual To purchase replacement battery packs, call VTech Communications Inc at 1-800-595-9511. In Canada, call VTech Electronics Ltd at 1-800-267-7377. INTERCOM/ TRANSFER 1 L1 OFF FLASH GHI GHI 2 ABC 3 DEF 5 JKL 6 MNO 7 PQRS TONE 7 PQRS * TONE HANDSFREE 2.
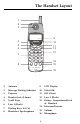
The Handset Layout 1 2 3 9 4 5 6 L1 7 4 GHI 7 PQRS * L2 FLASH CLEAR 1 8 OFF FLASH TONE HANDSFREE 2.4GHz 2 ABC 3 DEF 5 JKL 6 MNO 8 TUV 9 WXYZ OPER # 0 INTERCOM/ TRANSFER 10 11 12 13 14 15 VOLUME GIGAPHONE 16 1. Antenna 9. LCD Display 2. Message Waiting Indicator 10. Select/OK 3. Earpiece 11. Off (Clear) 4. Headset Jack (2.5mm) 12. Line 2 (Flash) 5. Scroll Keys 13. 6. Line 1 (Flash) Battery Compartment(back of Handset) 7.
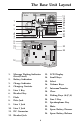
The Base Unit Layout 1 INTERCOM/ TRANSFER 8 TUV 9 WXYZ 0 OPER # 4 3 8L55 CANADA 1135 102 1814A MODEL : 20-2481 REN/IES:X.X VTECH TELECOMMUNICATIONS LTD. IC:RSS/CNRXXX MANUFACTURED IN CHINA HAC FCC ID: EW780-5001-00 COMPLIES WITH 47 CFR PART 68 REGISTRATION NO.: US: EW7 WI00B80-513700 RINGER EQUIVALENCE: 0.0B USOC JACK: RJ11C, RJ14C THIS DEVICE COMPLIES WITH PART 15 OF THE FCC RULES.
To telephone socket outlet 8L55 VTECH COMMUNICATIONS LTD. DC 7V 900mA CLASS 2 POWER SOURCE ONLY To AC outlet CORDLESS TELEPHONE CANADA 1135 102 1814A MODEL : 20-2481 REN/IES:X.X VTECH TELECOMMUNICATIONS LTD. IC:RSS/CNRXXX MANUFACTURED IN CHINA HAC FCC ID: EW780-5001-00 COMPLIES WITH 47 CFR PART 68 REGISTRATION NO.: US: EW7 WI00B80-513700 RINGER EQUIVALENCE: 0.0B USOC JACK: RJ11C, RJ14C THIS DEVICE COMPLIES WITH PART 15 OF THE FCC RULES.
Getting Starte Setup Checking for dial tone After the battery is charged press a LINE key on the Handset. PHONE ON will appear on the Handset display, and you will hear dial tone. If not, see In Case of Difficulty. Tone/Pulse selection See SELECT TONE/PULSE AT THE BASE UNIT for details. CAUTION: Use only the Vtech power supply provided with your cordless phone. IMPORTANT: FOR MAXIMUM PERFORMANCE OF YOUR CORDLESS TELEPHONE SYSTEM: 1. Choose a central location for your Base Unit. 2.
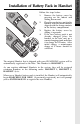
Follow the steps below: 1. 1 3 2. 3. 4. Remove the battery cover by pressing on the indent and sliding downward. Place the new battery pack in the handset with the metal contacts aligned with the charge contacts in the battery compartment. Replace the battery cover by sliding it upwards. If the new battery pack is not already charged, place the handset in the base unit, or a remote charging stand, and allow it to charge for 12 hours.
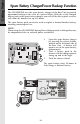
Getting Starte Spare Battery Charger/Power Backup Function The GIGAPHONE uses the spare battery charger in the Base Unit to provide operational backup in the event of a power failure. With the a fully charged battery pack in the spare battery charger, you will still be able to place a receive calls from the handset for up to 5 hours. The spare battery pack can also be used to replace a drained handset battery, ensuring uninterrupted use.
Charging Of Handset Battery Pack The Handset of your GIGAPHONE cordless telephone is powered by a rechargeable battery pack. It charges automatically whenever the Handset is in the Base Unit. You should charge the battery pack for 12 hours when you first receive your phone. You'll know the battery pack needs charging when: • The low battery message is displayed : • The handset seems completely dead, the LCD is completely clear and does not activate when you press the keys. IMPORTANT: 1. 2. 3. 4.
Getting Starte Registration and Operation Registration And Operation Of The VTech VT20-2420 Accessory Handset Your VTech GIGAPHONE system can operate up to 8 Handsets. The VTECH accessory Handset consists of the following: L1 OFF FLASH 4 GHI 7 PQRS * L2 FLASH CLEAR 1 TONE HANDSFREE 2.
Enter Base ID Code 1. After charging the Handset, remove it from its Charge Cradle; the screen will display: OK alternating with this screen: 2. If, after charging the Handset, you see: 3. Press NEW. You will now see the ENTER BASE ID screen as described in step 1. 4. Find the BASE ID Code by doing the following: (the Base must be in idle (OFF) mode) A. At the Base, press MENU B. Scroll down to DISPLAY BASE-ID C. Press OK.
Handset and Base Indicators Handset Icons Description Icon 1 Basic Operation 2 Line In Use indicator On steady with no number next to it when a parallel set is in use. On steady with one or more numbers next to it, indicating which extensions are using the line. For example, 1 02 indicates that Base (0) and Handset 2 are on a call on Line 1. Intercom indicator On steady with the extension numbers currently on an intercom call.
Handset and Base Indicators LED Description Message Waiting • Flash to indicate that you have new messages in your voicemail. Service must be subscribed to through your local telephone company. Base LEDS LED Description Line 1Message • Flashes to indicate that you have new messages in your voicemail. Service must be subscribed to through your local Waiting/Line 2 Message Waiting telephone company Line 1 Line 2 • Lights when line is being used by the GIGAPHONE system.
Soft Menu Functions The GIGAPHONE has an advanced design that uses a menu structure and soft keys to access all of the built-in features. Example of the idle mode display: Basic Operation RDL (Redial) Press RDL to display the last 5 telephone numbers dialed. The number on the top line is the most recent number dialed. • Use the scroll keys to select the desired the number. • To dial the number, you can simply press a LINE or the HANDSFREE key.
Call History (Caller ID) As new Caller ID/Call Waiting ID are received, your Handset and Base displays will alert to the new, Caller ID records, for example: The number of new calls displayed on each system Handset and Base may not be the same. If, for example, you answer a call on Handset 2, that Handset will not count the Caller ID information for that call as new. However, the other registered Handsets and Base displays will consider it a new call, and add it to the NEW CALLS total.
Call History (Caller ID) DIAL OPTION SHORTCUT Basic Operation With a Caller ID record displayed, press *. The 4 possible dialing options are displayed. Scroll to the desired dialing option, then press DIAL, or the desired LINE key to dial. You can also delete and save Caller ID records in the Directory: DELETE With a Caller ID record displayed, press MENU. DIAL Scroll to DELETE CID 4. Press OK. The CID record is displayed, with the choices THIS (delete only this record) and ALL (delete all CID records).
Handset and Base Settings RINGERS Handset: Press MENU, scroll to HANDSET SETTINGS, then press OK. RINGERS will be highlighted; press SET. Highlight the desired adjustment, then press SET. VOLUME : Use to sample the choices of loudness. There are five: OFF, LOW, MEDIUM, MEDIUMHIGH and HIGH. Press OK to confirm your selection. MELODY : Use your selection. to sample the six melodies. Press SAVE to confirm Base Unit: Press MENU, scroll to SETUP BASE,then press OK.
Handset and Base Settings KEYPAD TONE Basic Operation Select this option to turn the Keypad tones On or Off. Press the OFF or ON soft keys, to make your selection. Press OK to confirm your selection and return to the Handset Settings menu. When set to ON, the Handset will emit a beep whenever a key is pressed. Base Unit: Press MENU, scroll to SETUP BASE, then press OK. Scroll to KEYPAD TONE; press OK. Choose ON or OFF, then press OK to confirm your choice.
Handset and Base Settings · · Scroll to RANGE EXTENDER, then press SET. Your choices are OFF, ON and AUTO. Select OFF to disable Range Extender. Select ON to enable Range Extender. When the Handset is in use, an ‘E’ icon will appear in the upper left corner of the display, indicating that this feature is active. Select AUTO to allow your GIGAPHONE Handset to activate this feature when conditions warrant it. Scroll to the desired setting, then press OK.
Register and MEM (Memory) Register Basic Operation Use this option to register a Handset to the GIGAPHONE Base. You can register a total of eight Handsets to the GIGAPHONE Base. This process is activated automatically whenever a new handset is powered up in range of the GIGAPHONE Base. You will be prompted to enter the 15-digit Base ID code which can be found on the Base Unit screen see Registration and operation finding the Base Unit ID code. printed on the underside of the base unit.
Soft Mem Functions • Starting from the idle screen, enter the number you want to store in memory. If you make a mistake, press OFF to backspace. • Be sure to include long distance codes and pauses, (using the Pause softkey) if necessary. Press the MEM softkey. • You will then be prompted to ENTER NAME. Use the digit keys to 'spell' the name. If you make a mistake, press the CLR softkey. To enter a space press aa . When finished, press SAVE.
Soft Mem Functions Basic Operation To Search For and Dial a Number/ Name: • Starting from the idle screen, press the MEM softkey to review memory contents. • Using the softkeys scroll through the memory contents in alphabetical order. • Or, you can press the FIND softkey, enter the first few chararcters of the name and then press FIND to search. If you make a mistake, press CLR softkey. The closest match, in alphabetical order, will be displayed.
Soft Mem Functions • Press the DEL softkey. Handset will display: The • To delete this record, press THIS. • To confirm the deletion of ALL records, press YES. To exit without deleting press NO. Basic Operation • To Edit a Number • Using the steps in To Search For and Dial a Name/Number, locate the entry you want to edit. • Press the EDIT softkey twice. The Handset will display: • Select NAME or NUM.
Advanced Operations Handset and Base Operation Making Calls From the Handset • Press a LINE key (or, HANDSFREE to use the Handset Speakerphone feature). • Dial the phone number. -OR- • L1 OFF FLASH 7 * FLASH CLEAR 1 4 L2 2 GHI PQRS TONE HANDSFREE 2.4GHz ABC 3 5 JKL 6 MNO 8 TUV 9 WXYZ OPER # 0 INTERCOM/ TRANSFER DEF Dial the phone number first; then press a LINE key(or HANDSFREE).
Handset and Base Operation Redial From either Handset or Base Unit Each system Handset and Base Unit will remember the last 5 phone numbers dialed. From the idle mode, press RDL. Scroll until the desired phone number is highlighted. Then press the appropriate LINE key to dial the number ( follow the above instructions in Making Calls). You can also delete and save ‘redial’ numbers in the Directory. ERASE Press RDL. Scroll to the desired phone number, press SELECT then press ERASE. SAVE Press RDL.
Handset and Base Operation If the Base is active on one line when the idle line rings, you will hear a special alert tone, signifying an inbound call. This alert is designed to minimize disruption of the call in progress. You can then: • Press SPEAKERPHONE (or HEADSET if you are using a Headset connected to the Base) to end the first call, then answer the new call; - or – • Press the HOLD soft key to place the original call on hold.
Handset and Base Operation Mute Function During an active call pressing either the MUTE soft key on the Handset or the MUTE key on the Base (when in Speakerphone or Headset mode), will disable the microphone. Press MUTE key again to return to normal 2-way conversation. Hold Function 4 GHI 7 PQRS TONE Flash Function 2 ABC 3 5 JKL 6 MNO 8 TUV 9 WXYZ 0 OPER # DEF From the Base : • During an active call, press the HOLD soft key to place a call on hold.
Handset and Base Operation -ORPress the VOLUME key, located on the lower right edge of the Handset. Repeated pressing of the VOLUME key will cycle through the 5 volume levels. A rapid succession of beeps indicates you have reached the maximum or minimum volume setting. BASE SPEAKERPHONE HEADSET VOLUME: • During an active call simply press the Volume UP or DOWN keys to adjust the Speakerphone or Headset volume.
Handset and Base Operation Handsfree Speakerphone Operation Your GIGAPHONE Handset has a built-in handsfree Speakerphone. This feature allows you to stand the Handset upright on a table or desktop and have handsfree conversations. For more information, refer to MAKING CALLS in HANDSET AND BASE OPERATION. Switching from the Handset Earpiece to Handsfree While on a call using the Handset earpiece, press HANDSFREE on the lower left portion of the Handset.
Handset and Base Operation When both lines are in use at the same time, the LINE_IN USE message will alternate between 1 and 2. Low Battery Indication When a low battery is detected, the Battery icon will flash and a warning beep is played. The status message LOW BATTERY will also be displayed when the Handset is in idle mode. To prevent an unexpected call drop, a drained Handset battery should be replaced by a fully charged spare battery.
Handset and Base Operation Transferring Calls You can transfer calls on the GIGAPHONE system from the Base to Handset, Handset to Handset, or Handset to Base. Announced Transfer: You can perform an announced transfer (call and advise another extension) of an active call by doing the following steps: • Handset or Base must be on an active call. • Place the active call on HOLD. • Press the INTERCOM key. Scroll to the desired destination of your transfer. Then press OK.
Headset Operation connected to the Handset Your GIGAPHONE Handset is equipped with a 2.5mm Headset Jack for use with an optional accessory Headset for hands-free operation. If you choose to use the Headset option, you must obtain an optional accessory Headset, which is compatible with the GIGAPHONE. To purchase a Headset, call VTECH Customer Service at 1-800-595-9511. Once you have a compatible 2.5mm Headset, locate the Headset Jack on the GIGAPHONE Handset.
Maintenance Taking Care Of Your Telephone Your GIGAPHONE cordless telephone contains sophisticated electronic parts, so it must be treated with care. Avoid rough treatment Place the Handset down gently. Save the original packing materials to protect your telephone if you ever need to ship it. Avoid water Your telephone can be damaged if it gets wet. Do not use the Handset outdoors in the rain, or handle it with wet hands. Do not install your Base Unit near a sink, bathtub or shower.
Additional Information In Case Of Difficulty If you have difficulty operating your phone, the suggestions below should solve the problem. If you still have difficulty after trying these suggestions, call VTECH Communications at 1-800-595-9511. In Canada, call VTECH Electronics at 1-800-267-7377. The Phone Doesn't Work At All • • • • Make sure the Power Cord is plugged in. Make sure the telephone line cord is plugged firmly into the Base Unit and the telephone wall jack.
In Case Of Difficulty You Hear Other Calls While Using Your Phone • Disconnect your Base Unit from the telephone jack, and plug in a regular telephone. If you still hear other calls, the problem is probably in your wiring or local service. Call your local telephone company. You Hear Noise In The Handset, And None Of The Keys Or Buttons Work • Make sure the power cord is plugged in.
Additional Information Warranty Statement What does this limited warranty cover? • The manufacturer of this VTECH product, VTECH Communications, warrants to the holder of a valid proof of purchase (“Consumer” or “you”) that the product and all accessories provided by VTECH in the sales package (“Product”) are free from material defects in material and workmanship, pursuant to the following terms and conditions, when installed and used normally and in accordance with operation instructions.
Warranty Statement or 6. Product purchased, used, serviced, or shipped for repair from outside the United States, or used for commercial or institutional purposes (including but not limited to Products used for rental purposes ) ;or 7. Product returned without valid proof of purchase (see 2 below); or 8. Charges for installation or set up , adjustment of customer controls. and installation or repair of systems outside the unit.
Warranty Statement There are no other express warranties. No one is authorized to make modifications to this limited warranty and you should not rely on any such modification. State Law Rights: This warranty gives you specific legal rights, and you may also have other rights which vary from state to state.
FCC and IC Regulations This equipment complies with Parts 15 of the Federal Communications Commission (FCC) rules for the United States. It also complies with regulations RSS210 and CS-03 of Industry and Science Canada. Operation is subject to the following two conditions: (1) this device may not cause interference, and (2) this device must accept any interference, including interference that may cause undesired operation of the device.
Additional Information FCC and IC Regulations FCC and ACTA Information If this equipment was approved for cornection to the telephone network prior to July 23,2001, it was registered with the Federal Commissions (FCC) in accordance with Part 68 of its rules. If the equipment was approved after that date, it complies with the Part 68 rules and with Technical Requirements for Connection of Equipment to the Telephone Network adopted by the Administrative Council for Terminal Artachments (ACTA).
FCC and IC Regulations 5. Hearing aid compatibility If this product is equipped with a corded or cordless handset, it is hearing aid compatible. 6. Programming/testing of emergency numbers If this product has memory dialing locations, you may choose to store police, fire department and emergency medical service telephone number in this locations. If you do, please keep three things in mind: a.
FCC and IC Regulations Users should ensure for their own protection that the electrical ground connections of the power utility, telephone lines and internal metallic water pipe system, if present, are connected together. This precaution may be particularly important in rural areas. Caution : Users should not attempt to make such connections themselves, but should contact the appropriate electrical inspection authority, or electrician, as appropriate.
Technical Specifications FREQUENCY CONTROL WEIGHT Crystal controlled PLL synthesizer Handset : 116 grams Base : 587 grams (excluding battery pack) TRANSMIT FREQUENCY 2401.056 - 2481.408 MHz POWER REQUIREMENTS RECEIVE FREQUENCY Handset : 2.4V 1500mAh NiMH/ 2.4V 800mAh Ni-Cd Battery Pack 2401.056 - 2481.408 MHz CHANNELS 94 Channels Base : 7 VDC @ 900mA MEMORY NOMINAL EFFECTIVE RANGE Maximum power allowed by FCC and IC.
Table Of Contents 1. Important Safety Instructions 3. Introduction 4. 5. 6. Parts Check List The Handset Layout The Base Unit Layout 7. Getting Started 7. 9. Setup Installation of Battery Pack in Handset 10. Spare Battery Charger/Power Backup Function 11. Charging Of Handset Battery Pack 12. Registration and Operation 14. Basic Operation 14. 16. 16. 16. 17. 19. 22. 23. 23. 24.
VTECH TELECOMMUNICATIONS LTD. A member of THE VTECH GROUP OF COMPANIES. Distributed in the U.S.A. by VTech Communications Inc.; Beaverton, Oregon. Distributed in Canada by VTech Electronics Canada Ltd., Suite 200-7671 Alderbridge Way Richmond, B.C. V6X 1Z9. Copyright 2002 for VTECH TELECOMMUNICATIONS LTD.
ACCESSORY HANDSET FOR USE WITH VT20-2431/VT20-2481 MODELS 20-2420 ACCESSORY HANDSET Introduction EXPAND YOUR GIGAPHONE SYSTEM. YOUR 2-LINE BASE WILL WORK WITH UP TO 8 HANDSETS!!! IMPORTANT: The VT20-2420 is an Accessory Handset for use with either the VT20-2431or VT202481 GIGAPHONE system. You must have one of these 2-Line models in order to use the VT20-2420 Accessory Handset. This manual is designed to familiarize you with the VT20-2420 Accessory Handset setup, registration and basic functions.
Important Safety Instructions When using your telephone equipment, basic safety precautions should always be followed to reduce the risk of fire, electric shock and injury, including the following: 12. Unplug this product from the wall outlet and refer servicing to VTECH under the following conditions: 1. 2. 3. Read and understand all instructions. A. When the power supply cord or plug is damaged or frayed. Follow all warnings and instructions marked on the product. B.
Getting Started Installation of Battery Pack in Handset Setup Registration And Operation Of The VTECH VT20-2420 Accessory Handset Your VTECH 2-Line GIGAPHONE system can operate up to 8 Handsets. The VTECH accessory Handset consists of the following: L1 4 2 GHI 7 PQRS * TONE HANDSFREE 2.
Registration The Handset Layout Enter Base ID Code 1. 1 2 3 After charging the Handset, remove it from its Charge Cradle; the screen will display: OK alternating with this screen: 9 4 5 6 2. 7 * 8 4. 4 GHI 7 PQRS Press NEW. You will now see the ENTER BASE ID screen as described in step 1. Find the BASE ID Code by doing the following: (the Base must be in idle (OFF) mode) OFF L2 FLASH CLEAR 1 If, after charging the Handset, you see: MENU 3. L1 FLASH TONE HANDSFREE 2.
Handset Operation Handset Indicators Handset Icons Icon 1 Description 2 Line In Use indicator On steady with no number next to it when a parallel set is in use. On steady with one or more numbers next to it, indicating which extensions are using the line. For example, 1 12 indicates that Handset 1 and Handset 2 are on an outside call using Line 1. Additional Information Your GIGAPHONE 2-Line cordless Handset is equipped with a 2.
Maintenance In Case Of Difficulty Your GIGAPHONE cordless telephone contains sophisticated electronic parts, so it must be treated with care. If you have difficulty operating your phone, the suggestions below should solve the problem. If you still have difficulty after trying these suggestions, call VTECH Communications at 1-800-595-9511. In Canada, call VTECH Electronics at 1-800267-7377. Avoid rough treatment The Phone Doesn't Work At All Place the Handset down gently.
Warranty Statement In Case Of Difficulty • You may have too many extension phones on your telephone line to allow all of them to ring. Try unplugging some of the other phones. You Hear Other Calls While Using Your Phone • Disconnect your Base Unit from the telephone jack, and plug in a regular telephone. If you still hear other calls, the problem is probably in your wiring or local service. Call your local telephone company.
Warranty Statement Warranty Statement States, or used for commercial or institutional purposes (including but not limited to Products used for rental purposes ) ;or 7. Product returned without valid proof of purchase (see 2 below); or 8. Charges for installation or set up, adjustment of customer controls, and installation or repair of systems outside the unit.
FCC and IC Regulations This equipment complies with Parts 15 of the Federal Communications Commission (FCC) rules for the United States. It also complies with regulations RSS210 and CS03 of Industry and Science Canada. Operation is subject to the following two conditions: (1) this device may not cause interference, and (2) this device must accept any interference, including interference that may cause undesired operation of the device.
FCC and IC Regulations with the FCC. Your telephone company may make changes in facilities, equipment, operation, or procedures that could affect the proper functioning of this product. The telephone company is required to notify you if such changes are planned. 5. Hearing aid compatibility If this product is equipped with a corded or cordless handset, it is hearing aid compatible. 6.
Technical Specifications FREQUENCY CONTROL WEIGHT Crystal controlled PLL synthesizer Handset : Charger : TRANSMIT FREQUENCY POWER REQUIREMENTS 2401.056 - 2481.408 MHz Handset : 2.4V 1500mAh NiMH or 2.4V 800mAh Ni-Cd Battery Pack Charger : 6 VDC @ 300mA RECEIVE FREQUENCY 2401.056 - 2481.408 MHz CHANNELS 94 Channels NOMINAL RANGE 116 grams (excluding battery pack) 200 grams MEMORY Speed Dial : 50 Memory locations, up to 32 digits per location.