Important Safety Instructions When using your telephone equipment, basic safety precautions should always be followed to reduce the risk of fire, electric shock and injury, including the following: 1. Read and understand all instructions. 2. Follow all warnings and instructions marked on the product. 3. Unplug this product from the wall outlet before cleaning. Do not use liquid cleaners or aerosol cleaners. Use a damp cloth for cleaning. 4.
Important Safety Instructions VTECH COMMUNICATIONS, INC. CUSTOMER SERVICE : 1-800-595-9511. In Canada, call VTech Telecommunications Canada Ltd. at 1-800-267-7377. BEFORE USING YOUR i 5881 SYSTEM, CAREFULLY PEEL OFF THE PROTECTIVE FILM, COVERING THE DISPLAYS.
Introduction The i 5881 is an advanced cordless telephone that operates in the 5.8GHz frequency range. Your i 5881 is capable of supporting up to a maximum of 6 Handsets. Using additional Handsets, up to three people can be conferenced on a call (2 Handsets and the Base Speakerphone), or two extensions can be conferenced on a call, while two other extensions can be talking internally, using the Intercom feature. This manual is designed to familiarize you with the i 5881 cordless telephone.
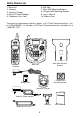
Parts Check List 1. 2. 3. 4. 5. 6. Belt Clip 7. Base Wall Mounting Bracket 8. Charger Wall Mounting Bracket 9. User’s Manual 10. Battery Pack Base Unit Handset Handset Charger Base AC Power Adapter Telephone Line Cord To purchase replacement battery packs, call VTech Communications, Inc. at 1-800-595-9511. In Canada, call VTech Telecommunication Canada Ltd. at 1-800-267-7377.
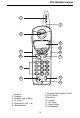
The Handset Layout 1 7 2 8 9 3 4 10 11 5 12 6 13 7. Incoming Call/Handset On LED 8. LCD Display 9. Soft Keys 10. Volume 11. Off (Clear) 12. Sound Select 13. Microphone 1. Antenna 2. Earpiece 3. Headset Jack (2.5mm) 4. On (Flash) 5. Dialing Keys (0-9, *, #) 6.
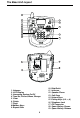
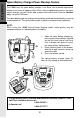
The Base Unit Layout 1 2 11 3 12 4 5 13 6 7 8 9 10 14 15 18 16 19 17 1. Antenna 2. LCD Display 3. Answering System On/Off 4. Time/Set, Record, Menu, Change 5. Clear 6. Delete 7. Flash 8.Mailbox Keys 9. Repeat/Slow 6 10. Skip/Quick 11. Intercom 12. Speaker Phone 13. Soft Keys 14. Volume Keys 15. Dialing Keys (0-9, *, #) 16. Telephone Jack 17. DC Connector 18. Spare Battery Drawer 19.
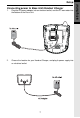
Connecting power to Base Unit/Handset Charger 1. Plug the AC power adapter into an electrical outlet, and the DC connector into the bottom of the Base Unit. 2. Choose the location for your Handset Charger, and plug its power supply into an electrical outlet.
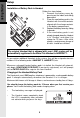
Getting Started Setup Installation of Battery Pack in Handset 1 Follow the steps below: 1. Remove the battery cover by pressing on the indent and sliding downward. 2. Place the new battery pack in the Handset with the metal contacts aligned with the charge contacts in the battery compartment. 3. Replace the battery cover by sliding it upwards. 4. If the new battery pack is not already charged, place the Handset in its Charger, and allow it to charge for 12 hours.
IMPORTANT: 1. 2. 3. 4. Do not dispose of a battery pack in a fire, the cell may explode. Do not open or mutilate the battery pack. Toxic substances may be released, causing harm to eyes or skin. Exercise care in handling battery packs in order to prevent an accidental short of the charge contacts, potentially causing the battery pack to overheat. Do not dispose of this battery pack into household garbage. Please refer to the information concerning proper battery recycling.
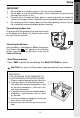
Getting Started Spare Battery Charger/Power Backup Feature The i 5881 uses the spare battery charger in the Base Unit to provide operational backup in the event of a power failure. With a fully charged battery pack in the spare battery charger, you will still be able to place and receive calls from the Handset only, for up to 2 1/2 hours. The spare battery pack can also be used to replace a drained Handset battery, ensuring uninterrupted use. The spare battery pack is optional and purchased separately.
The Wall Mount brackets are designed for use on standard wall mount plates only. Wall mounting is optional. 1. 2. 3. 4. Plug the AC adapters into an electrical outlet, and the DC connector to the bottom of the Base Unit. Connect the telephone line cord to the jack on the bottom of the Base Unit, and the other end to the wall jack. Line up the tabs on the wall mount adapters with the holes on the bottom of the Base Unit/back of the Handset Charger. Snap the wall mount bracket firmly in place.
Getting Started Registration and Operation Expand your i 5881 system by adding accessory Handsets. Bring telephone service to rooms where a phone jack isnít available! Registration and Operation Of The VTech VT 5820 Accessory Handset Your VTech i 5881 system can operate up to 6 Handsets. The VT 5820 accessory Handset consists of the following: Charger Wall Mounting Bracket Handset Handset Charger Belt Clip Setup Of The VT 5820 Accessory Handset 1. 2. 1 3. 3 4. 5.
Your i 5881 Handset comes registered to the Base Unit. To register additional VT 5820 Handsets, follow these steps: Enter Base ID Code 1. After charging the Handset, remove it from its Charge Cradle; the screen will display: alternating with this screen: 2. If, after charging the Handset, you see: 3. Press NEW. You will now see the ENTER BASE ID screen as described in step 1. Find the BASE ID Code by doing the following: (the Base must be in idle (OFF) mode) A. At the Base, press MENU B.
Handset and Base Indicators Handset Icons Icon Description Basic Operations Line In Use indicator On steady with no number next to it when a parallel set is in use. On steady with one or more numbers next to it, indicating which extensions are using the line. For example, 12 indicates that Handset 1 and Handset 2 are on an outside call. Intercom indicator On steady with the extension numbers currently on an intercom call. For example, 02 indicates that the Base and Handset 2 are on an intercom call.
Handset and Base Indicators Handset LEDs Incoming Call / Handset ON LED Description • Flashes with the incoming ringing. It also illuminates for 5 seconds after answering or making a call. Basic Operations LED Base Unit Icons Icon Description Ringer Off indicator is displayed when the Base ringer is turned off. Battery indicator Cycles (Low, Medium and Full) when a battery pack is charging in the spare battery compartment.
Soft Menu Functions The i 5881 has an advanced design that uses a menu structure and soft keys to access many of the features. Basic Operations Example of the idle mode display: REDIAL From the Handset: Press REDIAL to display the last 10 telephone numbers dialed from the Handset. The number on the top line represents the last number dialed. • Use the scroll keys to highlight the desired number. • To dial, press ON/FLASH SPEAKERPHONE.
Soft Menu Functions To dial, press SPEAKER PHONE. Erasing Numbers in Redial Memory (Handset or Base) • Press REDIAL, then scroll to the desired number. • Press SELECT, then ERASE. Saving Redial Numbers in Phone Book Memory (Handset or Base) • Press REDIAL, then scroll to the desired number. • Press SELECT, then SAVE. • You will be asked to ENTER NAME. Use the keypad to enter the desired name (see To Store a Number/Name for more information). • Press SAVE.
Soft Menu Functions Basic Operations HANDSET MENU With the Handset in the idle (OFF) mode, press MENU to access the following options: • CALLS LOG (Caller ID) • INTERCOM • HANDSET SETTINGS • SET TIME • CLOCK MODE • REGISTER Use the scroll keys to select the desired option, then press OK. Press the OFF/CLEAR key to step back through the menu structure. Press and hold the OFF/CLEAR key to immediately return to the idle screen.
Clock Mode (preset to ON) • At the Handset, press MENU, scroll down to CLOCK MODE, then press OK. • Press OFF (or ON), then press OK. 12 9 3 6 Basic Operations When your i 5881 is idle (OFF), the LCD displays the time of day, with both a digital and analog (clock face) readout. If you do not want the time displayed, follow these steps: You can activate and deactivate Clock Mode as often as you wish.
Calls Log (Caller ID) Reviewing Caller ID from the Handset or Base Basic Operations As new Caller ID/Call Waiting ID records are received, your Handset and Base displays will alert you to the new Caller ID records, for example: The number of new calls displayed on each system Handset and Base may not be the same. If, for example, you answer a call on Handset 2, that Handset will not count the Caller ID information for that call as new.
OPT# : Select this option to display up to four possible dialing strings of the number stored in Caller ID memory. If a number is provided in the Caller ID data, the possible options to choose from will be either 7, 8, 10, or 11 digits. For example, if the original number in Caller ID memory was 808-880-8808, then the display options will be: Use the and keys to make selection, and then press DIAL, ON or SPEAKERPHONE to dial the number.
Handset Settings From the HANDSET SETTINGS menu you can select the following options to modify: Basic Operations • RINGER VOLUME Select this option to adjust the ringer volume. scroll keys to adjust the Use the volume up or down. You will see a graph on the Handset display indicating the relative volume setting. At the lowest setting (graph is completely clear), the Handset will not ring when a call comes in. Press OK to confirm your setting.
Handset Settings Select this option to turn the Keypad tones on or off. Press the OFF or ON soft key to make your selection. Press OK to confirm your selection and return to the HANDSET SETTINGS menu. When set to ON, the Handset will emit a beep whenever a key is pressed. • CONTRAST Select this option to adjust the contrast level of the Handset display. Use the scroll keys to make your selection. The Handset display will automatically adjust as you make your selection.
Base Settings Basic Operations To access Base Settings, with the Base in the idle (OFF) mode, press MENU, scroll down to BASE SETTINGS, then press OK. You can now access the following setting options: • RINGER VOLUME • RINGER MELODY • KEYPAD TONE • TONE/PULSE • CONTRAST • LANGUAGE Press CLEAR at any time to back out of Base Settings mode. RINGER VOLUME To adjust the Base Unit ringer volume: • • • • Press MENU. Scroll down to BASE SETTINGS, then press OK. RINGER VOLUME will be highlighted.
Base Settings KEYPAD TONE (preset to ON) • • • Press MENU. Scroll down to BASE SETTINGS, then press OK. Scroll down to KEYPAD TONE. Press OK. Choose ON or OFF. Press OK to confirm your selection. TONE/PULSE (preset to TONE) If you want to change your dialing mode, follow these steps: • • • Press MENU. Scroll down to BASE SETTINGS, then press OK. Scroll down to TONE/PULSE. Press OK. Choose TONE or PULSE. Press OK to confirm your selection.
MEM (Memory) The i 5881 can store up to 50 names/numbers in memory. Each memory location can hold up to 32 digits and up to 16 characters for the name. Basic Operations When prompted to ENTER NAME, use the digit keys to ‘spell’ the name. Each press of a particular key causes characters to be displayed in the following order: Number Key Characters (in order) 1 &‘,.
Mem (Memory) • Starting from the idle screen, enter the number you want to store in memory. • Be sure to include long distance codes and pauses (using the PAUSE softkey) if necessary. Press the MEM softkey. • You will then be prompted to ENTER NAME. Use the digit keys to ‘spell’ the name. If you make a mistake, press the CLEAR softkey. To enter a space press . When finished, press SAVE.
Mem (Memory) Basic Operations To Search For and Dial a Number/ Name: • Starting from the idle screen, press the MEM softkey to review memory contents. • Using the softkeys scroll through the memory contents in alphabetical order. • Or, you can press the FIND softkey, enter the first few chararcters of the name and then press FIND to search. If you make a mistake, press CLEAR softkey. The closest match, in alphabetical order, will be displayed.
• Press the DEL softkey. The screen will display: • To delete this record, press THIS. The record will be deleted, and the next entry in the phonebook will be displayed. • To delete all records in your phonebook memory, press ALL. The display will ask ARE YOU SURE? • To confirm the deletion of ALL records, press YES. To exit without deleting press NO. To Edit a Number • Following the first 3 steps in To Search For and Dial a Number/ Name, locate the entry you want to edit.
Handset and Base Operation Making Calls From the Handset • • • Press ON (or, SPEAKERPHONE to use the Handset Speakerphone feature). Dial the phone number. -ORDial the phone number first; then press ON (or SPEAKERPHONE). Press OFF to end your call. Answering Calls Advanced Operations From the Handset • Press any key except OFF and the softkeys. • Press OFF to end your call. -OR• Place the Handset in charger cradle to end your call. Making Calls From the Base Unit • Press SPEAKERPHONE.
Handset and Base Operation How to Adjust the Handset Volume The volume control is on the right edge of or the Handset. During a call, press the key to adjust the listening volume to a comfortable level. The procedure is the same for the Handset earpiece, Headset and Speakerphone. Base Speakerphone Volume NOTE: To adjust the playback volume of the Answering System, see Adjust Playback Volume on page 39. Sound Select During a call, you can adjust the quality of the sound to best suit your hearing.
Handset and Base Operation NATURAL - No frequency enhancement (Your Handset is preset with this selection) The Handset will graphically display the four modes. Mute Function During an active call pressing either the MUTE soft key on the Handset or the MUTE softkey on the Base (when in Speakerphone mode), will disable the microphone. Press MUTE again to return to normal 2-way conversation. Hold Function From the Handset : Advanced Operations • Press the HOLD soft key to place a call on hold.
Handset and Base Operation Intercom From Base to ALL Handsets : • • • • To page all Handsets from the Base press the INTERCOM key. Scroll to GLOBAL PAGE, then press OK. Each Handset will display GLOBAL CALL FROM BASE. Any Handset can then answer the page, and enter intercom mode with the Base by pressing ON or any number key. To end an intercom call, press OFF on the Handset or INTERCOM on the Base. • • • Press the Base INTERCOM key, then scroll to the Handset you want to call (e.g. HANDSET 2).
Handset and Base Operation Handsfree Speakerphone Operation Your i 5881 Handset has a built-in handsfree speakerphone. This feature allows you to stand the Handset upright on a table or desktop and have handsfree conversations. For more information, refer to MAKING CALLS in HANDSET AND BASE OPERATION. Base Speakerphone Operation The Base of your i 5881 is equipped with a full duplex speakerphone. This is a very useful feature for handsfree conversations or conference calls at the Base Unit.
Handset and Base Operation Conference Calling The i 5881 is capable of supporting conference calls with up to two registered Handsets, and the Base Unit. To enter a conference call, simply access the line with two or more extensions by pressing ON (or SPEAKERPHONE) on the Handset or SPEAKERPHONE on the Base. and two or more extension numbers will be displayed in the The phone icon upper left corner of the Handset.
Answering System Operation Audible Indicators This system gives you voice prompts for feature operations and voice confirmations when you press a button or complete an operation. Turn Answering System On/Off When you supply power to the Base Unit, the answering system is automatically turned ON. Press ON/OFF to manually turn the system off or on. A voice prompt will confirm your selection. When the answering system is ON, the light inside the button will glow steadily.
Answering System Operation • By setting Announce Only to on or off, you decide which announcement your callers will hear when the system answers a call (the system comes set for normal answering, with Announce Only turned OFF). See “Set Announce Only” on page 38 to change your announcement selection. Record Your Announcement ï NOTE: If you have assigned different mailboxes to different people, be sure to tell callers in your announcement to press 1 , 2 , or 3 to leave a message in the appropriate mailbox.
Answering System Operation the system announce the feature you want to set. Refer to the Feature Summary chart below for a description of the features and your choices. 3 Press CHANGE to hear the current setting. Continue to press CHANGE to adjust the current setting. 4 Press TIME/SET to confirm your setting. 5 Press MENU to move on to the next feature, or press a MAILBOX key to exit Feature Setup. Use the 4-Way Multi-Function Selector to program the following features.
Answering System Operation Listen to, Save & Delete Messages The system automatically saves your messages until you delete them, and can store approximately 25 minutes of messages, memos, and announcements (up to a maximum of 99 messages). A message or memo can be up to 4 minutes in length. Before playing a message, the system announces the day and time it was received. While the message plays, the message window displays the number of the message.
Answering System Operation Call Screening/Intercept 1 2 3 Make sure the answering system is ON, and the Call Screening feature is set to ON. At the Base, set the message playback volume to level loud enough to hear the caller’s message. If you decide to take the call, press ON (or SPEAKERPHONE) on the Handset or SPEAKERPHONE on the Base. The answering system will return to the idle mode.
Answering System Operation MESSAGE WINDOW DISPLAY WINDOW DISPLAYS: WHEN: 0 No messages in any mailbox 1-98 In idle mode, the total number of messages/ memos in all mailboxes. During message playback, the order number of the message being played. F Memory is full, or total number of messages is 99. Counting 1 to 9 9 Duration(in seconds) of announcement or memo recording 9 9 , flashing Length of recording is more than 99 seconds.
Answering System Operation Answering System Operation REMOTE ACCESS COMMANDS FUNCTION: COMMAND: Play messages in a mailbox Press # , then enter the appropriate mailbox number(1 , 2 , or 3 ). The system plays new messages. If there are no new messages, the system plays old messages. Repeat a message Press #4 while message is playing; each press backs up another message. Skip a message Press #6 while message is playing; each press advances another message. Stop Press #5 . Save messages Hang up.
Headset Operation Your i 5881 cordless telephone is equipped with a 2.5mm Headset Jack for use with an optional accessory Headset for hands-free operation. If you choose to use the Headset option, you must obtain an optional accessory Headset, which is compatible with the i 5881. To purchase a Headset, call VTech Customer Service at 1-800-595-9511. Once you have a compatible 2.5mm Headset, locate the Headset Jack on the i 5881 Handset.
Maintenance Taking Care Of Your Telephone Your i 5881 cordless telephone contains sophisticated electronic parts, so it must be treated with care. Avoid rough treatment Place the Handset down gently. Save the original packing materials to protect your telephone if you ever need to ship it. Avoid water Your telephone can be damaged if it gets wet. Do not use the Handset outdoors in the rain, or handle it with wet hands. Do not install your Base Unit near a sink, bathtub or shower.
In Case Of Difficulty If you have difficulty operating your phone, the suggestions below should solve the problem. If you still have difficulty after trying these suggestions, call VTech Communications at 1-800-595-9511. In Canada, call VTech Telecommunications Canada Ltd. at 1-800-267-7377. The Phone Doesnít Work At All • • • Make sure the Power Cord is plugged in. Make sure the telephone line cord is plugged firmly into the Base Unit and the telephone wall jack.
In Case Of Difficulty Your Handset vibrates or shakes when a call comes in • It is likely that your Vibrating Handset Ringer option has been set to ON. If you’d like to turn it off, see Handset Settings-VIBRATE CONTROL, on page 22. You Hear Other Calls While Using Your Phone • Disconnect your Base Unit from the telephone jack, and plug in a regular telephone. If you still hear other calls, the problem is probably in your wiring or local service. Call your local telephone company.
Warranty Statement What does this limited warranty cover? • The manufacturer of this VTech product, VTech Communications, warrants to the holder of a valid proof of purchase (“Consumer” or “you”) that the product and all accessories provided by VTech in the sales package (“Product”) are free from material defects in material and workmanship, pursuant to the following terms and conditions, when installed and used normally and in accordance with operation instructions, This limited warranty extends only to t
Warranty Statement 8. Charges for installation or set up, adjustment of customer controls, and installation or repair of systems outside the unit. How do you get warranty service? • • • To obtain warranty service in the United States of America, call 1 800-595- 9511 for instructions regarding where to return the Product. Before calling for service, please check the user’s manual. A check of the Product controls and features may save you a service call.
FCC, ACTA and IC Regulations This equipment complies with Parts 15 of the Federal Communications Commission (FCC) rules for the United States. It also complies with regulations RSS210 and CS-03 of Industry and Science Canada. Operation is subject to the following two conditions: (1) this device may not cause interference, and (2) this device must accept any interference, including interference that may cause undesired operation of the device.
FCC, ACTA and IC Regulations FCC Part 68 and ACTA If this equipment was approved for connection to the telephone network prior to July 23, 2001, it complies with Part 68 of the Federal Communications Commission (FCC) rules. If the equipment was approved after that date, it complies with the Part 68 rules and with Technical Requirements for Connection of Equipment to the Telephone Network adopted by the Administrative Council for Terminal Attachments (ACTA).
FCC, ACTA and IC Regulations may make changes in its facilities, equipment, operation, or procedures that could affect the proper functioning of this product. The telephone company is required to notify you if such changes are planned. 5. Hearing aid compatibility If this product is equipped with a corded or cordless handset, it is hearing aid compatible. 6.
FCC, ACTA and IC Regulations Before installing this equipment, users should ensure that it is permissible to be connected to the facilities of the local telecommunications company. The equipment must also be installed using an acceptable method of connection. The customer should be aware that compliance with the above conditions may not prevent degradation of services in some situations. Repairs to certified equipment should be made by an authorized Canadian maintenance facility designated by the supplier.
Technical Specifications FREQUENCY CONTROL WEIGHT Crystal controlled PLL synthesizer Handset : 138 grams (excluding Battery Pack) 432 grams 216 grams TRANSMIT FREQUENCY Base : Charger : Base : 5744.736 - 5825.952 MHz Handset: 2401.056 - 2482.272 MHz POWER REQUIREMENTS Handset : RECEIVE FREQUENCY 2.4V 1400mAh NiMH Battery Pack 7 VDC @ 900mA 6 VDC @ 300mA Base: 2401.056 - 2482.272 MHz Handset : 5744.736 - 5825.
○ Wallet Card ○ Remote Access Commands ○ ○ ○ Wallet Card FUNCTION PRESS Hear Commands Menu *5 Play Messages In a Mailbox #, then 1, 2, or 3 Repeat a Message #4 Skip a Message #6 Stop Play or Record #5 Delete Message #9 Review Announcement #7 Record Announcement *7 Record Memo *8 Turn System Off/On #0 End Remote Access *0 ○ ○ ○ ○ VTech i 5881 Digital Answering System ○ ○ ○ ○ ○ ○ ○ ○ ○ ○ ○ ○ ○ ○ ____________________________________ ○ ○ Your Remote Access Code ______
Table Of Contents Important Safety Instructions .............................................................................. 1 Introduction ............................................................................................................ 3 Parts Check List ...................................................................................................... 4 The Handset Layout ...............................................................................................
Table Of Contents To Delete a Number/Name ................................................................................. 28 To Edit a Number ................................................................................................. 29 Advanced Operations ....................................................... 30 Handset and Base Operation ............................................................................ Making Calls ......................................................................
Index Answering Calls .......................................30 Answering System Feature Setup..........37 Answering System Operation.................36 BaseUnit Layout ......................................6 Indicators ...............................15 Settings .................................24 Menu ......................................18 Battery Pack Installation ...............................8 Charging..................................8 Recycling (RBRC ) ...............52 Calls Log (Caller ID) ......
VTECH TELECOMMUNICATIONS LTD. A member of THE VTECH GROUP OF COMPANIES. Distributed in the U.S.A. by VTech Communications, Inc. Beaverton, Oregon, 97008 Distributed in Canada by VTech Telecommunications Canada Ltd. 7671 Alderbridge Way, Richmond, B.C. V6X 1Z9. Copyright 2003 for VTECH TELECOMMUNICATIONS LTD.
Introduction EXPAND YOUR VT5831 OR i 5881 SYSTEMS. YOUR BASE WILL WORK WITH UP TO 6 HANDSETS!!! IMPORTANT: The i 5801 is an Accessory Handset for use with the VT5831 or i 5881 systems. You must have one of these Base Units in order to use the i 5801 Accessory Handset. This manual is designed to familiarize you with the i 5801 Accessory Handset setup, registration and basic functions. For detailed operational instructions, please refer to the VT5831 or i 5881 User's Manual.
Important Safety Instructions When using your telephone equipment, basic safety precautions should always be followed to reduce the risk of fire, electric shock and injury, including the following: 1. Read and understand all instructions. 2. Follow all warnings and instructions marked on the product. 3. Unplug this product from the wall outlet before cleaning. Do not use liquid cleaners or aerosol cleaners. Use a damp cloth for cleaning. 4.
Important Safety Instructions C. If the product has been exposed to rain or water. D. If the product does not operate normally by following the operating instructions. Adjust only those controls that are covered by the operating instructions, because improper adjustment of other controls may result in damage. E. If the product has been dropped and the cabinet has been damaged. F. If the product exhibits a distinct change in performance. 13.
Getting Started Parts Check List 1. 2. 3. 4. 5. Handset Charger Wall Mounting Bracket Belt Clip Handset Charger Software CD-ROM Disc 6. 7. 8. 9.
1 9 2 10 11 3 4 5 12 13 14 6 15 7 16 8 1. 2. 3. 4. 5. 6. 7. 8. 9. 17 Antenna Earpiece Headset Jack and Audio Patch Cable Jack (2.5mm) Soft/Select Key On/Flash Key Dialing Keys (0-9, * , #) Speakerphone Key Speakerphone LED Message Waiting /In Use/ Incoming Ringing LED 10. 11. 12. 13. 14. 15. 16. 17.
Getting Started Setup Connecting Power to Handset Charger Because the i 5801 is an accessory Handset to the VT 5831 or i 5881, all you need to do is choose the location for your Handset Charger, and plug in the power supply into an electrical outlet. Installation and charging of Battery Pack in Handset Follow the steps below: 1. Remove the battery compartment cover by pressing on the indent and sliding downward. 2.
Battery Life A fully charged battery provides an average talk time of about 8 hours or standby time of 5 days. NOTE: Talk time and standby time may vary depending on operating conditions. Battery Indicator Ten minutes before the battery charge level gets too low to operate the Handset, an empty battery icon will start flashing, five short tones are generated, and a LOW BATTERY message is displayed.
Getting Started Registration Registering an i 5801 Handset for the first time Register After charging, the screen will display: Find the BASE ID Code by doing the following (Base must be OFF): 1) At the Base, press MENU. 2) Scroll down to DISPLAY BASE-ID, then press OK. 3) Enter the 15-digit Base ID Code into the Handset. If you make a mistake, move the joystick to the left ( ) to backpace or press the to erase a character. right softkey 4) Press OK to complete the registration process.
Handset Indicators Handset Icons Icon Description 123 456 Handset Number Indicator • Indicates the Handset number. It's permanently displayed at the top left corner after the Handset has found the Base. Searching for Base Indicator • Indicates that the Handset is still searching for the Base. Intercom Indicator • On steady with the extension numbers currently on an intercom call. For example, 02 indicates that the Base and Handset 2 are on intercom call.
Handset Menu Joystick Operation • • • Basic Operation • • This Handset is equipped with a 5-way navigation joystick: Left ( ), Right ( ), Up ( ), Down ( ),and In ( ). The joystick allows you to access the Handset’s advanced features and settings. Press the joystick in any direction to access the Main Menu when in idle or screen saver mode. Press joystick Left ( ), Right ( ), Up ( ), or Down ( ), to navigate though the menu screen. Press joystick In ( ) to make a selection.
Handset Menu Calls Log (dialing key 3) - review Caller ID data; select and dial from the Caller ID data or from the Redial list that accounts for the last 10 dialed phone numbers. (dialing key 4) - choose from the many preset images or Pictures download new images into the Handset to be used as your idle screen (wall paper) or assign an image to a specific phonebook directory.
Basic Operation Handset Menu Global Page from Handset • With the Intercom icon highlighted, press the joystick in or press the left soft key. • Press the joystick or to navigate to GLOBAL PAGE or press “ ” key. * • Press the joystick in or press the left soft key for confirmation. • Any registered Handset or Base can answer the global page, thus entering Intercom mode. • To end the intercom call, press OFF on the Handset or INTERCOM on the Base.
Handset Menu Adding Phonebook Entries • From the Handset idle (OFF) mode, press the joystick in any direction or press the left softkey. The Phonebook icon should be highlighted. Press the joystick in or left soft key again. Press NEW. NOTE: When phone book is full, pressing NEW, "Phonebook is Full" displays and an error tone sounds. JOHN SMITH • You will then be prompted to Enter Name. Use the digit keys to ‘spell’ the name. If you make a mistake, press the softkey.
Handset Menu • to sample the ringer options. Press OK for confirmation. NOTE: There are 8 traditional ring tones and 12 recorded personal ringers. For Recordable Ringer, please refer to page 20 for details. NOTE: If there is no need to have distinctive image, you can press SAVE now. Basic Operation • • • • If you wish to be visually alerted to calls from this number by changing to a distinctive image, press the joystick or to scroll to PICTURE : (none) .
Handset Menu — OR — Search For J OK Editing Phonebook Entries Following the first 2 steps in Searching for and Dialing Phonebook Entries, locate the entry you want to edit. • 3 of 10 JOHN SMITH • Press the joystick in. The screen will display: • Press EDIT softkey. 1-604-720-358960 4203589 RINGER: Melody 1 PICTURE: EDIT 3 of 10 DELETE JOHN SMITH • Press the joystick or to the option you want to edit then enter the corrections as needed. Press the softkey for deleting.
Handset Menu • Press the joystick in. The screen will display: JOHN SMITH 1-604-720-358960 4203589 RINGER: Melody 1 PICTURE: Basic Operation EDIT • Press DELETE softkey. The screen will display: • To confirm the deletion, press YES. To exit without deleting. press NO.
Handset Menu Clear Redial (dialing key 4) - select this option to delete all phone numbers stored in redial memory.You will be asked Are you sure? Choosing YES clears all records. Choosing NO returns you to the previous screen. With this icon highlighted, press the joystick in or left soft key to reveal the following menu: Set Time(dialing key 2) - this option allows you to set the time to be displayed on the bottom of the idle screen.
Handset Menu Sounds& Alerts With this icon highlighted, press the joystick in or left soft key to reveal the following options: Basic Operation Ringer Control(dialing key 2) - this option allows you to change the Ringer Volume, turn the Ringer On/Off and control the Vibrating Ringer. Ringers(dialing key 3) - this option allows you to assign a new Ring Tone. You can choose one of 8 traditional ringers, and 12 musical ringers to choose from.
Handset Menu screen (wall paper) or assign a specific image to a phonebook directory in the available 50 directories. To set a wallpaper image, select the icon Pictures in the main menu. Then choose an image in one of the three (My Pictures, Images or Emotions) soft menu options. Once you have selected the image, press the key to set the image as your wallpaper. You will receive a message on the screen confirming “Wallpaper Set!” and an audio confirmation.
Recordable Ringer Basic Operation You can easily record a unique ringer to be used as either your Default Ringer or for a Distinctive Ringer for assigning to a individual phonebook directory. You can either record using the provided Audio Patch Cord (not the USB cord), or simply use the Handset microphone. You are allowed to record 9 unique ringers for a maximum of 10 seconds each. Note: Your i 5801 Handset is preset with many musical (i.e.
Picture Download Download your own image ONE-TIME SOFTWARE INSTALLATION 1. Insert the enclosed Image Editor Tool CD into your personal computer. 2. You will immediately see a pop-up window giving you three options: a. Install/Uninstall the Vtech i 5801 Image Editor b. Browse the installation CD c. Visit Vtech on the web To install the software, click on the Install/Uninstall the Vtech i 5801 Image Editor icon and follow the download instructions. 3.
Picture Download -Adjust Brightness and Contrast -Adjust Color Basic Operation • Before downloading your image, make sure that the provided USB cord is correctly installed into your computer (using the large connector) and Handset (using the small connector). After you have completed the image and then your image will be editing process, press Send to Phone downloaded into the Handset.
Handset Operation Making Calls From the Handset • • Press ON (or, SPEAKERPHONE to use the Handset Speakerphone feature). Dial the phone number. -ORDial the phone number first; then press ON (or SPEAKERPHONE). Press OFF to end your call or place the Handset in charger cradle to end your call. Answering Calls • • • Press any key except OFF and the softkeys. Press OFF to end your call. -ORPlace the Handset in charger cradle to end your call.
Handset Operation 1 MID - Mid-Range sounds enhanced (This is the recommended setting for hearing aid users) 1 Mid Boost HOLD 1 MUTE 1 Treble Boost TREBLE - High Frequency sounds enhanced HOLD NATURAL - No frequency enhancement (Your Handset is preset with this selection) 1 MUTE 1 Natural Audio Advance Operation The Handset will graphically display the four modes. NOTE: The Sound Select feature can't be use when in Speakerphone or Headset talking mode.
Handset Operation Flash Function You can use your i 5801 with services such as Call Waiting. Simply press the ON/FLASH key on the Handset Conference Calling The i5881 or VT5831 is capable of supporting conference calls with up to two registered Handsets, and the Base Unit. To enter a conference call, simply access the line with two or more extensions by pressing ON (or SPEAKERPHONE) on the Handset or SPEAKERPHONE on the Base.
Headset Operation Your i 5801 cordless Handset is equipped with a 2.5mm Headset Jack for use with an optional accessory Headset for hands-free operation. If you choose to use the Headset option, you must obtain an optional accessory Headset, which is compatible with the i 5801. To purchase a Headset, call VTECH Customer Service at 1-800-595-9511. Once you have a compatible 2.5mm Headset, locate the Headset Jack on the Handset.
Maintenance Taking Care Of Your Telephone Your i 5801 cordless telephone contains sophisticated electronic parts, so it must be treated with care. Avoid rough treatment Place the Handset down gently. Save the original packing materials to protect your telephone if you ever need to ship it. Avoid water Your telephone can be damaged if it gets wet. Do not use the Handset outdoors in the rain, or handle it with wet hands. Do not install your Base Unit near a sink, bathtub or shower.
In Case Of Difficulty If you have difficulty operating your phone, the suggestions below should solve the problem. If you still have difficulty after trying these suggestions, call VTech Communications at 1-800-595-9511. In Canada, call VTech Telecommucations Canada Ltd. at 1-800-267-7377. The Phone Doesn't Work At All • • • • Make sure the Power Cord is plugged into the electrical outlet. Make sure the telephone line cord is plugged firmly into the Base Unit and the telephone wall jack.
In Case Of Difficulty Your Handset vibrates or shakes when a call comes in • It is likely that your Vibrating Handset Ringer option has been set to ON. If you’d like to turn it off, see Sounds & Alerts - Ringer CONTROL. You Hear Other Calls While Using Your Phone • Disconnect your Base Unit from the telephone jack, and plug in a regular telephone. If you still hear other calls, the problem is probably in your wiring or local service. Call your local telephone company.
Warranty Statement What does this limited warranty cover? • The manufacturer of this VTech product, VTech Communications, warrants to the holder of a valid proof of purchase (“Consumer” or “you”) that the product and all accessories provided by VTech in the sales package (“Product”) are free from material defects in material and workmanship, pursuant to the following terms and conditions, when installed and used normally and in accordance with operation instructions.
Warranty Statement 6. Product purchased, used, serviced, or shipped for repair from outside the United States, or used for commercial or institutional purposes (including but not limited to Products used for rental purposes ); or 7. Product returned without valid proof of purchase (see 2 below); or 8. Charges for installation or set up, adjustment of customer controls, and installation or repair of systems outside the unit.
Warranty Statement may also have other rights which vary from state to state. Limitations: Implied warranties, including those of fitness for a particular purpose and merchantability (an unwritten warranty that the product is fit for ordinary use) are limited to one year from date of purchase. Some states do not allow limitations on how long an implied warranty lasts, so the above limitation may not apply to you.
FCC, ACTA and IC Regulations This equipment complies with Parts 15 of the Federal Communications Commission (FCC) rules for the United States. It also complies with regulations RSS210 and CS-03 of Industry and Science Canada. Operation is subject to the following two conditions: (1) this device may not cause interference, and (2) this device must accept any interference, including interference that may cause undesired operation of the device.
FCC, ACTA and IC Regulations FCC Part 68 and ACTA If this equipment was approved for connection to the telephone network prior to July 23, 2001, it complies with Part 68 of the Federal Communications Commission (FCC) rules. If the equipment was approved after that date, it complies with the Part 68 rules and with Technical Requirements for Connection of Equipment to the Telephone Network adopted by the Administrative Council for Terminal Attachments (ACTA).
FCC, ACTA and IC Regulations company may temporarily discontinue your telephone service. The telephone company is required to notify you before interrupting service. If advance notice is not practical, you will be notified as soon as possible. You will be given the opportunity to correct the problem and the telephone company is required to inform you of your right to file a complaint with the FCC.
FCC, ACTA and IC Regulations be connected to the facilities of the local telecommunications company. The equipment must also be installed using an acceptable method of connection. The customer should be aware that compliance with the above conditions may not prevent degradation of services in some situations. Repairs to certified equipment should be made by an authorized Canadian maintenance facility designated by the supplier.
Technical Specifications FREQUENCY CONTROL WEIGHT Crystal controlled PLL synthesizer Handset : 148.5 grams (excluding battery pack) Charger : 233.2 grams TRANSMIT FREQUENCY POWER REQUIREMENTS Base : 5744.736-5825.952 MHz Handset : 2401.056-2482.272 MHz Handset : 2.4V 1400mAh NiMH Battery Pack RECEIVE FREQUENCY Charger : 6 VDC @ 300mA Base : 2401.056-2482.272 MHz Handset: 5744.736 - 5825.
VTECH TELECOMMUNICATIONS LTD. A member of THE VTECH GROUP OF COMPANIES. Distributed in the U.S.A. by VTech Communications Inc.; Beaverton, Oregon, 97008 Distributed in Canada by VTech Telecommunications Canada Ltd., 200-7671 Alderbridge Way, Richmond, B.C. V6X 1Z9. Copyright 2003 for VTECH TELECOMMUNICATIONS LTD.
Table of Contents Introduction....................................................................................................................1 Important Safety Instructions..................................................................................2 Getting Started.............................................................................................................4 Parts Check List...........................................................................................................
40
Introduction EXPAND YOUR VT5831 SYSTEM. YOUR BASE WILL WORK WITH UP TO 6 HANDSETS!!! IMPORTANT: The VT5820 is an Accessory Handset for use with the VT5831 system. You must have this model in order to use the VT5820 Accessory Handset. This manual is designed to familiarize you with the VT5820 Accessory Handset setup, registration and basic functions. For detailed operational instructions, please refer to the VT5831 User's Manual.
Important Safety Instructions When using your telephone equipment, basic safety precautions should always be followed to reduce the risk of fire, electric shock and injury, including the following: 1. Read and understand all instructions. 2. Follow all warnings and instructions marked on the product. 3. Unplug this product from the wall outlet before cleaning. Do not use liquid cleaners or aerosol cleaners. Use a damp cloth for cleaning. 4.
Important Safety Instructions B. If liquid has been spilled into the product. C. If the product has been exposed to rain or water. D. If the product does not operate normally by following the operating instructions. Adjust only those controls that are covered by the operating instructions, because improper adjustment of other controls may result in damage. E. If the product has been dropped and the cabinet has been damaged. F. If the product exhibits a distinct change in performance. 13.
Setup Registration And Operation Of The VTECH VT5820 Accessory Handset Your VTECH VT5831 system can operate up to 6 Handsets. The VTECH accessory Handset consists of the following: Handset Charger Telephone Line Cord Handset Belt Clip Battery Pack Charger Wall Mounting Bracket Setup Of The VT5820 Accessory Handset 1. 2. 1 3. 3 4. 5. 5 4 Plug the AC power adapter into an electrical outlet. Remove the Handset battery cover by pressing on the indent and sliding downward.
Installation of Battery Pack in Handset 1 3 2 Follow the steps below: 1. Remove the battery cover by pressing on the indent and sliding downward. 2. Place the new battery pack in the Handset with the metal contacts aligned with the charge contacts in the battery compartment. 3. Replace the battery cover by sliding it upwards. 4. If the new battery pack is not already charged, place the Handset in the charger, and allow it to charge for 12 hours.
Registration Enter Base ID Code 1. After charging the Handset, remove it from its Charge Cradle; the screen will display: alternating with this screen: 2. If, after charging the Handset, you see: 3. Press NEW. You will now see the ENTER BASE ID screen as described in step 1. 4. Find the BASE ID Code by doing the following: (the Base must be in idle (OFF) mode) A. At the Base, press MENU B. Scroll down to DISPLAY BASE-ID C. Press OK. The Base screen will display the 15-digit ID Code.
The Handset Layout 1 7 2 8 9 3 4 10 11 5 12 6 13 1. Antenna 8. LCD Display 2. Earpiece 9. Soft Keys 3. Headset Jack (2.5mm) 10. Volume 4. On (Flash) 11. Off (Clear) 5. Dialing Keys (0-9, 12. Sound Select 6. Speakerphone 13. Microphone 7.
Handset Indicators Handset Icons Icon Description Line In Use indicator On steady with no number next to it when a parallel set is in use. On steady with one or more numbers next to it, indicating which extensions are using the line. For example, 12 indicates that Handset 1 and Handset 2 are on an outside call. Intercom indicator On steady with the extension numbers currently on an intercom call. For example, 02 indicates that the Base and Handset 2 are on an intercom call.
Headset Operation Your VT5820 cordless Handset is equipped with a 2.5mm Headset Jack for use with an optional accessory Headset for hands-free operation. If you choose to use the Headset option, you must obtain an optional accessory Headset, which is compatible with the VT5820. To purchase a Headset, call VTECH Customer Service at 1-800-595-9511. Once you have a compatible 2.5mm Headset, locate the Headset Jack on the Handset. Connect the plug on the Headset cord to the jack on the cordless Handset.
Maintenace Taking Care Of Your Telephone Your VT5820 cordless telephone contains sophisticated electronic parts, so it must be treated with care. Avoid rough treatment Place the Handset down gently. Save the original packing materials to protect your telephone if you ever need to ship it. Avoid water Your telephone can be damaged if it gets wet. Do not use the Handset outdoors in the rain, or handle it with wet hands. Do not install your Base Unit near a sink, bathtub or shower.
In Case Of Difficulty If you have difficulty operating your phone, the suggestions below should solve the problem. If you still have difficulty after trying these suggestions, call VTECH Communications at 1-800-595-9511. In Canada, call VTECH Electronics at 1-800-267-7377. The Phone Doesn't Work At All • • • • Make sure the Power Cord is plugged Make sure the telephone line cord is plugged firmly into the Base Unit and the telephone wall jack. Make sure the batteries are properly charged.
In Case Of Difficulty Your Handset vibrates or shakes when a call comes in • It is likely that your Vibrating Handset Ringer option has been set to ON. If you’d like to turn it off, see VT5831 User’s Manual - Handset Settings - VIBRATE CONTROL, on page 22. You Hear Other Calls While Using Your Phone • Disconnect your Base Unit from the telephone jack, and plug in a regular telephone. If you still hear other calls, the problem is probably in your wiring or local service. Call your local telephone company.
Warranty Statement What does this limited warranty cover? • The manufacturer of this VTECH product, VTECH Communications, warrants to the holder of a valid proof of purchase (“Consumer” or “you”) that the product and all accessories provided by VTECH in the sales package (“Product”) are free from material defects in material and workmanship, pursuant to the following terms and conditions, when installed and used normally and in accordance with operation instructions.
Warranty Statement 6. Product purchased, used, serviced, or shipped for repair from outside the United States, or used for commercial or institutional purposes (including but not limited to Products used for rental purposes ); or 7. Product returned without valid proof of purchase (see 2 below); or 8. Charges for installation or set up, adjustment of customer controls, and installation or repair of systems outside the unit.
Warranty Statement State Law Rights: This warranty gives you specific legal rights, and you may also have other rights which vary from state to state. Limitations: Implied warranties, including those of fitness for a particular purpose and merchantability (an unwritten warranty that the product is fit for ordinary use) are limited to one year from date of purchase. Some states do not allow limitations on how long an implied warranty lasts, so the above limitation may not apply to you.
FCC, ACTA and IC Regulations This equipment complies with Parts 15 of the Federal Communications Commission (FCC) rules for the United States. It also complies with regulations RSS210 and CS-03 of Industry and Science Canada. Operation is subject to the following two conditions: (1) this device may not cause interference, and (2) this device must accept any interference, including interference that may cause undesired operation of the device.
FCC, ACTA and IC Regulations FCC Part 68 and ACTA If this equipment was approved for connection to the telephone network prior to July 23, 2001, it complies with Part 68 of the Federal Communications Commission (FCC) rules. If the equipment was approved after that date, it complies with the Part 68 rules and with Technical Requirements for Connection of Equipment to the Telephone Network adopted by the Administrative Council for Terminal Attachments (ACTA).
FCC, ACTA and IC Regulations company may temporarily discontinue your telephone service. The telephone company is required to notify you before interrupting service. If advance notice is not practical, you will be notified as soon as possible. You will be given the opportunity to correct the problem and the telephone company is required to inform you of your right to file a complaint with the FCC.
FCC, ACTA and IC Regulations Before installing this equipment, users should ensure that it is permissible to be connected to the facilities of the local telecommunications company. The equipment must also be installed using an acceptable method of connection. The customer should be aware that compliance with the above conditions may not prevent degradation of services in some situations. Repairs to certified equipment should be made by an authorized Canadian maintenance facility designated by the supplier.
Technical Specifications FREQUENCY CONTROL WEIGHT Crystal controlled PLL synthesizer Handset : Charger : 138 grams (excluding battery pack) 216 grams TRANSMIT FREQUENCY POWER REQUIREMENTS Base : 5744.736-5825.952 MHz Handset : 2401.056-2482.272 MHz Handset : 2.4V 1400mAh NiMH Battery Pack Charger : 6 VDC @ 300mA RECEIVE FREQUENCY Base : 2401.056-2482.272 MHz Handset: 5744.736 - 5825.952 MHz MEMORY CHANNELS Speed Dial : 50 Memory locations, up to 32 digits per location.
VTECH TELECOMMUNICATIONS LTD. A member of THE VTECH GROUP OF COMPANIES. Distributed in the U.S.A. by VTech Communications Inc.; Beaverton, Oregon. Distributed in Canada by VTech Electronics Canada Ltd., Suite 200, 7671 Alderbridge Way, Richmond, B.C. V6X 1Z9. Copyright 2002 for VTECH TELECOMMUNICATIONS LTD.