Skylink Pro™ USB Personal VoIP Gateway User’s Guide Ver 2.
Contents Contents .............................................................................................................................. 2 Welcome ............................................................................................................................. 3 Package Contents ................................................................................................................ 4 Requirements ....................................................................................
Welcome The Skylink Pro™ USB Personal VoIP Gateway (Skylink Pro) is an exciting new device that let’s you make and receive Skype™ calls using your standard telephone handset.
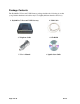
Package Contents The Skylink Pro™ Personal VoIP Gateway package includes the following (note that your particular hardware and cables may look slightly different than shown below). 1. Skylink Pro™ Personal VoIP Gateway 2. USB Cable 3. Telephone Cable 4. CD-ROM 5. User’s Manual 6. Quick Start Guide Page 4 of 48 Ver 2.
Requirements In order to install the Skylink Pro™ adapter you will need the following: 1. Skylink Pro™ adapter 2. USB cable 3. RJ11 cable 4. Telephone (regular telephone, cordless phone, DECT phone, …) 5. Telephone service (for conf call, 3 way calling and forwarding features) 6. Broadband internet service is recommended 7. PC with the following minimum specifications: o Pentium 450MHz or equivalent o Windows 2000 or XP o Available USB port (1.0, 1.1 or 2.0) o Skype™ version 1.3 or higher (www.skype.
Skylink Pro™ Installation DO NOT CONNECT THE SKYLINK PRO™ ADAPTER TO YOUR COMPUTER UNTIL INSTRUCTED TO DO SO BY THE SKYLINK PRO™ INSTALLATION WIZARD The following instructions will guide you to through the process of installing the Skylink Pro™ Personal VoIP Gateway.
STEP 2: Insert the supplied CD-ROM into your PC CD-ROM drive. The installation should start automatically. If not, or if you have quit the setup, then open the installation folder on the CD-ROM and double click on the setup.exe program as shown below. You will see the following popup. Press Yes to proceed or No to cancel. Page 7 of 48 Ver 2.
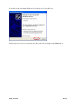
You will see the End User License Agreement. Click the “I have read …” checkbox and press the I Agree button as shown below. You will see the following progress bar below indicating that the installation is proceeding. Page 8 of 48 Ver 2.
Wait until you see the following popup and press the OK button. Connect the USB cable to the Skylink Pro™ adapter USB port as shown below: The other end of the USB cable must be connected to a USB port on your computer as shown below, or to an AC Powered USB hub. The Skylink Pro Adapter MUST not be connected to a bus powered USB hub. Page 9 of 48 Ver 2.
You will see the following Windows New Hardware Found Wizard. Select Install the software automatically (Recommended) and press the Next button. Page 10 of 48 Ver 2.
The installation will continue and you will see the following screen. When you see the following screen, press the Finish button. Page 11 of 48 Ver 2.
Then you will see the following Windows New Hardware Found Wizard screen. Select Install the software automatically (Recommended) and press the Next button. The installation will continue and you will see the following screen. Page 12 of 48 Ver 2.
When you see the following screen, press the Continue Anyway button. When you will see the following screen, select the option, “allow this program to use Skype” and press the OK button. Page 13 of 48 Ver 2.
When you see the following screen, press the Finish button. Page 14 of 48 Ver 2.
STEP 3: When the installation completes you should see the following message appear near your system tray and a new telephone icon (circled in red below) in your system tray as shown below. The telephone icon indicates that the Skylink Pro ™ software is installed and running and that you can start making calls via Skype™ and the Skylink Pro™ adapter. You will see a new program group named Skylink Pro™, accessed from the Start button > All Programs as shown below. Page 15 of 48 Ver 2.
STEP 4: Connect a standard telephone handset to the Skylink Pro ™ phone jack using a telephone cable as shown below STEP 5: Connect a telephone cable between the Skylink Pro™ line jack and a wall jack as shown below. Note that this is only required for making regular phone calls or for forwarding Skype calls to your mobile (or other off-site) phone or for toll bypass applications. Page 16 of 48 Ver 2.
You final configuration should resemble the following. Page 17 of 48 Ver 2.
Enabling Skylink Pro™ In order to use Skylink Pro™ and it’s features, (1) the Skylink Pro™ adapter must be plugged into the PC, (2) a telephone handset must be plugged into the Skylink Pro ™ adapter, (3) the Skylink Pro™ adapter must be connected to the telephone wall jack 1 and (4) the Skylink Pro™ agent must be running (see green telephone in the Windows System Tray).
You may see the following screen, select the option, “allow this program to use Skype” and press the OK button. You should now see the Skylink Pro™ agent in the Windows System Tray as shown below. You are now ready to use the Skylink Pro™ Personal VoIP Gateway. Page 19 of 48 Ver 2.
Skylink Pro™ States When the Skylink Pro adapter is installed and the software is installed properly, then you will see a green phone in the system tray as shown below. If the Skylink Pro™ agent is running and the Skylink Pro™ adapter is removed or Skype is not running, then the telephone will be red as shown below. During an incoming or outgoing Skype call, the telephone handset will jiggle as shown below, indicating an VoIP call is being initiated.
Testing Skylink Pro™ Skype provides a useful feature to test your connection. It is called Echo123. If you send “callme” in a chat with echo123, the echo123 service will call you and let you leave a message which will be played back to you. This will help you verify that the Skylink Pro adapter, Skylink Pro driver and the telephone are all connected and installed properly.
You will see the following chat screen and you should enter “callme” and press the Enter key on your keyboard. Page 22 of 48 Ver 2.
Within 10-20 seconds, you should see the following screen, and the telephone connected to the Skylink Pro adapter should ring. Pick up the handset and follow the instructions. The Echo Test Service will ask you to leave a message which will be played back immediately. This will help you verify that the Skylink Pro adapter, Skylink Pro driver and the telephone handset are all connected and installed properly. Page 23 of 48 Ver 2.
When the test concludes you can press OK on the following screen. and then press Finish on the following screen. Page 24 of 48 Ver 2.
Making and Receiving Calls You can continue to use the telephone handset connected to the Skylink Pro ™ adapter to make and receive standard telephone calls as you used without any change. To make a standard phone call, just pick up the handset and dial as you normally would. To answer (receive) a standard phone call just pick up the handset when the phone rings. When you receive an incoming Skype™ call, the handset connected to the Skylink Pro ™ adapter will ring.
Step 1: Right click on the desired contact as shown below and select Assign Speed-Dial: Step 2: Enter the desired speed dial number (e.g. 22) as shown below and press the OK button. Page 26 of 48 Ver 2.
Step 3: You will now see an indication that the Skype ™ contact has a speed dial associated with them as shown below. Page 27 of 48 Ver 2.
Switching Between VoIP and Regular Calls While on a regular phone call you may receive a Skype™ call or while on a Skype™ call you may receive a regular call.
Forwarding Calls The Skylink Pro™ adapter can be configured to forward incoming Skype ™ calls to another telephone number, such as your mobile phone. It can also forward incoming telephone calls to a Skype™ or SkypeOut™ call. Right click on the Skype Agent (green telephone in the Windows System Tray) and select configure as shown below. You will see the Skylink Pro configuration screen as shown below. Page 29 of 48 Ver 2.
Press the Call Forwarding tab to see the Call Forwarding parameters as shown below. In order to forward incoming Skype™ calls to a telephone number such as your mobile phone, change the VOIP to Phone Line settings as follows: • Check the Enable Call Forward checkbox as shown below Page 30 of 48 Ver 2.
• Select the number of rings before the forwarding takes place as shown below. Page 31 of 48 Ver 2.
• Then select the telephone that should be dialed on the telephone line and press the Apply and/or Exit button as shown below. Enter the telephone exactly as you would dial it if you were to pick up a telephone directly connected to the phone line. If you are on a PBX, you may need to press a digit to get an outside line (i.e. 9). In this case you would enter 9,,,16175551212.
Toll Bypass Toll bypass is similar to forwarding, except the incoming caller hears a beep, enters a password and then dials out an arbitrary number instead of fixed forwarding as described in the previous section. There are two common scenarios for this. You can call in from your mobile phone to the computer that the Skylink Pro adaptor is connected to and make a low cost SkypeOut international call.
You will see the Skylink Pro configuration screen as shown below. Press the Call Forwarding tab to see the Call Forwarding parameters as shown below. Page 34 of 48 Ver 2.
In order to enable toll bypass of incoming PSTN calls, change the Phone Line to VOIP settings as follows: • Check the Enable Toll Bypass checkbox as shown below • Select the number of rings before the forwarding takes place as shown below. Page 35 of 48 Ver 2.
• Set your password and press apply as shown below. The password can be any 4 to 8 digits When you call into your telephone line you will hear a beep. Enter the pin code followed by the * button and then enter the Skype speed dial (e.g. 77) or the SkypeOut telephone number (e.g. 00 + country code + telephone number) followed by the * button. In order perform toll bypass on an incoming Skype call, enable Toll Bypass in the VoIP to Phone Line section.
Toll Bypass + Call Forward If you enable both toll bypass and call forward, then the call forward number will only be dialed if you do not enter your pin code within 10 seconds. Skype Voicemail With Skylink Pro active, the attached telephone handset can be used to check for, and listen to your Skype voicemail. When you have a new Skype voicemail that you have not listened to, you will hear an intermittent beep in the VoIP dial tone. If you have no new voicemail (i.e.
Recorder With Skylink Pro active, the attached telephone handset can be used to check for, and listen to your Skype voicemail. The call recorder is accessed and configured through the Skylink Pro Agent Call Recorder tab as shown below. You can change the default location where the recordings will be stored by pressing the button (with three dots) immediately to the right of the location field. The folder containing the recordings can be accessed by pressing the Open Folder button.
Recording is controlled by two mechanisms: automatic and manual. Manual recording has two modes: • Through the Call Recorder screen above - controlled by pressing the record (red dot) and stop (black square) buttons. • From the telephone handset – controlled by pressing the #7 keys (start recording) and #8 keys (stop recording) on the telephone handset connected to Skylink Pro. Automatic recording is controlled through the Recorder all calls checkbox in the Automation section. Page 39 of 48 Ver 2.
Changing the Default Settings You can change the default settings for sending a call, activating a Skype ™ call, switching between a Skype™ call and a regular call (call waiting) and conference calling, by running the Skylink Pro™ configuration. Right click on the Skylink Pro™ agent and select Configure as shown below. You will see the configuration tab as shown below. The Initiate Voip Call – press these keys to get a VoIP dial-tone.
The Conference Key Sequence – while on a Skype call and you receive a regular call or while on a regular call and you receive a Skype call, press these keys conference together the two calls. The Set Phone Type selects which softphone you would like to work with. Press the Restore Defaults button if you want to restore all sequences to their factory shipped settings. Page 41 of 48 Ver 2.
Disabling Skylink Pro™ In order to disable Skylink Pro™, right click on the Skylink Pro™ agent in the system tray and select Exit as shown below. You can now disconnect the Skylink Pro™ adapter from the PC. Page 42 of 48 Ver 2.
Uninstall In order to uninstall the Skylink Pro™ adapter, click on the uninstall utility in the Skylink Pro™ program group accessed from the Start button -> All Programs -> Skylink Pro™. You will see the uninstall indicator as follows. When the uninstall indicator disappears, the un-installation is complete. Page 43 of 48 Ver 2.
Installing a New Version When you install a new version of Skylink Pro software, at the end you will see a slightly different Skype warning message as shown below. Select “Allow this program to use Skype” and press OK as shown below: Page 44 of 48 Ver 2.
Troubleshooting The first step in troubleshooting is to read the readme.txt that appears in the Skylink Pro program group. It contains a list of known issues for the current Skylink Pro driver version. To find out the driver version, right click on the Skylink ProAgent (green telephone in the system tray) and select About. You will see the Skylink ProAgent About screen below. Common Fix If Skylink Pro was working OK and suddenly stops working properly (e.g.
Wrong Device Installed If you insert the Skylink Pro™ adapter on a Windows XP SP2 PC “prior” to installing the software, the adapter will be incorrectly installed as a Smart Link USB Modem. Simply proceed to install the Skylink Pro™ software and it will resolve the issue and install the adapter properly. Softphone Version Warning If you get a Softphone Version Warning from Skylink Pro, then you should upgrade your softphone to the latest version. Otherwise, Skylink Pro may not operate properly.
Cannot hear the Skype™ call in telephone handset Check to make sure that Skype is configured to use the Smart Link Audio device as it ’s Audio In and Audio Out Sound Device. This is done as following: Select Options from the Skype™ Tools Menu as shown below. and then select Sound Devices as shown below. Page 47 of 48 Ver 2.
Check the Audio In and Audio Out list boxes and make sure Smart Link Virtual Audio device is selected.