Analog Contemporary Series Master User Guide Models: Analog corded lobby hotel telephone - A2100, Analog corded 1-line hotel telephone - A2210, Analog corded 2-line hotel telephone - A2220, Analog corded trimstyle hotel telephone - A2310, Analog cordless 1-line hotel telephone - A2410, Analog cordless 2-line hotel telephone - A2420, Analog cordless charging base - C4000, Analog cordless charging stand - C4010, Analog cordless 1-line accessory handset - C4100, and Analog cordless 2-line accessory handset - C
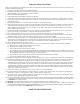
Important safety instructions When using your telephone equipment, basic safety precautions should always be followed to reduce the risk of fire, electric shock and injury, including the following: 1. This product should be installed by a qualified technician. 2. This product should only be connected to the host equipment and never directly to the network such as Public Switch Telephone Network (PSTN) or Plain Old Telephone Services (POTS). 3. Read and understand all instructions. 4.
Table of contents Parts checklist..................................................................................................................................................................................... 1 Telephone layout................................................................................................................................................................................. 2 Analog corded lobby - A2100........................................................................
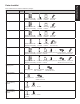
Items contained in the respective telephone package: Model Name Analog corded lobby Analog corded 1-line Analog corded 2-line Model Parts included number A2100 Telephone base with faceplate and overlay Corded handset Mounting bracket Telephone line cord Telephone base with faceplate and overlay Corded handset Mounting bracket Telephone line cord Telephone base with faceplate and overlay Corded handset Mounting bracket Telephone line cord Telephone base with faceplate and overlay Corded hand
Telephone layout Analog corded lobby - A2100 Data port Switch hook Wall mount clip RINGER VOL +/VOLUME -/VOLUME
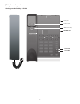
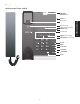
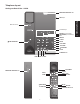
Telephone layout Analog corded 1-line - A2210 MESSAGE WAITING LED DATA port Wall mount clip Sticker covering jumpers RINGER VOL Autodial keys PAUSE (recessed key) PROGRAM (recessed key) FLASH MUTE +/VOLUME -/VOLUME /SPEAKER HOLD Telephone layout Switch hook
Telephone layout Analog corded 2-line - A2220 MESSAGE WAITING LED DATA port Switch hook Wall mount clip Sticker covering jumpers RINGER VOL Autodial keys PAUSE (recessed key) PROGRAM (recessed key) FLASH MUTE +/VOLUME -/VOLUME /SPEAKER LINE 1 LINE 2 CONF HOLD
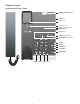
Telephone layout Analog corded trimstyle - A2310 MESSAGE WAITING LED Wall mount clip -/VOLUME/+ MUTE MUTE LED FLASH RINGER VOL Telephone layout FAX/DATA port Switch hook
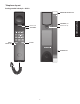
Telephone layout Analog cordless 1-line - A2410 MESSAGE WAITING LED DATA port Wall mount clip Autodial keys PAUSE (recessed key) PROGRAM (recessed key) INT REDIAL FLASH /FIND HANDSET MUTE +/VOLUME -/VOLUME /SPEAKER HOLD CHARGE LED IN USE LED -/VOLUME/+ MESSAGE WAITING LED TALK REDIAL HOLD /SPEAKER MUTE OFF FLASH INTERCOM LOW BATTERY LED
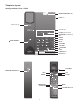
Telephone layout Analog cordless 2-line - A2420 MESSAGE WAITING LED DATA port Autodial keys PAUSE (recessed key) PROGRAM (recessed key) INT REDIAL FLASH /FIND HANDSET MUTE +/VOLUME -/VOLUME /SPEAKER HOLD CHARGE LED LINE 1 LINE 2 CONF -/VOLUME/+ MESSAGE WAITING LED LINE 1 CONF /SPEAKER INTERCOM LINE 2 HOLD MUTE OFF FLASH REDIAL LOW BATTERY LED Telephone layout Wall mount clip
Telephone layout Analog cordless charging base - C4000 Wall mount clip CHARGE LED
Telephone layout Analog cordless charging stand - C4010 Telephone layout CHARGE LED
Telephone layout Analog cordless 1-line accessory handset - C4100 -/VOLUME/+ MESSAGE WAITING LED TALK REDIAL HOLD /SPEAKER MUTE OFF FLASH INTERCOM LOW BATTERY LED 10
Telephone layout Analog cordless 2-line accessory handset - C4200 LINE 1 CONF /SPEAKER INTERCOM LINE 2 HOLD MUTE OFF FLASH REDIAL LOW BATTERY LED 11 Telephone layout -/VOLUME/+ MESSAGE WAITING LED
Installation Analog corded lobby/1-line/2-line - A2100/A2210/A2220 Telephone base installation This telephone can be adapted to desktop use or mount on a standard telephone wall plate. Installation option - desktop position 1. Turn the telephone base over with the bottom side facing up. Connect the coiled handset cord to the telephone base. Coiled handset cord jack 2. Insert the tabs into the grooves to affix the mounting bracket in place. 3. Install the telephone base as shown below.
Installation Analog corded lobby/1-line/2-line - A2100/A2210/A2220 Installation option - converting from desktop to wall mount position To mount the telephone base on the wall: 1. Set aside the handset. On the telephone base cradle, place a coin in the provided slit of the wall mount clip and rotate a half turn (180 degrees). It locks into place with the protruding edge pointing towards the upper edge of the telephone base. This protruding edge holds the handset when the phone is mounted on the wall.
Installation Analog corded trimstyle - A2310 Telephone base installation The telephone can be adapted to desktop use or mount on a standard telephone wall plate. Installation option - desktop position 1. Turn the telephone base over with the bottom side facing up. Connect the telephone line cord to the telephone base and route along the wire duct. Wire duct Telephone line jack 2. Position the mounting bracket as shown.
Installation Analog corded trimstyle - A2310 Installation option - converting from desktop to wall mount position To mount the telephone base on the wall: 1. Set aside the handset. On the telephone base cradle, place a coin in the provided slit of the wall mount clip and rotate a half turn (180 degrees). It locks into place with the protruding edge pointing towards the upper edge of the charging base. This protruding edge holds the cordless handset when the phone is mounted on the wall. Protruding edge 2.
Installation Analog cordless 1-line/2-line - A2410/A2420 Telephone base installation This telephone can be adapted to desktop use or mount on a standard telephone wall plate. Installation option - desktop position 1. Turn the telephone base over with the bottom side facing up. Insert the tabs into the grooves to affix the mounting bracket in place. 2. Plug the power adapter into an electrical outlet not controlled by a wall switch.
Installation Analog cordless 1-line/2-line - A2410/A2420 Installation option - converting from desktop to wall mount position To mount the telephone base on the wall: 1. Unplug the power adapter and telephone line cord. Disconnect the power cord from the telephone base. 2. Set aside the handset. On the telephone base cradle, place a coin in the provided slit of the wall mount clip and rotate a half turn (180 degrees).
Installation Analog cordless 1-line/2-line - A2410/A2420 Handset battery installation Install the battery as shown below. 1. Gently lift the handset cover. Do not detach the speaker wires between the handset cover and the handset. 2. Plug the battery connector securely into the socket inside the handset battery compartment. 3. Place the battery with the label THIS SIDE UP facing up and the wires inside the battery compartment. 4.
Installation Analog cordless charging base - C4000 Charging base installation The charging base can be adapted to desktop use or mount on a standard telephone wall plate. Installation option - desktop position 1. Turn the charging base over with the bottom side facing up. Position the mounting bracket as shown. Connect the power cord to the charging base and route the cord out from the large eyelet on the mounting bracket. Power cord jack 2.
Installation Analog cordless charging stand - C4010 Charging stand installation The charging stand is designed for desktop use. Install the charging stand as shown below.
Installation Analog cordless 1-line/2-line accessory handset - C4100/C4200 Handset battery installation Install the battery as shown below. 1. Gently lift the handset cover. Do not detach the speaker wires between the handset cover and the handset. 2. Plug the battery connector securely into the socket inside the handset battery compartment. 3. Place the battery with the label THIS SIDE UP facing up and the wires inside the battery compartment. 4.
Telephone settings Analog corded lobby/1-line/2-line/trimstyle - A2100/A2210/A2220/A2310 Default settings are indicated by asterisks (*).
Telephone settings Analog corded lobby/1-line/2-line/trimstyle - A2100/A2210/A2220/A2310 Voicemail voltage detection For 1-line and 2-line models (A2210 and A2220), there are 3 options to set the voicemail voltage detection on the telephone base. To disable the voicemail voltage detection: 1. Remove the faceplate and overlay if they are on the telephone base. Then remove the sticker Jumper on the telephone base. 2. Use a narrow object to unplug all the jumpers from the telephone base. 1 2 3 4 3.
Telephone settings Analog cordless 1-line/2-line - A2410/A2420 Default settings are indicated by asterisks (*).
Telephone settings Analog cordless 1-line/2-line - A2410/A2420 Voicemail voltage detection There are 3 voicemail voltage detection methods on the telephone base that can be programmed. To change the voicemail voltage detection by the steady high voltage, periodic high voltage pulse and periodic low voltage pulse detection method: 1. Remove the faceplate and overlay if they are on the telephone base. Then press the recessed PROGRAM key. 2. Press 10 and you hear 3 beeps.
Telephone operation Analog corded lobby - A2100 Receive a call The telephone rings when there is an incoming call. Lift the corded handset from the telephone base to answer. Place a call Lift the corded handset and it automatically connects to the operator. Refer to your PABX user’s manual for automatic dialing. End a call Place the corded handset in the telephone base. Volume Listening volume and ringer volume can be adjusted from the telephone base.
Telephone operation Analog corded 1-line - A2210 Using the corded handset and the telephone base The corded handset and the telephone base speakerphone cannot be used at the same time. However, calls can be switched between the corded handset and the telephone base speakerphone. Receive a call When there is an incoming call, the telephone rings and the MESSAGE WAITING LED flashes. To answer a call using the corded handset: Lift the corded handset from the telephone base.
Telephone operation Analog corded 2-line - A2220 Using the corded handset and the telephone base The corded handset and the telephone base speakerphone cannot be used at the same time. However, calls can be switched between the corded handset and the telephone base speakerphone. Receive a call • • When there is a line 1 incoming call, the telephone rings. The MESSAGE WAITING LED and LINE 1 key flash. When there is a line 2 incoming call, the telephone rings. LINE 2 key flashes.
Telephone operation Analog corded 2-line - A2220 Mute To mute the microphone: 1. During a call, press MUTE on the telephone base. The MUTE key illuminates when the mute function is turned on. You can hear the party on the other end but they cannot hear you. 2. Press MUTE again to resume the conversation. The light on the MUTE key turns off. Hold When a call is placed on hold, any parallel phone that tries to use the same phone line will take the call off hold and pick the call. To place a call on hold: 1.
Telephone operation Analog corded trimstyle - A2310 Receive a call When there is an incoming call, the telephone rings and the MESSAGE WAITING LED flashes. To answer a call: Lift the corded handset from the telephone base. Place a call Lift the corded handset from the telephone base. Listen for a dial tone and then dial the desired number. End a call Place the corded handset in the telephone base. Share a call During a call, parallel telephones (telephones on the same line) can join the call.
Telephone operation Analog cordless 1-line - A2410 Using the cordless handset and the telephone base The cordless handset and the telephone base cannot be used on the same call. However, calls can be switched between the cordless handset and the telephone base speakerphone. When the cordless handset or the telephone base is in use, the TALK key on the cordless handset and the IN USE LED on the telephone base illuminate. Receive a call When there is an incoming call, the telephone rings.
Telephone operation Analog cordless 1-line - A2410 Redial The last dialed number on the cordless handset or the telephone base is stored for 15 minutes. To redial the last dialed number from the cordless handset: Press TALK or /SPEAKER. Listen for a dial tone. Then press REDIAL. To redial the last dialed number from the telephone base: Press /SPEAKER. Listen for a dial tone. Then press REDIAL. Volume Listening volume can be adjusted on the cordless handset and the telephone base.
Telephone operation Analog cordless 1-line - A2410 Intercom Use this feature for conversations between two cordless handsets, or a cordless handset and the telephone base. To initiate an intercom call: • On the cordless handset, press INTERCOM when it is not in use. It beeps and the INTERCOM key illuminates. All destination cordless handsets (except the cordless handset on the telephone base) and the telephone base ring, and the INTERCOM/INT keys flash.
Telephone operation Analog cordless 2-line - A2420 Using the cordless handset and the telephone base The cordless handset and the telephone base cannot be used on the same call. However, calls can be switched between the cordless handset and the telephone base speakerphone. When the cordless handset or the telephone base is in use, the corresponding line keys on the cordless handset and the telephone base illuminate. Receive a call When there is an incoming call, the telephone rings.
Telephone operation Analog cordless 2-line - A2420 Redial The last dialed number on the cordless handset or telephone base is stored for 15 minutes. To redial the last dialed number from the handset or telephone base: Press LINE 1, LINE 2 or /SPEAKER. Listen for a dial tone. Then press REDIAL. Volume Listening volume can be adjusted on the cordless handset and the telephone base. To adjust the listening volume: • During a call on the handset, press -/VOLUME/+ on it to adjust the listening volume.
Telephone operation Analog cordless 2-line - A2420 To answer an incoming call during an intercom call: Press the flashing line key on the cordless handset or telephone base, or press intercom call ends automatically. /SPEAKER twice on the telephone base. The To end an intercom call: • Place the cordless handset on the telephone base cradle, or press OFF on the cordless handset. -OR• Press INT on the telephone base. Conference call This telephone allows three-way conversations.
Appendix Handset battery It takes up to 16 hours for the battery to be fully charged. When it is fully charged, you can expect the following performance: Operation Operating time While in handset use (talking*) Up to 7 hours While in speakerphone mode (talking*) Up to 5 hours While not in use (standby**) Up to 7 days * Operating times vary depending on your actual use and the age of the battery. ** Handset is not charging or in use.
Appendix Troubleshooting If you have difficulty with the telephones, please try the suggestions below. For customer service, visit our website at www.vtechhotelphones.com or call 1-888-907-2007. For corded telephones: The telephone does not work at all. • Make sure the telephone line is plugged into the TEL port of the telephone base. • Make sure the telephone line cord is plugged firmly into the telephone wall jack.
Appendix Troubleshooting For cordless telephones: The telephone does not work at all. • Make sure the RJ-45 cord is plugged into the TEL port of the telephone base. • Make sure the power adapter is securely plugged into an outlet not controlled by a wall switch. • Make sure the telephone line cord is plugged firmly into the power adapter and the telephone wall jack. • Make sure the battery is installed and charged correctly (page 18).
Appendix Troubleshooting For cordless telephones: The telephone does not ring when there is an incoming call. • Make sure the telephone line cord and the power adapter are plugged in properly (page 16). • The cordless handset may be too far from the telephone base. Move it closer to the telephone base. • Adjust the setting of RF transmission power (page 24). It may be out of range. • If other telephones in your hotel are having the same problem, the problem is in the wiring or telephone service.
Appendix Precautions for users of implanted cardiac pacemakers Cardiac pacemakers (applies only to digital cordless telephones): Wireless Technology Research, LLC (WTR), an independent research entity, led a multidisciplinary evaluation of the interference between portable wireless telephones and implanted cardiac pacemakers. Supported by the U.S. Food and Drug Administration, WTR recommends to physicians that: Pacemaker patients • Should keep wireless telephones at least six inches from the pacemaker.
Appendix VTech Hospitality limited warranty program VTech Communications, Inc., the manufacturer of VTech Hospitality Product (“Product”), warrants to the holder of a valid proof of purchase (“end user” or “you”) that the Product and all accessories provided by VTech in the Product’s package are free from defects in material and workmanship, pursuant to the following terms and conditions, when installed and used normally and in accordance with the Product’s operating instructions.
Appendix FCC, ACTA and IC regulations FCC Part 15 This equipment has been tested and found to comply with the requirements for a Class B digital device under Part 15 of the Federal Communications Commission (FCC) rules. These requirements are intended to provide reasonable protection against harmful interference in a residential installation.
Appendix Maintenance Taking care of your telephone Your telephone contains sophisticated electronic parts, so it must be treated with care. Avoid rough treatment Place the handset down gently. Save the original packing materials to protect your telephone if you ever need to ship it. Avoid water Your telephone can be damaged if it gets wet. Do not use the handset outdoors in the rain, or handle it with wet hands. Do not install the telephone base near a sink, bathtub or shower.
Appendix Technical specifications Analog corded lobby - A2100 Power requirement Line powered 24V or 48V Size Telephone base: 8.03 x 5.98 x 3.74 in (204 x 152 x 95 mm) Corded handset: 8.39 x 1.85 x 1.58 in (213 x 47 x 40 mm) Analog corded 1-line/2-line - A2210/A2220 Power requirement Line powered 24V or 48V Message waiting signal Steady/periodic high voltage pulse and periodic low voltage pulse Autodial memory Telephone base: up to 10 memory locations; up to 16 digits Size Telephone base: 8.
Index A Handset charging 18, 21 Handset deregistration 18, 21 Handset registration 18, 21 Handset speakerphone 31, 34 Hold 24, 27, 29, 32, 35 About cordless telephones 41 Answer an intercom call 33, 35 Autodial key cancellation 23, 25 Autodial key programming 23, 25 Autodial keys 23, 25 I B Important safety instructions i Initiate a conference call 29, 36 Initiate an intercom call 33, 35 Installation 12–21 Intercom 33, 35–36 Battery charging 18, 21 Battery installation 18, 21 C Call waiting 27, 28,
VTECH TELECOMMUNICATIONS LTD. A member of THE VTECH GROUP OF COMPANIES. Distributed in the U.S.A. by VTech Communications, Inc., Beaverton, Oregon 97008. Distributed in Canada by VTech Technologies Canada Ltd., Richmond, B.C. V6W 1L5. VTech is the registered trademark of VTech Holdings Limited. Copyright © 2011 for VTECH TELECOMMUNICATIONS LTD. All rights reserved. Printed in China.