User’s manual w w w.v t e c h p h o n e s .
Congratulations on purchasing your new VTech product. Before using this telephone, please read the Important safety instructions on page 47 of this manual. This manual has all the feature operations and troubleshooting necessary to install and operate your new VTech telephone. Please review this manual thoroughly to ensure proper installation and operation of this innovative and feature rich VTech product. For support, shopping, and everything new at VTech, visit our website at www.vtechphones.com.
Table of contents Getting started..........................1 Parts checklist.............................1 Telephone base and charger installation................................2 Battery installation and charging...................................3 Installation options......................4 Table top to wall mount .............. installation................................4 Wall mount to table top .............. installation................................5 Handset layout............................
Table of contents Record a memo...........................32 Message window displays..........33 Remote access...........................34 Appendix....................................35 Handset display screen messages.................................35 Handset and telephone base indicators.................................37 Battery.........................................38 Expand your telephone system......................................39 Add and register a handset (optional)............................
Getting started Parts checklist Your telephone contains the following items. Save your sales receipt and original packaging in the event warranty service is necessary.
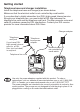
Getting started Telephone base and charger installation Install the telephone base and charger(s) as shown below. Make sure that the electrical outlet is not controlled by a wall switch. If you subscribe to digital subscriber line (DSL) high-speed Internet service through your telephone line, you must install a DSL filter between the telephone line cord and the telephone wall jack. The filter prevents noise and caller ID problems caused by DSL interference.
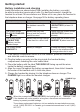
Getting started Battery installation and charging Install the battery as shown below. After installing the battery, you might be able to make and receive short calls. For best performance, charge the handset for at least 16 hours before use. When not in use, place the handset in the telephone base or charger. See page 38 for battery operating times. Battery indicators Battery status Action The screen is blank. Battery has no charge and the handset cannot be used.
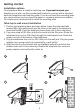
Getting started Installation options Your telephone base is ready for table top use. If �������������������������� you want to mount your telephone on a wall, use the provided wall bracket to connect with a standard dual-stud telephone wall mounting plate. If you do not have this mounting plate, you can purchase one from many hardware or consumer electronics retailers. You might need a professional to install the mounting plate. Table top to wall mount installation 1.
Getting started Wall mount to table top installation 1. If the telephone line cord and power adapter cord are bundled, untie them first. 2. Lift the telephone base up to detach it from the black plastic wall bracket. Unplug the telephone line cord (or DSL filter) from the wall. Unplug the power adapter from the power outlet. 3. See Telephone base and charger installation on page 2.
Getting started Handset layout CID (caller ID) Press to review the call log when the telephone is not in use. While in a menu, press to scroll down. During a call, press to lower the listening volume. CHARGE light On when the handset is charging in the telephone base or charger. (Directory) Press to enter the directory when the telephone is not in use. While in a menu, press to scroll up. During a call, press to raise the listening volume. MENU/SELECT Press to show the menu.
Getting started Telephone base layout X/DELETE Press to delete the message currently playing (page 31). When the phone is not in use, press twice to delete all previously reviewed messages (page 32). Message window Shows the number of messages and other answering system information (page 33). /PLAY/STOP Press to play messages (page 31). Press to stop message playback (page 31). /REPEAT Press to repeat a message or press twice to play previous message (page 31).
Telephone settings Ringer volume (handset) You can set the ringer volume or turn the ringer off. 1. Press MENU/SELECT to show the menu when the handset is not in use. 2. Press or to select >RINGER VOLUME, then press MENU/SELECT. 3. Press or to adjust the volume. A sample of each ringer volume plays as you scroll through the choices. 4. Press MENU/SELECT to confirm your selection. >RINGER VOLUME RINGER TONE RINGER VOLUME Setting the volume to the lowest level turns off the ringer.
Telephone settings LCD language You can select ENGLISH, FRANÇAIS or ESPAÑOL to be used in all screen displays. 1. Press MENU/SELECT to show the menu when the handset is not in use. 2. Press or to select >LCD LANGUAGE, then press MENU/SELECT. 3. Press or to scroll through the choices. 4. Press MENU/SELECT to confirm your selection. >LCD LANGUAGE SET DATE/TIME LCD LANGUAGE ENGLISH Set date/time he answering system announces the day and time of the message prior to T playing it.
Telephone settings Clear voicemail If you subscribe to voicemail service offered by your telephone company, NEW VOICEMAIL and appear on the handset, and the VOICEMAIL light on the telephone base flashes when you have new voicemail messages. Contact your local telephone company for more information and assistance about using your voicemail service. After you have listened to all new voicemail messages, the indicators on both the handset and telephone base turn off automatically.
Answering system settings Answering system set up Use a system handset to change your answering system settings. Number of rings You can choose from two, four, or six rings; or toll saver. With toll saver selected, the answering system answers after two rings when you have new messages, and after four rings when you have no new messages. This enables you to check for new messages and avoid paying unnecessary long distance charges if you are calling from out of your local area. 1.
Answering system settings Announcement The telephone is preset with a greeting that answers calls with “Hello, please leave a message after the tone.” You can use this preset announcement, or replace it with your own. Play your announcement 1. 2. 3. 4. 5. Press MENU/SELECT to show the menu when the handset is not in use. Press MENU/SELECT to select >ANS. SYSTEM. Press or to select >ANS SYS SETUP, then press MENU/SELECT. Press or to select >ANNOUNCEMENT, then press MENU/SELECT.
Telephone operation Make a call 1. Press /FLASH or 2. Dial the number. . You hear a dial tone. Make a predial call 1. Dial the number. 2. Press /FLASH or . Answer a call Press /FLASH, or any of the dialing keys (0-9, #, *). The screen shows the elapsed time as you talk (in hours, minutes and seconds). When predialing (preview numbers before dialing), press MUTE/REMOVE or OFF/CLEAR to backspace and delete; press and hold REDIAL/PAUSE to insert a dialing pause (p appears).
Telephone operation Mute The mute function allows you to hear the other party but the other party cannot hear you. 1. During a call, press MUTE/REMOVE on the handset. The handset screen shows MUTED for a few seconds and MUTE appears until the mute function is turned off. 2. Press MUTE/REMOVE again to resume the conversation. The handset screen temporarily shows MICROPHONE ON.
Telephone operation Chain dialing Use this feature while already dialing one phone number or while on a call to initiate a dialing sequence from numbers stored in the directory, stored in the call log, or from the most recent redial phone number. Chain dialing can be useful when accessing numbers other than phone numbers (such as bank account information or access codes). To access a number in the directory while on a call: 1. Press MENU/SELECT twice to select >DIRECTORY. 2.
Telephone operation Multiple handset use You can use up to two system handsets at a time on an outside call. If a handset is already on a call and you would like to join the call, press /FLASH or on another handset to join the call. To end the call, press OFF/CLEAR or place the handset in the telephone base or charger. The call will not be terminated until all handsets hang up. You can buy additional expansion handsets (model CS6209) for this telephone base.
Telephone operation Share an outside call You can call another system handset to join an outside call. That call continues even if you hang up. 1. During a call, press INT. The other handset rings. The outside call is put on hold. • If you have a two-handset system, your handset screen shows CALLING OTHER HANDSET. The other handset rings and its screen shows OTHER HANDSET IS CALLING. • If you have more than two handsets, your screen shows TRANSFER TO:. Use the dialing keys to select the other handset.
Telephone operation Directory The directory can store up to 50 entries with up to 30 digits for each phone number and 15 characters for each name. • When there are no records in the directory, the screen shows DIRECTORY EMPTY. • When the directory is full and you try to save an entry, the screen shows LIST FULL. • If you try to save a number already stored in the directory, the screen shows ALREADY SAVED.
Telephone operation Store a directory entry Use the following steps to store an entry in the directory. 1. Press MENU/SELECT when the handset is not in use. >DIRECTORY 2. Press or to select >DIRECTORY and then press CALL LOG MENU/SELECT. 3. Press or to select >STORE, then press MENU/SELECT. The screen shows ENTER NUMBER. >STORE 4. Use the dialing keys to enter the number. REVIEW • Press MUTE/REMOVE to backspace and erase a digit. • Press and hold MUTE/REMOVE to erase the ENTER NUMBER entire entry.
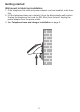
Telephone operation Character chart Use the dial pad and the chart below to enter a name (up to 15 characters). Each press of a particular key causes the characters to be displayed in the following order: Number key Characters by number of key presses 1 2 3 , 4 5 6 7 1 1 # , - .
Telephone operation Search the directory Entries are sorted alphabetically. To search the directory: when the handset is not in use. 1. Press -ORPress MENU/SELECT when the handset is not in use. Press or to select >DIRECTORY and then press MENU/SELECT twice. 2. Press or to browse. >REVIEW STORE VTECH 800-595-9511 Alphabetical search To start an alphabetical search: 1. Press when the handset is not in use. -ORPress MENU/SELECT when the handset is not in use.
Telephone operation Edit a directory entry Use the following steps to edit an entry in the directory. 1. Press when the handset is not in use. -ORPress MENU/SELECT when the handset is not in use. Press or to select >DIRECTORY and then press MENU/SELECT twice. 2. Press or , or use the alphabetical search to browse (see page 21). 3. Press MENU/SELECT to select an entry. The screen EDIT NUMBER shows EDIT NUMBER. 595-9511_ 4. Use the dialing keys to edit the number.
Telephone operation About caller ID You can use this telephone with regular caller ID service or combined caller ID with call waiting. You can use the telephone’s other features without subscribing to caller ID services. There might be fees for caller ID services and these services might not be available in all areas. Depending on your service, you might see the caller’s number or the caller’s name and number. The time and date are sent by the telephone company along with the call information.
Telephone operation Call log If you subscribe to caller ID service, information about each caller appears after the first or second ring. If you answer a call before the caller information appears on the screen, it will not be saved in the call log. • The call log stores up to 50 entries. Each entry has up to 24 digits for the phone number and 15 characters for the name. If the phone number has more than 15 but fewer than 24 digits, only the last 15 digits appear.
Telephone operation Missed calls indicator When there are unreviewed calls in the call log, the handset shows XX MISSED CALL(S). Each time you review a call log entry marked NEW, the number of missed calls decreases by one. When you have reviewed all the missed calls, the missed calls indicator no longer shows. If you do not want to review the missed calls one by one, press and hold OFF/CLEAR to erase the missed calls indicator. All the entries are then considered old and kept in the call log.
Telephone operation Make a call log entry ready to dial Although the call log entries received have 10 digits (the area code plus the seven-digit number), in some areas, you might need to dial only the seven digits, or 1 plus the seven digits, or 1 plus the area code plus the seven digits. You can change the number of digits that you dial from the call log and store to the directory.
Telephone operation Delete from the call log To delete one entry: 1. When in the call log, press or to browse. 2. Press MUTE/REMOVE to delete the selected entry. To delete all entries: 1. Press MENU/SELECT when the handset is not in use. 2. Press or to select >CALL LOG, then press MENU/SELECT. 3. Press or to select >DEL ALL CALLS, then press MENU/SELECT. 4. The screen shows DELETE ALL CALLS? Press MENU/SELECT to confirm.
Telephone operation Redial list The telephone stores the five most recently dialed numbers. • When there are already five entries, the oldest entry is deleted to make room for the new entry. • Entries are shown in reverse chronological order. • Press REDIAL/PAUSE to browse the redial list. Dial a redial entry 1. Press REDIAL/PAUSE, then , or REDIAL/PAUSE to browse. You hear a double beep when it reaches the beginning or end of the redial list. 2. Press /FLASH or to dial the number. Delete from redial 1.
Answering system operation Answering system and voicemail Your telephone has both a digital answering system and voicemail indication. Most telephone companies offer voicemail service (fees may apply). Your telephone’s answering system and voicemail indication are independent features, and each alerts you to new messages differently. For more information on the voicemail indicators, see page 10. To listen to your voicemail, follow the instructions provided by your voicemail service provider.
Answering system operation Turn the answering system on or off The answering system must be turned on to answer and record messages. When the answering system is turned on, the ANS ON/OFF light on the telephone base will be on and ANS ON will display on the handset. To turn on or off with the telephone base: • Press ANS ON/OFF to turn the answering system on or off. If the answering system is turned on, it announces, “Calls will be answered.
Answering system operation New message indication The message window on the telephone base flashes and shows on the handset when there are new answering system messages. If the new message alert tone is turned on, the telephone base beeps every 10 seconds when there are unreviewed messages. Message playback If you have new messages, the telephone plays only the new messages (oldest first). If there are no new messages, the telephone plays back all messages (oldest first).
Answering system operation Delete all messages To delete all messages with the telephone base: Press X/DELETE when the phone is not in use. The telephone announces, “To delete all old messages, press DELETE again.” Press X/DELETE again. All previously heard messages are erased and the telephone announces, “All old messages deleted.” To delete all messages with a handset: 1. Press MENU/SELECT to show the menu when the handset is not in use. 2. Press MENU/SELECT to select >ANS. SYSTEM. 3.
Answering system operation Message window displays Window displays Descriptions 0 No messages. 1-99 Total number of old messages recorded. 0-99 (flashing) Total number of messages recorded. The telephone base might have lost and regained power. The clock needs to be set. 1-99 & F (alternating) Memory is full with total number of messages recorded. 1-99 (flashing) Current message number during new message playback. 1-99 Current message number during old message playback.
Answering system operation Remote access A two-digit security code is required to access the answering system remotely from any touch tone telephone. The preset code is 19; see Remote code on page 11 to change it. 1. Dial your telephone number from any touch tone telephone. 2. When the system plays your announcement, enter the two-digit security code. 3. You can also enter one of the following remote commands. Command Function 1 Play all messages. 2 Play only new messages.
Appendix Handset display screen messages ALREADY SAVED CALL LOG EMPTY CALLING HANDSET X (for models with three or more handsets) The telephone number entered is already stored in the directory. There are no call log entries. Calling another handset. CALLING OTHER HANDSET (for models with two handsets) CHARGING The cordless handset is searching for the telephone base. The handset with low battery is recharging. DIRECTORY EMPTY There are no directory entries. ENDED You have just ended a call.
Appendix Handset display screen messages NO LINE There is no telephone line connected. NO SIGNAL, CALL ENDED **PAGING** Communication between handset and telephone base is lost during a call. One handset is already viewing the call log or directory and another handset attempts to review it. Connected to the external call during call transfer. The cordless handset locator is activated. PHONE The handset is on a call. PLACE IN CHARGER SAVED The battery is very low.
Appendix Handset and telephone base indicators Handset lights On when the handset speakerphone is in use. CHARGE On when the handset is charging in the telephone base or charger. Telephone base lights IN USE Flashes when there is an incoming call or another telephone sharing the same line is in use. On when the handset is in use. VOICEMAIL Flashes when you have new voicemail from your telephone company. ANS ON/OFF On when the answering system is on.
Appendix Battery It takes up to 16 hours for the battery to be fully charged. When it is fully charged, you can expect the following performance: Operation Operating time While in handset use (talking*) Up to eight hours While in speakerphone mode (talking*) Up to five hours While not in use (standby**) Up to six days *Operating times vary depending on your actual use and the age of the battery. **Handset is not charging or in use.
Appendix Expand your telephone system The handsets provided with your telephone system are pre-registered. Each handset is assigned a number that shows on the handset display. Additional handsets registered to the telephone system are assigned in sequential order. For instance, if the telephone system already has HANDSET 1 and HANDSET 2, the new registered handset is assigned HANDSET 3. This telephone system accommodates up to 12 handsets.
Appendix Replace a handset If you want to replace a handset or re-assign the designated handset number of a registered handset, you must de-register all the handsets and then individually register each handset. To make de-registration easier, read all of the instructions on this page before you begin. To de-register all handsets: 1. Press and hold FIND HANDSET on the telephone base for about 10 seconds (until the IN USE light on the telephone base turns on and starts to flash), then release FIND HANDSET. 2.
Appendix Troubleshooting If you have difficulty with your telephone, please try the suggestions below. For Customer Service, visit our website at www.vtechphones.com, or call 1 (800) 595-9511; in Canada, call 1 (800) 267-7377. My telephone does not work at all. • Make sure the battery is installed and charged correctly (page 3). For optimum daily performance, return the handset to the telephone base or charger after use.
Appendix Troubleshooting The CHARGE light is off. • Clean the charging contacts on the handset and telephone base each month with a pencil eraser or a dry non-abrasive fabric. • Make sure the power adapter and telephone line cord are plugged in correctly and securely. • Unplug the power adapter. Wait for 15 seconds before plugging it back in. Allow up to one minute for the handset and telephone base to reset. There is no dial tone. • • • • First, try all the above suggestions.
Appendix Troubleshooting I cannot dial out. • First, try all the above suggestions. • Make sure there is a dial tone before dialing. It is normal if the handset takes a second or two to synchronize with the telephone before producing a dial tone. Wait an extra second before dialing. • If the other telephones in your home are having the same problem, the problem is in the wiring or local service. Contact your local telephone company (charges might apply). • Eliminate any background noise.
Appendix Troubleshooting • The location of your telephone base can impact the performance of your cordless phone. For better reception, install the telephone base in a centralized location within your home or office, away from walls or other obstructions. In many environments, elevating the telephone base improves overall performance. • Disconnect the telephone base from the telephone wall jack and plug in a corded telephone.
Appendix Troubleshooting Caller ID entries do not match the numbers I need to dial. • Caller ID service delivers 10 digits (the area code plus the seven-digits number). If you need to dial something other 10 digits, see page 26 for instructions on changing the number. • If you dial seven digits for local calls you might want to use the Home area code feature (page 10). CONNECTING... shows in the handset screen. • The handset might be out of range. Move it closer to the telephone base.
Appendix Troubleshooting The messages on the answering system are very difficult to hear. • Press VOL on ���������������������������������������������������������������� the telephone base or handset to increase the speaker volume. The answering system does not record messages. • Make sure the answering system is on. • If the answering machine memory is full, it does not record new messages until some old messages are deleted. The messages on the answering system are incomplete.
Appendix Important safety instructions When using your telephone equipment, basic safety precautions should always be followed to reduce the risk of fire, electric shock and injury, including the following: 1. Read and understand all instructions. 2. Follow all warnings and instructions marked on the product. 3. Unplug this product from the wall outlet before cleaning. Do not use liquid or aerosol cleaners. Use a damp cloth for cleaning. 4. Do not use this product near water. 5.
Appendix Operating range This cordless telephone operates with the maximum power allowed by the Federal Communications Commission (FCC). Even so, this handset and telephone base can communicate over only a certain distance - which can vary with the locations of the telephone base and handset, the weather, and the layout of your home or office. When the handset is out of range, the handset displays CONNECTING...
Appendix About cordless telephones • Privacy: The same features that make a cordless telephone convenient create some limitations. Telephone calls are transmitted between the telephone base and the cordless handset by radio waves, so there is a possibility that the cordless telephone conversations could be intercepted by radio receiving equipment within range of the cordless handset. For this reason, you should not think of cordless telephone conversations as being as private as those on corded telephones.
Appendix Warranty What does this limited warranty cover? The manufacturer of this VTech Product warrants to the holder of a valid proof of purchase (“Consumer” or “you”) that the Product and all accessories provided in the sales package (“Product”) are free from defects in material and workmanship, pursuant to the following terms and conditions, when installed and used normally and in accordance with the Product operating instructions.
Appendix Warranty How do you get warranty service? To obtain warranty service in the United States of America, please call 1 (800) 595-9511. In Canada, please call 1 (800) 267-7377. NOTE: Before calling for service, please review the user’s manual - a check of the Product’s controls and features may save you a service call.
Appendix FCC, ACTA and IC regulations FCC Part 15 This equipment has been tested and found to comply with the requirements for a Class B digital device under Part 15 of the Federal Communications Commission (FCC) rules. These requirements are intended to provide reasonable protection against harmful interference in a residential installation.
Appendix FCC, ACTA and IC regulations If this equipment is causing harm to the telephone network, the telephone company may temporarily discontinue your telephone service. The telephone company is required to notify you before interrupting service. If advance notice is not practical, you will be notified as soon as possible. You will be given the opportunity to correct the problem and the telephone company is required to inform you of your right to file a complaint with the FCC.
Appendix Technical specifications Frequency control Crystal controlled PLL synthesizer Transmit frequency Handset: 1921.536-1928.448 MHz Telephone base: 1921.536-1928.448 MHz Channels 5 Nominal effective range Maximum power allowed by FCC and IC. Actual operating range might vary according to environmental conditions at the time of use. Size Handset: 6.35 X 1.87 X 1.24 in (161.50 X 47.50 X 31.50 mm) Telephone base: 5.38 X 4.70 X 3.28 in (137.00 X 119.50 X 83.50 mm) Charger: 3.70 X 3.60 X 1.
Index A F Add a handset 39 Alphabetical search 21 Announcement 12 Answer a call 13 Answering system 29 Find handset 14 H Handset display screen messages 35 Handset icons 37 Handset lights 37 Home area code 10 B Battery 3, 38 I C Important safety instructions 47 Intercom 16 Caller ID 23 Call intercept 30 Call log 24 Call log display screen messages 27 Call screening 30 Call waiting 14 Chain dialing 15 Character chart 20 Charging 3 Clear voicemail 10 K Key tone 8 L Language 9 M Maintenance 48
Index P Parts checklist 1 Play your announcement 12 Predialing 13 R Record and play memos 32 Record announcement 12 Redial list 28 Register a handset 39 Remote access 34 Remote code 11 Review the call log 25 Ringer mute 14 Ringer tone 8 Ringer volume 8 V Volume 8, 13 W Wall mount installation 4 Warranty 50 S Save a call log entry to the directory 26 Search the directory 21 Share an outside call 17 Speakerphone 13 Store a directory entry 19 Store from redial 19 T Technical specifications 54 Teleph
VTECH TELECOMMUNICATIONS LTD. A member of THE VTECH GROUP OF COMPANIES. Distributed in the U.S.A. by VTech Communications, Inc. Beaverton, Oregon 97008 Distributed in Canada by VTech Technologies Canada, Ltd., Richmond, B.C. V6W 1L5 Copyright © 2009 for VTECH TELECOMMUNICATIONS LTD. Printed in China.