Go to www.vtechcanada.com for the latest VTech product news. CS6858-3 CS6858-33 CS6859 CS6859-2 DECT 6.
Congratulations on purchasing your new VTech product. Before using this telephone, please read Important safety instructions. This manual has all the feature operations and troubleshooting necessary to install and operate your new VTech telephone. Please review this manual thoroughly to ensure proper installation and operation of this innovative and feature rich VTech product. For support, shopping, and everything new at VTech, visit our website at www.vtechcanada.com.
9. Do not allow anything to rest on the power cord. Do not install this product where the cord may be walked on. 10. Never push objects of any kind into this product through the slots in the telephone base or handset because they may touch dangerous voltage points or create a short circuit. Never spill liquid of any kind on the product. 11. To reduce the risk of electric shock, do not disassemble this product, but take it to an authorized service facility.
codes for special disposal instructions. • Do not open or mutilate the battery. Released electrolyte is corrosive and may cause burns or injury to the eyes or skin. The electrolyte may be toxic if swallowed. • Exercise care in handling batteries in order not to create a short circuit with conductive materials. • Charge the battery provided with this product only in accordance with the instructions and limitations specified in this manual.
Table of contents What’s in the box . . . . . . . . . . . . . . . 1 Transfer a call . . . . . . . . . . . . . . . . . . . . . 14 Overview . . . . . . . . . . . . . . . . . . . . . . 2 Intercom . . . . . . . . . . . . . . . . . . . . . . . . . . 15 Answer an incoming call during an intercom call . . . . . . . . . . . . . . . . . . . . 16 Handset overview . . . . . . . . . . . . . . . . . . . 2 Telephone base overview . . . . . . . . . . . . . 3 Call transfer using intercom . . . . . . . . . . .
Table of contents ® About the built-in answering system and voicemail service . . . 26 The RBRC seal . . . . . . . . . . . . . . . 39 FCC, ACTA and IC regulations . . . 40 Set your built-in answering system . . . . . . . . . . . . . . . . . . . . . . 27 Limited warranty . . . . . . . . . . . . . . 42 Turn the answering system on or off . . . . 27 Technical specifications . . . . . . . . . 44 Default announcement . . . . . . . . . . . . . . 27 Record your own announcement . . . . . . .
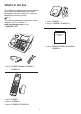
What’s in the box Your telephone package contains the following items. Save your sales receipt and original packaging in case it is necessary to ship your telephone for warranty service. NOTE To purchase replacement batteries or power adapters, visit our website at www.vtechcanada.com or call 1 (800) 267-7377.
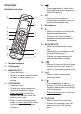
Overview 5– • Press repeatedly to show other dialing options when reviewing a caller ID log entry. Handset overview p 6 – INT • Press to start an intercom conversation or transfer a call (for multi-handset models only). a b 7 – Microphone o n m 8– • Make or answer a call using the handset speakerphone. • During a call, press to switch between the speakerphone and the handset. c d l 9 – MUTE/DELETE • Mute the microphone during a call. • Delete digits or characters while using the dialing keys.
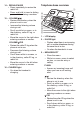
14 – REDIAL/PAUSE • Press repeatedly to review the redial list. • Press and hold to insert a dialing pause while entering a number. Telephone base overview 15 – VOLUME/ / • Review the directory when the phone is not in use. • Increase the listening volume during a call. • Scroll up while in a menu, or in the directory, caller ID log, or redial list. • Move the cursor to the right when entering numbers or names. VOLUME/ /CID • Review the caller ID log when the phone is not in use.
• Move the cursor to the left when entering numbers or names. 9– • Press repeatedly to show other dialing options when reviewing a caller ID log entry. OFF/CANCEL • Press and hold to erase the missed call indicator while the phone is not in use. • Press to return to the previous menu; or press and hold to return to idle mode, without making changes. 10 – • Press to add a space when entering names. 11 – • While you have set the dial mode to pulse and on a call, press to switch to tone dialing temporarily.
Display icons overview Handset and Telephone base lights overview Handset icons Handset lights The battery icon flashes when the battery is low and needs charging. On when the handset speakerphone is in use. CHARGE The battery icon animates when the battery is charging. The battery icon becomes solid when the battery is fully charged. Telephone base lights IN USE On when the telephone line is in use. On when you are registering a handset. Flashes quickly when there is an incoming call.
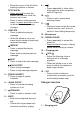
Connect Connect the charger You can choose to connect the telephone base for desktop usage or wall mounting. NOTES • Use only the power adapters supplied with this product. • Make sure the electrical outlets are not controlled by wall switches. • The adapters are intended to be correctly oriented in a vertical or floor mount position. The prongs are not designed to hold the plug in place if it is plugged into a ceiling, under-the-table or cabinet outlet. Mount the telephone base 1.
Install and charge the battery 3. Plug the telephone line cord (or DSL filter) into the wall jack. Align the holes on the back of the telephone base with the standard wall plate. Slide the bracket down until it clicks securely in place. Connect the power adapter to the telephone base and an electrical outlet not controlled by a wall switch. Install the battery as shown below. NOTES • Use only supplied battery.
Charge the battery When it is fully charged, you can expect the following performance: Place the handset in the telephone base or the charger to charge. Operation Operating time While in handset use (talking*) Seven hours While in speakerphone mode (talking*) Three hours and 30 minutes While not in use (standby**) Five days * Operating times vary depending on your actual use and the age of the battery. ** Handset is not charging or in use.
Before use Operating range After you install your telephone or power returns following a power outage, the handset will prompt you to set the date and time. This cordless telephone operates with the maximum power allowed by the Federal Communications Commission (FCC). Even so, this handset and telephone base can communicate over only a certain distance - which can vary with the locations of the telephone base and handset, the weather, and the layout of your home or office.
Configure your telephone Set date and time 1. Press MENU when the phone is not in use. 2. Press or until the screen displays the desired feature menu. 3. Press SELECT to enter that menu. • Make sure you set the date and time including the year correctly; otherwise the answering system does not announce the correct day of the week for your recorded messages time stamp. NOTE 1. Press MENU when the handset is not in use. 2. Press or to highlight Set date/time, and then press SELECT. 3.
Home area code Dial mode If you dial your local calls using only seven digits (area code not required), you can program your home area code so that when you receive a call within your local area, the telephone number is automatically stored without the area code in the caller ID log. 1. Press MENU when the phone is not in use. 2. Press or to highlight Settings, and then press SELECT. 3. Press or to highlight Home area code, and then press SELECT. 4.
Telephone Operations Make a call 1. Press or on ���������������� the handset. 2. When you hear a dial tone, dial the number. • The handset displays Unable to call if the telephone line is in use. Handset control key panel: NOTES • The handset shows the elapsed time as you talk (in hours, minutes and seconds). • While entering numbers, press and hold PAUSE to insert a dialing pause (a p appears). Predial a call 1. Enter the telephone number. 2. Press or to �������� dial.
Volume control To join a call: To adjust the listening volume at the handset: • When a handset is already on a call, press or on another handset to join the call. • Press OFF or place the handset in the telephone base or handset charger to exit the call. The call continues on the other handset until both handsets hang up. During a call, press /VOLUME/ . To adjust the listening volume at the telephone base: During a call, press /VOL/ the listening volume.
Transfer a call To access a number from the caller ID log while on a call: While on an outside call, you can transfer the call from one handset to another. 1. Press MENU. 2. Press or to highlight Caller ID log, and then press SELECT. 3. Press or to scroll to the desired entry. 4. Press SELECT to dial the displayed number. 1. During a call, press MENU. 2. Press or to scroll to Transfer, then press SELECT. • If you have one handset, your handset displays Calling base and then Transferred.
Intercom NOTES • You can cancel the intercom call before it is answered by pressing OFF or INT. • If the destination device does not answer the intercom call within 100 seconds, is accessing the answering system, on a call or out of range, the originating handset displays Unable to call and returns to idle mode. • You can press OFF or MUTE on the destination handset, or CANCEL or MUTE on the telephone base to temporarily silence the intercom ringer.
Call transfer using intercom - OR To end the intercom call on the destination handset, press OFF or place the handset back in the telephone base or charger. Both devices display Intercom ended. Use the intercom feature to transfer an outside call from one device to another. 1. During a call, press INT on your handset or telephone base • If you have one handset, the outside call is put on hold and your handset displays Calling base or the telephone base displays Calling HS 1.
Redial list • If the destination device does not answer within 100 seconds, is in use, on a call or is out of range, the originating device displays Unable to call and then reconnects to the outside call. Each handset stores the last 10 telephone numbers dialed (up to 30 digits). When there are already 10 entries, the oldest entry is deleted to make room for the new entry. 3.
Directory Press the key repeatedly until the desired character appears. The first character of every word is capitalized. 7. Press SELECT to save. You hear a confirmation tone and then the handset returns to the previous menu. The directory can store up to 50 entries, which are shared by all handsets. Each entry may consist of a telephone number up to 30 digits, and a name up to 15 characters. Each handset directory is independent (for multiple handset models only).
Alphabetical search While entering names and numbers, you can: 1. Press when the phone is not in use. -ORi. Press MENU when the phone is not in use. ii. Press or to highlight Directory, and then press SELECT. iii. Press or to highlight Review, and then press SELECT. 2. Use the dialing keys to enter the letter associated with the name.
Speed dial Reassign a speed dial entry You can copy up to 9 directory entries into the speed dial locations (0 and 2-9) so that you can dial these numbers using fewer keys than usual. 1. Press MENU when the phone is not in use. 2. Press or to scroll to Directory, then press SELECT. 3. Press or to scroll to Speed dial, then press SELECT. 4. Press or , or use the dialing keys to choose the speed dial location you want to reassign. 5. Press SELECT twice. The screen displays Reassign SD. 6. Press SELECT.
Caller ID Delete a speed dial entry 1. Press MENU when the phone is not in use. 2. Press or to scroll to Directory, then press SELECT. 3. Press or to scroll to Speed dial, then press SELECT. 4. Press or , or use the dialing keys to choose the desired speed dial location, then press DELETE. The screen displays Clear SD #X? 5. Press SELECT to confirm. You hear a confirmation tone. If you subscribe to caller ID service, information about each caller appears after the first or second ring.
-OR1. Press MENU when the phone is not in use. 2. Press or to scroll to Caller ID log, and then press SELECT twice to choose Review. The handset displays the first entry in the caller ID log. 3. Press or to browse. If you do not want to review the missed calls one by one, press and hold CANCEL on the handset when not in use to clear the missed call indicator. All the entries are then considered old and kept in the caller ID log.
Dial a caller ID log entry Delete the caller ID log entries 1. Search for the desired caller ID log entry (see Review the Caller ID log). 2. When the desired entry displays, press or to dial. 1. Search for the desired caller ID log entry (see Review the Caller ID log). 2. Press DELETE to delete the displayed entry. Save a caller ID log entry to the directory To delete all entries: 1. Press MENU when the phone is not in use. 2. Press or to scroll to Caller ID log, and then press SELECT. 3.
Sound settings Handset ringer volume Key tone You can set the ringer volume or turn the ringer off on each handset. When the ringer is off, appears on the screen. You can turn the key tone on or off for each handset. If you turn the key tone off, there are no beeps when you press the handset keys. 1. Press MENU when the handset is not in use. 2. Press or to highlight Ringers, and then press SELECT. 3. Press or to select Ringer volume, and then press SELECT. 4. Press or to sample each volume level. 5.
Temporary ringer silencing Quiet mode When the telephone is ringing, you can temporarily silence the ringer of the handset without disconnecting the call. The next call rings normally at the preset volume. You can turn on the quiet mode for a period of time (1-12 hours). During this period, all tones (except paging tone) are muted. 1. Press and hold ) when the handset is not in use. 2. The handset displays Quiet: _ _ hours. Use the dialing keys (0-9) to enter the desired duration (1-12). 3.
About the built-in answering system and voicemail service Telephone base control key panel: For message recording, your telephone has a built-in answering system, and it also support voicemail service offered by your telephone service provider (subscription is required, and fee may apply). The main differences between them are: Category Storage Built-in answering system Voicemail from telephone service Messages are Messages are stored in the stored in a telephone base.
Set your built-in answering Default announcement The telephone is preset with a greeting system that answers calls with “Hello, please leave a message after the tone.” You can use this preset announcement, or replace it with your own. The answering system can record and store up to 99 messages. Each message can be up to three minutes in length. The total storage capacity for the announcement, messages and memos is approximately 11 minutes.
Turn the call screening on or off 4. The handset displays Play [2] Del [3] Rec [7] and it announces, “To play, press 2. To record, press 7.” Press 3 to delete your recorded announcement. The handset displays Annc deleted and then the system announces, “Announcement deleted.” You hear a confirmation tone. Use this feature to choose whether incoming messages can be heard while they are being recorded. 1. Press MENU when the phone is not in use. 2. Press or to scroll to Answering sys, and then press SELECT.
Using your built-in answering system Set the recording time You can set the recording time limit for each incoming message. 1. Press MENU when the phone is not in use. 2. Press or to scroll to Answering sys then press SELECT. 3. Press or to scroll to Ans sys setup then press SELECT. 4. Press or to scroll to Recording time then press SELECT. 5. Press or to choose 3 minutes, 2 minutes, or 1 minute. 6. Press SELECT to save and you hear a confirmation tone.
To play messages on a handset: To delete all old messages on a handset: 1. Press MENU when the phone is not in use. 2. Press SELECT to choose Play messages. 1. Press MENU when the phone is not in use. 2. Press or to scroll to Answering sys, and then press SELECT. 3. Press or to scroll to Delete all old, and then press SELECT. The handset shows Delete all msg? 4. Press SELECT to confirm. The handset displays Deleting... then No old messages and then returns to the previous menu.
6 Skip to the next message (during playback). *7 Record a new announcement. 8 End the call. 0 Turn the answering system on or off. Call screening To screen a call at the telephone base: If the answering system and call screening are turned on, the announcement and the incoming message broadcast at the telephone base while the call is answered by the answering system. 4. Hang up or press 8 to end the call.
Using your built-in answering system and voicemail service Record, play, and delete memos Memos are your own recorded messages used as reminders for yourself or others using the same answering system. You can record your own memos using a system handset. Each message can be up to 3 minutes in length. Play and delete them in the same way as incoming messages (see Message playback).
Retrieve voicemail from telephone service Expand your telephone system Voicemail is a feature available from most telephone service providers. It may be included with your telephone service, or may be optional. Fees may apply. You can add new handsets (CS6709, purchased separately) to your telephone system. Your telephone base supports a maximum of five handsets. For more details, refer to the user’s manual that comes with your CS6709 new handset.
Screen messages Base is calling The telephone base is calling (for intercom calls). Call log empty There are no caller ID log entries. Calling HS X (for models with two or more handsets only) You are calling another handset (for intercom calls). Contact deleted A directory entry is deleted. Directory empty There are no directory entries. Directory full The directory is full. You cannot save any new entry unless you delete some current entries. Ended You have just ended a call.
Out of range or no pwr at base The telephone base has lost power, or the handset is out of range. Phone The handset is on a call. Put in charger The battery is very low. Put the handset in the telephone base or charger for recharging. Quiet mode off The quiet mode is turned off. Quiet mode on The quiet mode is turned on. Rec mem full The answering system has no recording time left. Rec mem low The answering system has less than three minutes of recording time left. Registering...
Frequently asked questions I cannot dial out. Below are the questions most frequently asked about the cordless telephone. If you cannot find the answer to your question, visit our website at www.vtechcanada.com or call 1 (800) 267-7377 for customer service. My telephone does not work at all. The display shows No line. I cannot hear the dial tone. Make sure there is a dial tone before dialing.
I hear other calls when using the telephone. I hear noise on the cordless handset and the keys do not work. There is interference during a telephone conversation. My calls fade out when I am using the cordless handset. Disconnect the telephone base from the telephone wall jack. Plug in a different telephone. If you still hear other calls, the problem is probably in the wiring or telephone service. Contact your telephone service provider. Make sure the telephone line cord is plugged in securely.
The answering system does not record messages. ECO mode Make sure the answering system is on. When the answering system is on, ANS ON should display on the handset and the telephone base. This power conserving technology reduces power consumption for optimal battery performance. The ECO mode activates automatically whenever the handset is synchronized with the telephone base. When the answering machine memory is full, it does not record new messages until some old messages are deleted.
® General product care The RBRC seal Taking care of your telephone Your cordless telephone contains sophisticated electronic parts, so it must be treated with care. The RBRC® seal on the nickel-metal hydride battery indicates that VTech Communications, Inc. is voluntarily participating in an industry program to collect and recycle these batteries at the end of their useful lives, when taken out of service within the United States and Canada.
FCC, ACTA and IC regulations and (2) this device must accept any interference received, including interference that may cause undesired operation. Privacy of communications may not be ensured when using this telephone. To ensure safety of users, the FCC has established criteria for the amount of radio frequency energy that can be safely absorbed by a user or bystander according to the intended usage of the product. This product has been tested and found to comply with the FCC criteria.
RJ11 jack should normally be used for connecting to a single line and an RJ14 jack for two lines. See the installation instructions in the user’s manual. The Ringer Equivalence Number (REN) is used to determine how many devices you may connect to your telephone line and still have them ring when you are called. The REN for this product is encoded as the 6th and 7th characters following the US: in the product identifier (e.g., if ## is 03, the REN is 0.3).
Limited warranty under the terms of this limited warranty, this limited warranty also applies to the repaired or replacement Product for a period of either (a) 90 days from the date the repaired or replacement Product is shipped to you or (b) the time remaining on the original one-year warranty; whichever is longer.
Other limitations This warranty is the complete and exclusive agreement between you and VTech. It supersedes all other written or oral communications related to this Product. VTech provides no other warranties for this Product. The warranty exclusively describes all of VTech’s responsibilities regarding the Product. There are no other express warranties. No one is authorized to make modifications to this limited warranty and you should not rely on any such modification.
Technical specifications Frequency control Crystal controlled PLL synthesizer Transmit frequency Handset: 1921.536-1928.448 MHz Telephone base: 1921.536-1928.448 MHz Channels 5 Nominal effective range Maximum power allowed by FCC and IC. Actual operating range may vary according to environment conditions at the time of use. Power Handset: 2.
Designed to fit your home. And your life. VTech Technologies Canada Ltd. A member of THE VTECH GROUP OF COMPANIES. VTech is a registered trademark of VTech Holdings Limited. Specifications are subject to change without notice. Copyright © 2014 for VTech Technologies Canada Ltd. All rights reserved. 12/14. CS6859-X_CA_WEBCIB_V4.