User’s manual Models: ES1210/ ES1210-2/ES1210-3 w w w.v tec h.
Table of contents 1. Important safety instructions................................................. 1 2. SET UP THE TELEPHONE..................................................................... 3 3. GET TO KNOW YOUR PHONE............................................................... 6 4. Use your phone............................................................................... 12 2.1 2.2 2.3 2.4 2.5 3.1 3.2 3.3 3.4 3.5 4.1 4.2 4.3 4.4 4.5 4.6 4.7 4.8 4.9 4.10 5. Package Contents...........
5.3 5.4 5.5 5.6 5.7 View a Phonebook Entry...........................................................................17 Edit a Phonebook Entry............................................................................18 Delete a Phonebook Entry........................................................................18 Delete the Entire Private Phonebook........................................................18 Check the Phonebook Usage...................................................................
1. Important safety instructions When using your telephone equipment, basic safety precautions should always be followed to reduce the risk of fire, electric shock and injury, including the following: 1. Read and understand all the instructions. 2. Follow all warnings and instructions marked on the product. 3. Unplug this product from the wall outlet before cleaning. Do not use liquid cleaners or aerosol cleaners. Use a damp cloth for cleaning. 4.
3. The correct disposal of your old appliance/battery will help prevent potential negative consequences for the environment and human health. For more detailed information about disposal of your old appliance/battery, please contact your city office, waste disposal service or The Shop where you purchased the product. If you have questions about this product, or having difficulty with setup or operation, call or Customer Service Centre.
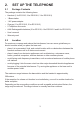
2. SET UP THE TELEPHONE 2.1 Package Contents The package contains the following items: • Handset (1 for ES1210, 2 for ES1210-2, 3 for ES1210-3) • 1 Base station • 1 AC power adapter • Charger (1 for ES1210-2, 2 for ES1210-3) • 2 Telephone line cords • AAA Rechargeable batteries (2 for ES1210, 4 for ES1210-2 and 6 for ES1210-3) • User’s manual • Warranty card 2.
2.3 Connect the Base Station Power adapter cable /LQH &RUG Line Cord /LQH &RUG 1. Insert the DC plug of the power adapter and the telephone line cord into the base station, as shown above. 2. Insert the other end of the power adapter into the wall outlet not controlled by a wall switch and the telephone line cord into a telephone wall jack. If you have DSL high /LQH &RUG speed internet service, a DSL filter (not included) is required. /LQH &RUG 2. 2.
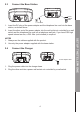
2.5 Install and Charge the Handset Batteries 1. Slide open the battery compartment cover. 2. Place the two batteries as indicated. Check that the polarity is correct. 3. Slide the battery compartment cover back. 4. Put the handset on the base and charge for 14 hours for the first charge. A beep indicates that the handset is properly placed on the base or charger. NOTES 1. Use only the supplied NiMH rechargeable batteries. 2.
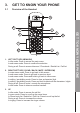
3. GET TO KNOW YOUR PHONE 3.1 Overview of the Handset 12 9 1 2 3 6 4 7 8 10 11 HS BS 1. LEFT SOFT KEY (MENU/OK) In idle mode: Press to access the main menu. In sub-menu mode: Press to confirm the selection. During a call: Press to access Intercom / Phonebook / Redial List / Call list. 2. RIGHT SOFT KEY (CLEAR / BACK / MUTE / INTERCOM) In main menu mode: Press to go back to idle screen. In sub-menu mode: Press to go back to previous level.
4. DOWN In idle mode: Press to access the redial list. In menu mode: Press to scroll down the menu items. In Phonebook list / Redial list / Call list: Press to scroll down the list. During a call: Press to decrease the volume. In ringing: Press to decrease the ringer volume. 5. TALK In idle / pre-dialling mode: Press to make a call. In Redial list / Call list / Phonebook entry: Press to make a call to the selected entry in the list. During ringing: Press to answer a call. 6.
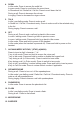
3.2 Overview of the Base Station 1 2 PAGE HS BS Charger Press the Page on the base station to page your handset. It will ring for approximately 60 seconds. 2. CHARGING CRADLE 3.3 Handset LCD Display Icons and Symbols p q The LCD display gives you information on the current status of the telephone. p q p q Scroll up/ down the menu items/ Phonebook list/ Redial list/ Call list On steadily when the handset is in range of the base. Flashes when out of range of the base or not registered to the base.
Indicates that the ringer is switched off. On steadily when an alarm is set. Flashes when the alarm time set before reaches. Indicates that the keypad is locked. Indicates when there are unreviewed new messages. Off when all the messages have been read. Indicates when the battery is fully charged. The whole icon flashes when the battery performs initial charging. Internal block icon flashes when the battery is in final charging stage.
3.4 Menu Structure In idle mode, press structure. Key Press to enter the menu.
3.5 Text and Digit Entry Table The following table shows you where each letter and punctuation character can be found. Respective character table will be used when corresponding menu language is selected. This will be helpful when storing a name in the phonebook and renaming your handset. In editing mode, a cursor is displayed to indicate the current text entry position. It is positioned at the right of the last character entered. Notes 1.
4. Use your phone 4.1 Make a Call 4.1.1 Preparatory Dialling Enter the phone number and press entry. 4.1.2 Direct Dialing Press or 4.1.3 Call from the Phonebook or to dial the number. Press to clear the to take the line and enter the phone number. 4.1.4 Call from the Call List Press CID to access the Call List and press p q to select the desired Call List entry. Press or to dial the selected Call List entry. Alternatively, press to access the Call List from the main menu. 4.1.
4.3 End a Call During a call connection, press to end the call. OR Put the handset on the base station to end the call. 4.4 Adjust Earpiece and Hands Free Volume There are 5 levels (VOLUME 1 to VOLUME 5) to choose from earpiece and speakerphone volume. During a call: Press p q to select volume 1-5. The current setting is shown. When you end the call, the setting will remain at the last selected level. 4.5 Mute a Call You can talk to someone nearby without letting the caller hear you during a call.
4.8.1 Redial a Number from the Redial List 1. In idle mode, press REDIAL to access the redial list. Remark: If redial entry with name, press to view the number. 2. Press p q to browse the redial list. Press / to dial to the selected redial number. 3. NOTE If there are no numbers in the redial list, the display shows “EMPTY”. 4.8.2 Store a Redial Number into the Phonebook Follow Steps 1 and 2 in section 4.8.1. 2. Press 3. Press and p q to select ADD TO PB. to enter the name. 4.
4.10 Make an Internal Call This feature is only applicable when there are at least two registered handsets. It allows you to make internal calls, transfer external calls from one handset to another handset and make conference calls. If the called handset is not answered within 60 seconds, the called handset will stop ringing and the calling handset will return to standby mode. NOTE: If only one handset is registered to the base station, press POSSIBLE”. will display “NOT 4.10.1 Call Another Handset 1.
4.10.4 Make a 3-way Conference Call The conference call feature allows one external call to be shared with two handsets (in intercom). The three parties can share the conversation and no network subscription is required. During an external call: 1. Follow Steps 1 to 4 in section 4.10.3. 2. Press and hold on the calling handset to establish the conference call. If one of the handsets hangs up during a conference call, the other handset will remain on the call with the external party.
5. PRIVATE PHONEBOOK Your phone can store up to 20 private phonebook entries with names and numbers. Each phonebook entry can have a maximum of 20 digits for the phone number and 12 characters for the name. You can also select different ringtones for your phonebook entries. Phonebook entries are stored alphabetically by name. 5.1 Add a New Phonebook Entry In idle: 1. Press to access the phonebook. OR 1. Press and p q to select PHONEBOOK main menu item and then press to access the phonebook. 2.
5.4 Edit a Phonebook Entry In idle: 1. Press 2. 3. Press p q to select the desired phonebook entry. Press and p q to select EDIT. 4. Press 5. Edit the name and press 6. Edit the number and press 7. Press p q to select the ringtone and press 5.5 to access the phonebook. and the current contents of the selected phonebook entry displays. . . to confirm. Delete a Phonebook Entry In idle: Press 2. 3. Press p q to select the desired phonebook entry. Press and p q to select DELETE. 4.
6. CALLER DISPLAY (NETWORK DEPENDENT) This feature is available if you have subscribed to the Caller Line Identification service from your telephone company. Your phone can store up to 10 received calls with date/ time information in the Call List. The number will be shown on the LCD when the phone is ringing. If the number matches with one of the entries in your Private Phonebook, the caller’s name stored in the private phonebook will be displayed alternatively with the number.
6.4 Delete the Entire List of the Call List 1. Follow Steps 1 and 2 in Section 6.1. 2. Press 3. Press and p q to select DELETE ALL. to confirm. 4. Press to re-confirm. View the Details of the Call List Entry 1. Follow Steps 1 and 2 in Section 6.1. 2. Press 3. Press and p q to select DETAILS. to display the date and time of the selected call list entry. 4. Press to go back to the previous screen. 20 CALLER DISPLAY (NETWORK DEPENDENT) 6.
7. PHONE SETTINGS Your phone comes with a selection of settings that you can change to personalize your phone the way you like it to work. 7.1 Date and Time Settings You will need to set the correct time and date so that you know when you received calls. 7.1.1 Change the Date Format 1. Press 2. Press and p q to select HS SETTINGS. and p q to select DATE & TIME. 3. Press and p q to select DATE FORMAT. 4. Press p q to select your desired date format (DD-MM-YY or MM-DD-YY). Press to confirm.
4. Press to enter the date information. The date entered will be in the format you set in Section 7.1.2. 5. Press to confirm. NOTE If date has been set before, the current date will display, otherwise, “DD-MM-YY” will display. 7.2 Alarm Settings You can use this phone to set an alarm clock. When an alarm is set, the displays on the LCD. When the alarm time is reached, the and “ALARM ON” flashes on the LCD ringing with the alarm melody for a duration of 45 seconds.
3. Press to set the snooze function. 4. Press 5. Press and p q to select ON or OFF. to confirm. 7.3 Handset Settings 7.3.1 Set the Ringer Melody for Internal Calls 1. Press 2. Press and p q to select HS SETTINGS. and p q to select RING SETUP. 3. Press and p q to select INT RING. 4. Press and p q to select the desired ringer melody (a total of 5 melodies for your selection). 5. Press to confirm. NOTES 1. The respective ringer melody will be played while browsing the melody list. 2.
7.3.4 Set Alert Tones A single beep is emitted when you press a key. You can also turn on the alert tones when the handset battery is low or the handset is out of range. Low battery tone will be emitted while you are talking on the phone to alert you that you need to charge the battery. and p q to select HS SETTINGS. and p q to select TONE SETUP. 1. Press 2. Press 3. Press 4. Press and p q to select KEY TONE/BATTERY TONE/ OUT OF RANGE. and p q to turn on or off these tones. 5.
7.4 Base Settings The current settings are marked an asterisk which is displayed at the rightmost of the menu item. 7.4.1 De-register a Handset You need to enter a 4-digit PIN to de-register a handset from the base station. The icon on the de-registered handset will blink. NOTE You cannot de-register the handset that you are currently using. 1. Press 2. Press and p q to select BS SETTINGS. and p q to select DELETE HS. 3. Press . 4. Enter the 4-digit system PIN. 5. Press 6.
7.4.4 Change the System PIN Code A 4-digit system PIN code is used for changing the system settings of the base station. It is used to protect your phone against unauthorized use. The default system PIN code is 0000. 1. Press 2. Press and p q to select BS SETTINGS. and p q to select CHANGE PIN. 3. Press . 4. Enter the old system PIN. 5. Press and enter the new system PIN. 6. Press and enter the new system PIN again.
7.6 Reset Your Phone You can reset your phone to the default settings. After reset, all your personal settings and call list entries will be deleted, but your phonebook entries remain in the system. and p q to select DEFAULT. . 1. Press 2. Press 3. Enter the 4-digit system PIN. 4. Press to confirm. 5. Press to re-confirm.
8.
9. Troubleshooting If you have difficulty with your phone, please try the suggestion listed below. Problem Solutions My telephone does not work at all. • Make sure the batteries are installed and charged correctly. For optimum daily performance, return the handset to the telephone base after use. • Make sure the power adapter is securely plugged into an outlet not controlled by a wall switch. • Make sure the telephone line cord is plugged firmly into the telephone base and the telephone wall jack.
There is interference during a telephone conversation. My calls fade out when I am using the handset. The handset may be out of range. Move it closer to the telephone base. • If you subscribe to high-speed Internet service (digital subscriber line - DSL) through your telephone line, you must install a DSL filter between the telephone base and the telephone wall jack. The filter prevents noise and caller ID problems caused by DSL interference.
Common cure for electronic equipment. If the telephone is not responding normally, put the handset in the telephone base. If it does not respond, try the following (in the order listed): • Disconnect the power to the telephone base. • Disconnect the batteries on the handset. • Wait a few minutes before connecting power to the telephone base. • Re-install the batteries and place the handset in the telephone base. • Wait for the handset to synchronize with the telephone base.
10. TECHNICAL SPECIFICATIONS Basic Information Dimensions Handset: width / depth / height = 51 X 33 X 154 mm Charger: width / depth / height = 92 X 52 X 108 mm Base: width / depth / height = 102 X 53 X 118 mm Weight Handset: 90g Base: 130g Valid range Indoor: 50m Handset Operating Time Standby time: 100Hours approx. Talk time: 10Hours approx. RF Parameter Frequency 1.88GHz to 1.
11. Care and maintenance instructions Take care of your telephone • Your cordless telephone contains sophisticated electronic parts, so you must treat it with care. • Avoid rough treatment. • Place the handset down gently. • Save the original packing materials to protect your telephone if you ever need to ship it. Avoid water • You can damage your telephone if it gets wet. Do not use the handset in the rain, or handle it with the wet hands.
Customer Service Centre Suite 1601, Lever Tech Centre, 69-71 King Yip Street, Kwun Tong, Kowloon, Hong Kong. Customer Service Hotline: (852) 2666 5558 Technical Inquiry Hotline: (852) 2667 7433 VTECH TELECOMMUNICATIONS LTD. A member of THE VTECH GROUP OF COMPANIES. © 2012 VTech Telecommunications Ltd. All Rights Reserved.