Dear Parent, VTech®, with the introduction of our V.FLASHTM, offers kids a cool, fun, and educational alternative to the world of violent video games. We know that kids want to play popular video games, and we also understand parents’ reluctance to put potentially inappropriate content into their hands. As kids get older they want to be able to play independently, and make choices for themselves, and parents want to feel comfortable that these choices are going to be healthy and beneficial to their kids.
CONTENT • INTRODUCTION ................................................................. 1 Packaging Contents ............................................................... 1 Product Features ................................................................... 2 • GETTING STARTED ........................................................... 4 AC Adaptor ............................................................................ 4 Connecting to a TV ..........................................................
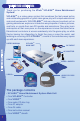
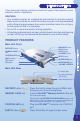
INTRODUCTION Thank you for purchasing the VTech® V.FLASHTM Home Edutainment System! V.FLASHTM is a video game system that combines the fast-paced action and outstanding graphics of great video game play with unique educational and creative elements. With V.FLASHTM, kids can choose to embark on fun gaming adventures, explore an interactive encyclopedia of videos, pictures, and facts, or create their own 3D models and animations.
INTRODUCTION If any items are missing, contact our technical support line number on your warranty card for assistance. WARNING: • This product requires an undisturbed environment to operate properly. Make sure it is placed on a hard flat surface (carpet is not recommended) with sufficient space between the product and other items. Do not tap or hit the product while it is operating. • Do not lift or move the product during operation.
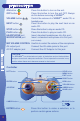
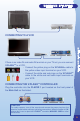
INTRODUCTION ON button OFF button VOLUME button NEXT button STOP button PLAY button HEADPHONE port MICROPHONE port Press this button to turn on the unit. Press this button to turn the unit OFF. Always do this before removing a V.DISCTM. Control the volume of a V.DISCTM, audio CD, or headphones. Press this button to play the next track on an audio CD. Press this button to stop an audio CD. Press this button to play an audio CD. Insert standard headphones into this port.
JOYSTICK 4 SELECTION buttons HELP button MENU button EXIT button GREEN button RED button Use this to control on-screen character movement, or scroll through menus on certain screens. Use these buttons to choose answers in certain activities, or to perform certain game actions. Press this button to hear helpful hints in certain games. Press this button to enter the Menu screen. Press this button to exit or pause a game. Enter / Confirm Back / Cancel The V.
GETTING STARTED NOTE: When the toy is not going to be in use for an extended period of time, it is recommended to unplug the adaptor and remove the adaptor from the Main Unit. Standard Guidelines for Adaptor Toys: • Not for use by children under 3 years of age. • Only use the recommended adaptor with the toy. • The adaptor is not a toy. • Never clean a plugged-in toy with liquid. • Never use more than one adaptor. • Do not leave the toy plugged-in for extended periods of time.
GETTING STARTED If there is no video IN and audio IN terminal on your TV set, you can connect V.FLASHTM to a VCR. - Connect the yellow plug on the V.FLASHTM cable to the yellow video input terminal on your VCR. - Connect the white and red plugs on the V.FLASHTM cable to the white and red audio input terminals on your VCR. GETTING STARTED CONNECTING TO A VCR CONNECTING THE V.FLASHTM CONTROLLER Plug the controller into the PLAYER 1 port located on the front panel of the Main Unit as illustrated.
SYSTEM OPERATION SYSTEM OPERATION TO BEGIN PLAY • Make sure the unit is turned OFF. • Press the EJECT button to open the Main Unit cover. • Place the V.DISC™, label and printed side up, into the disc compartment and onto the center hub. • Close the Main Unit cover. • Turn your TV on. • Set your TV input mode to accept input from the port to which V.FLASHTM is connected.
SYSTEM OPERATION NOTE: • If the Main Unit disc cover is opened while the power is OFF, the V.DISC™ may still be spinning. If this happens, wait until the disc stops spinning before removing it from the console. • To prevent your V.DISC™ from becoming dirty or scratched, avoid opening the disc sliding door and touching the unprinted surface of the disc. When the disc is not in the console, always store it in the V.DISC™ Sheath. TO PLAY AN AUDIO CD • While the power is ON, press the OFF button.
ACCESSING THE MAIN MENU ACCESSING THE MAIN MENU ACCESSING THE MAIN MENU The Main Menu allows you to create your own setup, see information about the game you have saved, play an audio CD, and access information stored on a Memory Card if you have one inserted into the unit. To go to the Main Menu Screen, use one of the following methods: • Turn the power ON while the Main Unit cover is open or, • Turn the power ON while there is no V.DISC™ loaded in the console.
ACCESSING THE MAIN MENU Set console setup. Main Menu, Console Setup Play, Pause, Stop, Rewind, Fast V.FLASHTM CD Player Backward, Fast Forward current CD track or play the Next CD track. TM Left and right cursor to view the Zoomed-in V.FLASH Picture Viewer previous or next picture. Play, Stop, or Skip to the Next Track on Play music CD while disk cover is closed and the console is an audio CD. turned on. Increase or Decrease the volume of Play CD when the disk cover a V.
ACCESSING THE MAIN MENU V.FLASHTM CD Player From the Main Menu Screen, go to the V.FLASH™ CD Player Screen by selecting the 4th icon of the top row of the Main Menu. Move the joystick to the left or right and then press the green button to play, pause, stop, rewind t the current CD track or play the next track. ACCESSING THE MAIN MENU Press the red button to return to the Main Menu.
V.FLASHTM Media Player From the Main Menu Screen, go to the V.FLASHTM Media Player Screen by selecting the 3rd icon of the top row of the Main Menu. You will enter a general Media Player Screen first. Move the joystick up or down to highlight a media track and then press the green button to select it. Press the Screen. yellow button to delete a record in the general Media Player Press the red button to return to the last level Menu. V.FLASHTM Console Setup From the Main Menu Screen, go to the V.
CARE & MAINTENANCE CARE&MAINTENANCE \ WARNING \ TROUBLESHOOTING CARE & MAINTENANCE 13 1. Keep your V.FLASHTM clean by wiping it with a slightly damp cloth. Never use solvents or abrasives. 2. Keep it out of direct sunlight and away from direct sources of heat. 3. Unplug the adaptor and remove the adaptor from the Main Unit when not using it for an extended peroid of time. 4. Avoid dropping it. NEVER try to dismantle it. 5. Always keep the V.FLASHTM away from water. 6.
TROUBLESHOOTING Problem There is no picture on the TV screen. Solution 1. Make sure that the V.FLASHTM, TV and VCR (if used) are plugged into power outlets. 2. Make sure that the DC jack on the AC Adaptor is firmly plugged into the DC input connector on the back of the Main Unit. 3. Make sure that V.FLASHTM is turned ON and the TV and VCR (if used) are turned ON. 4. Check the connections between the console and the TV or VCR (if used) and review the appropriate connection in this manual. 5.
TECHNICAL SUPPORT The music is interrupted when playing a music CD 1. Make sure that the V.FLASHTM is put on a stable playing surface without vibrations. 2. Make sure the unit is not placed too close to any type of loud speaker. TROUBLESHOOTING \ TECHNICAL SUPPORT 3. Remove the CD from the CD tray; check for contamination, dirt, scratches, or other irregularities. If necessary, clean the disc by wiping with a soft cotton cloth (don’t use paper) from the middle to the outside edge.
OTHER INFO OTHER INFO DISCLAIMER AND LIMITATION OF LIABILITY VTech® Electronics North America, L.L.C. and its suppliers assume no responsibility for any damage or loss resulting from the use of this handbook. VTech® Electronics North America, L.L.C. and its suppliers assume no responsibility for any loss or claims by third parties that may arise through the use of this software. VTech® Electronics North America, L.L.C.
06 © VTech Printed in China 91-02177-000-000