Important Safety Instructions When using your telephone equipment, basic safety precautions should always be followed to reduce the risk of fire, electric shock and injury, including the following: 1. Read and understand all instructions. 2. Follow all warnings and instructions marked on the product. 3. Unplug this product from the wall outlet before cleaning. Do not use liquid cleaners or aerosol cleaners. Use a damp cloth for cleaning. 4.
Important Safety Instructions F. If the product exhibits a distinct change in performance. 13. Avoid using a telephone (other than a cordless type) during an electrical storm. There may be a remote risk of electric shock from lightning. 14. Do not use this or any cordless telephone to report a gas leak in the vicinity of the leak. VTECH COMMUNICATIONS INC. CUSTOMER SERVICE: 1-800-595-9511. In Canada VTech Telecommunications Canada Ltd. at 1-800-267-7377.
Introduction Your ip 5850 is an advanced cordless telephone set, capable of supporting two Handsets. This manual is designed to familiarize you with this cordless telephone. We strongly recommend you read the manual before using your phone.
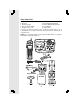
Parts Check List 1. Base Unit 2. Handsets 3. Handset Charger 4. Base AC Power Adapter 5. Telephone Line Cord 6. Belt Clips 7. Base Wall Mounting Bracket 8. Charger Wall Mounting Bracket 9. User’s Manual 10. Battery Cells To purchase replacement battery cells, call VTech Communications, Inc. at 1-800-595-9511. In Canada, call VTech Telecommunications Canada Ltd. at 1-800-267-7377. NOTE: Use only VTech batteries (part number 80-5381-00-00) or equivalent AAA NiMH rechargeable batteries.
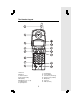
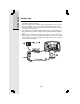
The Handset Layout 1. Antenna 2. Earpiece 3. Volume Control 4. CID (Scroll Down) 5. On (Flash) 6. Dialing Keys (0-9, *, #) 7. Redial (Pause) 8. Speakerphone 9. 10. 11. 12. 13. 14. 15. 5 LCD Display Select (Menu) Phonebook (Scroll Up) Headset Jack (2.
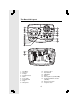
The Base Unit Layout 1. 2. 3. 4. 5. 6. 7. 8. 9. Rec/Memo Time/Set Change Cradle Contacts Menu In Use LED Charging LED Page Microphone 10. 11. 12. 13. 14. 15. Volume Control Repeat/Slow Skip/Quick Delete Message Boxes (PLAY/STOP) Answering Machine Control (On/Off) 16. DC Connector Jack 17.
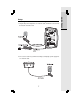
Connecting Power to Base Unit/Handset Charger 1. Plug the AC power adapter into an electrical outlet, and the DC connector into the bottom of the Base Unit. 2. Choose the location for your Handset Charger, and plug its power supply into an electrical outlet.
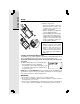
Getting Started Setup Installation of Battery Cells in Handset Follow the steps below: 1. Place the new battery cells in the Handset with the positive and negative poles aligned in the battery compartment. 2. Replace the battery compartment cover by sliding it upwards. 3. If the new battery cells are not already charged, place the Handset in its Charger or Base Unit, and allow it to charge for 10-12 hours. After initial charge, a maintenance charge of 8 hours should be sufficient.
4. Do not dispose of this battery cell into household garbage. Please refer to the information concerning proper battery recycling located near the end of this Owner's Manual. 5. Do not charge the battery cell with other electrical devices. Check Battery Indicator If you receive a check battery warning, it indicates one of the following: 1. There are no battery cells in your Handset.
Getting Started Wall Mounting The Wall Mount brackets are designed for use on standard wall mount plates only. Wall mounting is optional. 1. Plug the AC adapters into electrical outlets. Then plug the DC connector of the Base power adapter to the connector jack at the bottom of the Base Unit. 2. Connect the telephone line cord to the jack at the bottom of the Base Unit, and the other end to the wall jack. 3.
Handset and Base Indicators Handset Icons Description MUTE • Turns on when the microphone is muted. NEW • Turns on when there are new call log entries. • Turns on when the ringer is muted. • Low battery indicator or charging indicator. Handset LEDs . LED SPEAKER Description • LED is on when in handsfree mode. Base LEDs LED IN USE CHARGING PLAY/STOP 1, 2, 3 ON/OFF Description • • • • • • On when the phone is off hook. Flashes when an extension phone is off hook.
Handset Operation Basic Operation Making Calls • Press ON (or SPEAKER to use the Handset Speakerphone feature). Dial the phone number. -ORDial the phone number first, then press ON (or SPEAKER). • Press OFF to end your call. Answering Calls • Press ON, SPEAKER or any dialing keys. • Press OFF to end your call. Adjust the Handset Volume • The volume control is on the left edge of the or key to Handset. During a call, press adjust the listening volume to a comfortable level.
Mute Function • During an active call, pressing the MUTE/ DELETE key will disable the microphone. The screen will display MICROPHONE MUTED briefly: • Press MUTE/DELETE again to return to normal 2-way conversation. MICROPHONE ON will display briefly. Intercom Call • From the idle (OFF) mode, press INT. The Handset will display: • The other Handset will ring and the screen will display: • Press INT or SPEAKER to answer the intercom call.
Basic Operation Handset Operation Call Forward • A Handset (HS1) on an external call can forward it to the other Handset (HS2) by pressing and holding the INT key. The display of HS1 will initially show: • HS2 can press ON to answer the call. NOTE: If HS2 does not answer the call in about 30 seconds, the external call will be returned to HS1 and the display will show: If the returned call is not answered within another 30 seconds, the external call will end automatically.
Phonebook Operation Your ip 5850 can store up to 50 numbers with names in memory. Each memory location can hold up to 32 digits for the number and 16 characters for the name. When one Handset is accessing the phonebook, the other Handset cannot access it at the same time. If this is attempted, NOT AVAILABLE AT THIS TIME will display on the second Handset. Storing a New Entry • Press SEL. • With Phonebook selected, press SEL again. to select STORE. Press SEL. • Press • You will be prompted to ENTER NUMBER.
Phonebook Operation Each press of a particular key causes characters to be displayed in the following order: Basic Operation Key Characters by number of key presses 1 2 1 space 1 2 A 3 D 4 G H 5 J K 6 M N 7 P Q 8 T U V 8 t u v 9 W X Y Z 9 w x 0 0 ? ! / ( ) ' , - . & # # 3 4 5 6 7 B C 2 a b c E F 3 d e f I 4 g h i L 5 j k l O 6 m n o R S 7 p q Reviewing/Dialing from the Phonebook • Press SEL.
Phonebook Operation • Press ON or SPEAKERPHONE, to dial the number. Editing a Phonebook Entry • Follow the two steps in Reviewing/Dialing from the phonebook (on page 16) to reach the entry to be edited. • Press SEL to enter number edit mode. • Press MUTE.DEL to backspace then press the digit keys to correct the number. Press and hold REDIAL.PAUSE to add pauses if necessary. You can also press REDIAL.
Basic Operation Call Log (Caller ID - Call Waiting) Caller ID - Call Waiting ID Your ip 5850 is capable of displaying the number of the calling party before you answer the phone (Caller ID). If the number is contained in the phonebook, the name of the caller will also be displayed. It is also capable of displaying Caller ID information in conjunction with a Call Waiting alert signal (Call Waiting Caller ID).
Call Log (Caller ID - Call Waiting) Storing a Caller ID • Follow the steps in Reviewing Caller ID to scroll to the record to be stored. • Press SEL. • If the Caller ID contains both name and number, the Caller ID will be stored after pressing SEL.
Basic Operation Call Log (Caller ID - Call Waiting) Deleting Caller ID • Follow the steps in Reviewing Caller ID to scroll to the record to be deleted. • Press DELETE key to delete the desired record. A confirmation tone will sound and the previous Caller ID record will be displayed on the screen. • To delete all the Caller ID records, press and hold the DELETE key. The screen will ask you DELETE ALL CALLS? Press SEL for confirmation. Or, press OFF to return to the CID record previously displayed.
Handset Settings or • Press SEL again. The current ringer volume will be shown: • Press or keys or enter digit 0-6 to the desired ringer volume. The current ring tone is played and the volume bar is increased/decreased each time the setting is adjusted. At the lowest setting, display will show: NOTE: The Handset will not ring when a call comes in if Ringer Volume is set to the lowest setting. • Press SEL to confirm the setting. Ringer Tone • From the idle (OFF) mode, press SEL then key to RINGER TONE.
Handset Settings Handset Name (preset as ‘VTECH’) Basic Operation • It is possible to give each Handset its own unique name. The name is shown in the first line when the Handset is idle. The name can be a maximum of 16 characters in length. • From the idle (OFF) mode, press SEL then or key to HANDSET NAME. • Press SEL again. The display will show the current setting, for example: • Press DELETE to backspace then ‘spell’ the desired name.
Answering System Operation Audible Indicators This system gives you voice prompts for feature operations and voice confirmations when you press a button or complete an operation. Press ON/OFF to turn the system on or off. When the system is turned on, you will hear "Answering machine on" and the ON/OFF light will be lit. When the system is off, you will hear "Answering machine off" and the ON/OFF light will not be lit.
Answering System Operation About Mailboxes This answering system has three voice mailboxes. Callers using a touch tone phone can select the mailbox in which their messages will be recorded by pressing 1, 2, or 3 while the system plays the outgoing announcement. Otherwise, messages will be recorded in Mailbox 1.
Answering System Operation 3. Press any PLAY/STOP button to stop recording. The system plays back your recorded message. Review Your Announcement: 1. Press MENU until you hear "Set Outgoing Messages." 2. Press any PLAY/STOP button. The system plays the current announcement. Delete Your Announcement: Answering System Feature Setup You can set up one feature at a time, or you can set up a feature and then move on to set up another feature. 1. Make sure the answering system is on. 2.
Answering System Operation Answering System Operation FEATURE SUMMARY (Default setting indicated by “*”) SYSTEM ANNOUNCES: DESCRIPTION/DIRECTIONS: "Set Security Code" 50* Set the remote access code you will use to access features and functions of the answering system from a touch tone phone. Choose a two-digit number from 40 to 99. "Set Audible Message Alert" Off* On When Message Alert is turned on the Base beeps once every 10 seconds when new messages have been received.
Answering System Operation This system automatically saves your messages until you delete them, and can store approximately 15 minutes of messages, memos and announcements (up to a maximum of 99 messages). A message or memo can be up to 4 minutes long. If the system has less than 30 seconds of recording time left, it automatically turns off.
Answering System Operation Press the PLAY/STOP button at any time during playback to exit message playback. You will hear a long beep. Adjust Playback Volume Answering System Operation Press VOL or VOL to adjust playback volume to a comfortable level. If volume is set to level 1, you will not hear incoming messages as they are received. The system beeps three times when you reach the highest or lowest volume setting. Delete Messages NOTE: Deleted messages cannot be recovered.
Answering System Operation Record a Memo 1. Press and release REC/MEMO. The system announces "Please select mailbox." 2. Press the PLAY/STOP button to select a mailbox for the memo. After the system announces "Now recording," speak towards the Base microphone. The message window displays the length of your memo, up to 99 seconds. If you record longer memo, 99 continues to flash until you finish. 3. To stop recording, press the PLAY/ STOP button again. Call Screening 1.
Answering System Operation Answering System Operation MESSAGE WINDOW DISPLAY WINDOW DISPLAYS 0 1-98 TO INDICATE: 0-99 Memory is full or total number of messages is 99. F No messages in any mailbox. Total number of messages in all mailboxes. Counting 1 to 99 Duration of announcement or memo recording. (Maximum length of announcement is 90 seconds.) 99 (flashing) Length of recording is more than 99 seconds. 1-99 (flashing) New message number message playback.
Answering System Operation Remote Access You can access many features of this system remotely from a touch tone phone. 1. Dial your telephone number. 2. When the system answers, enter your Remote Access Code (preset to 50). The system beeps once and announces the number of new messages on the system. 3. Enter a remote command (see “Remote Access Commands” below). 4. Press * 0 to exit remote operation. Voice Menu The system has voice prompts to help you with remote operation.
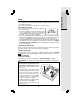
Headset Operation Your ip 5850 Handset is equipped with a 2.5mm Headset Jack for use with an optional accessory Headset for hands-free operation. If you choose to use the Headset option, you must obtain an optional accessory Headset, which is compatible with the ip 5850. For best results use a VTech 2.5 mm headset. To purchase a Headset, call VTech Customer Service at 1-800-595-9511. Once you have a compatible 2.5mm Headset, locate the Headset Jack on the ip 5850 Handset.
In Case Of Difficulty If you have difficulties in operating your phone, the suggestions below should solve the problem. If you still have difficulties after trying these suggestions, call VTECH Communications at 1-800-595-9511. In Canada, call VTECH Telecommunications Canada Ltd. at 1-800-267-7377. The Phone Doesn’t Work At All • Make sure the Power Cord is plugged in. • Make sure the telephone line cord is plugged firmly into the Base Unit and the telephone wall jack.
In Case Of Difficulty You Hear Noise In The Handset, And None Of The Keys Or Buttons Work • Make sure the power cord is plugged in. Common Cure For Electronic Equipment Additional Information If the unit does not seem to be responding normally, then try to put the Handset in the cradle. If it does not seem to respond, do the following (in the order listed): 1. Disconnect the power to the Base. 2. Disconnect the Handset battery cells. 3. Wait a few minutes. 4. Connect power to the Base. 5.
Maintenance Taking care of your telephone Your cordless telephone contains sophisticated electronic parts, so it must be treated with care. Avoid rough treatment Place the Handset down gently. Save the original packing materials to protect your telephone if you ever need to ship it. Avoid water Your telephone can be damaged if it gets wet. Do not use the Handset outdoors in the rain, or handle it with wet hands. Do not install your Base Unit near a sink, bathtub or shower.
Warranty Statement What does this limited warranty cover? • The manufacturer of this VTech product, VTech Communications, warrants to the holder of a valid proof of purchase (“Consumer” or “you”) that the product and all accessories provided by VTech in the sales package (“Product”) are free from material defects in material and workmanship, pursuant to the following terms and conditions, when installed and used normally and in accordance with operation instructions, This limited warranty extends only to th
Warranty Statement 6. Product purchased, used, serviced, or shipped for repair from outside the United States, or used for commercial or institutional purposes (including but not limited to Products used for rental purposes); or 7. Product returned without valid proof of purchase (see 2 below); or 8. Charges for installation or set up, adjustment of customer controls, and installation or repair of systems outside the unit.
Warranty Statement Limitations: Implied warranties, including those of fitness for a particular purpose and merchantability (an unwritten warranty that the product is fit for ordinary use) are limited to one year from date of purchase. Some states do not allow limitations on how long an implied warranty lasts, so the above limitation may not apply to you.
FCC, ACTA and IC Regulations This equipment complies with Parts 15 of the Federal Communications Commission (FCC) rules for the United States. It also complies with regulations RSS210 and CS-03 of Industry and Science Canada. Operation is subject to the following two conditions: (1) this device may not cause interference, and (2) this device must accept any interference, including interference that may cause undesired operation of the device.
FCC, ACTA and IC Regulations frequency energy that can be safely absorbed by a user or bystander according to the intended usage of the product. This product has been tested and found to comply with the FCC criteria. The handset has such a low power that it does not require testing. It may be safely held against the ear of the user. The base unit shall be installed & used such that parts of the user’s body ther than the hands should be maintained at a comfortable distance of approximately 20 cm or more.
FCC, ACTA and IC Regulations 3. Repair instructions If this equipment is malfunctioning, it must be unplugged from the modular jack until the problem has been corrected. Repairs to this telephone equipment can only be made by the manufacturer or its authorized agents. For repair procedures, follow the instructions outlined under the Limited Warranty. 4.
FCC, ACTA and IC Regulations Notice: This equipment meets the applicable Industry Canada Terminal Equipment Technical Specifications. This is confirmed by the registration number. The abbreviation, IC, before the registration number signifies that registration was performed based on a Declaration of Conformity indicating that Industry Canada technical specifications were met. It does not imply that Industry Canada approved the equipment.
Technical Specifications FREQUENCY CONTROL WEIGHT Crystal controlled PLL synthesizer Handset: 146 grams (excluding Batteries) Base: 378.66 grams (excluding Base Wall Mounting Bracket and AC power adapter). Charger: 226.03 grams (excluding AC power adapter) TRANSMIT FREQUENCY Base: 5744.736 - 5825.952 MHz Handset: 2401.056 - 2482.272 MHz RECEIVE FREQUENCY POWER REQUIREMENTS Base: 2401.056 - 2482.272 MHz Handset: 5744.736 - 5825.952 MHz Handset: 3.
VTECH TELECOMMUNICATIONS LTD. A member of THE VTECH GROUP OF COMPANIES. Distributed in the U.S.A. by VTech Communications, Inc. Beaverton, Oregon, 97008 Distributed in Canada by VTech Telecommunications Canada Ltd. 7671 Alderbridge Way, Richmond, B.C. V6X 1Z9.
Table Of Contents IMPORTANT SAFETY INSTRUCTIONS.............................................1 INTRODUCTION..................................................................................3 Parts Check List.......................................................................................................4 The Handset Layout................................................................................................5 The Base Unit Layout.................................................................
Table Of Contents Key Tone ............................................................................................................21 Handset Name ..................................................................................................22 Language ..........................................................................................................22 Dial Type ..................................................................................................................