Important Safety Instructions When using your telephone equipment, basic safety precautions should always be followed to reduce the risk of fire, electric shock and injury to persons, including the following: 0 1. Read and understand all instructions. 2. Follow all warnings and instructions marked on the product. 3. Unplug this product from the wall outlet before cleaning. Do not use liquid cleaners or aerosol cleaners. Use a damp cloth for cleaning. 4.
Important Safety Instructions 12. Unplug this product from the wall outlet and refer servicing to an authorized service facility under the following conditions: A. When the power supply cord or plug is damaged or frayed. B. If liquid has been spilled into the product. C. If the product has been exposed to rain or water. D. If the product does not operate normally by following the operating instructions.
Introduction The QW2432 is an advanced cordless telephone that operates in the 2.4GHz frequency range. Your QW2432 is capable of supporting up to a maximum of 4 Handsets. Using additional Handsets, up to three people can be conferenced on a call (2 Handsets and the Base Speakerphone), or two extensions can be conferenced on a call, while two other extensions can be talking internally, using the Intercom feature. This manual is designed to familiarize you with the QW2432 cordless telephone.
Parts Check List 1. 2. 3. 4. 5. 6. 7. 8.
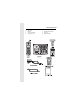
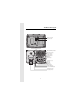
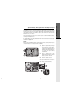
The Handset Layout 1 2 3 9 4 10 5 6 11 7 12 8 13 14 15 4 1. Antenna 9. 2. Message Waiting Indicator 10. Select 3. Earpiece 11. Off (Clear) 4. Headset Jack (2.5mm) 12. Battery Compartment 5. Scroll Keys 13. Intercom 6. On (Flash) 14. Services Key 7. Dialing Key (0-9) 15. Microphone 8.
The Base Unit Layout Phone Cord Jack AC Power Jack Message Waiting Indicator Page/Intercom Key In Use Indicator Power Indicator Charge Indicator Mute Key Volume Keys Dialing Keys (0-9) QW2432 Hold Key Flash Key Redial Key Messages Key 3-Way Calling Key Cancel Call Waiting Key Speakerphone Key Charging Contacts 6
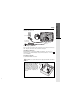
Plug the AC power adapter into an electrical outlet, and the DC connector into the back of the base unit. To AC outlet To telephone socket outlet AC adapter To telephone jack Connecting to phone line Plug one end of the telephone line cord into the jack on the back of the base unit. Plug the other end of this cord into the wall jack. Checking for dial tone After the battery is charged press ON on the Handset. The Phone icon will appear on the handset display, and you will hear dial tone.
Getting Started Installation of Battery Pack in Handset Follow the steps below: 1. Remove the battery cover by pressing on the indent and sliding downward. 1 3 2 2. Place the new battery pack in the handset with the metal contacts aligned with the charge contacts in the battery compartment. 3. Replace the battery cover by sliding it upwards. 4. If the new battery pack is not already charged, place the handset in the base unit, or a remote charging stand, and allow it to charge for 12 hours.
The QW2432 can use a the spare battery in the Base Unit to provide operational backup in the event of a power failure. With a fully charged battery pack in the spare battery charger, you will still be able to place and receive calls from the Handset for up to 5 hours. The spare battery pack can also be used to replace a drained handset battery, ensuring uninterrupted use. A spare battery can be purchased from most retail stores that carry electronic equipment.
Getting Started Charging Of Handset Battery Pack The Handset of your QW2432 cordless telephone is powered by a rechargeable battery pack. It charges automatically whenever the Handset is in the Base Unit. You should charge the battery pack for 12 hours when you first receive your phone. You'll know the battery pack needs charging when: • The low battery message is displayed : • The handset seems completely dead, the LCD is completely clear and does not activate when you press the keys.
The Wall Mount bracket is designed for use on standard Wall Mount plates only. 1. Line up the tabs on the wall mount adapter with the holes on the back of the base unit. Snap the wall mount bracket firmly in place. Plug the AC adapter into an electrical outlet, and the DC connector to the back of the base unit. If the handset battery pack has not been charged previously, place the handset in the base unit cradle, and allow it to charge for 12 hours.
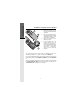
Getting Started Registration and Operation Registration and Operation of the QW2422 Accessory Handset Your QW2432 system can operate up to 4 Handsets. The accessory Handset consists of the following: Setup of the QW2422 Accessory Handset 1 3 5 12 1. Plug the AC power adapter into an electrical outlet. 2. Remove the Handset battery cover by pressing on the indent and sliding downward. 3.
Enter Base ID Code 1. After charging the Handset, remove it from its Charge Cradle, the screen will display: 2. Press NEW, then enter the 15 digit Base Unit ID code, located on the underside of the Base Unit. 3. Press OK. The Handset will display: PLEASE WAIT!! 4. Wait approximately 15 seconds. The Handset will display: FOUND BASE V14 If the Handset displays: BASE BUSY TRY LATER, this indicates that the system is in use. Wait until the Base Unit is in the idle (on hook) mode, and repeat step 2 to 4.
Handset and Base Indicators Handset Icons Description Icon Basic Operation Line In Use indicator On steady with no number next to it when a parallel set is in use. On steady with one or more numbers next to it, indicating which extensions are using the line. For example, 12 indicates that Handset 1 and Handset 2 are on an outside call. Intercom indicator On steady with the extension numbers currently on an intercom call. For example, 02 indicates that the Base and Handset 2 are on an intercom call.
Handset and Base Indicators Handset LEDs LED Description Message Waiting • Flashes to indicate that you have new messages in your voicemail. Service must be subscribed to through your local telephone company. LED Description Message Waiting • Flashes to indicate that you have new messages in your voicemail. Service must be subscribed to through your local telephone company Power • Lights when base unit is receiving power from wall outlet • Flashes when unit is in Power Backup mode.
Soft Menu Functions The QW2432 has an advanced design that uses a menu structure and soft keys to access all of the built-in features. Example of the idle mode display: Basic Operation RDL (Redial) Press RDL to display the last 5 telephone numbers dialed. The number on top line is the most recent number dialed. • Use the • To dial the number, you can simply press the ON or HANDSFREE key. scroll keys to select the desired number.
Calls Log (Caller ID) To dial the number displayed, you can simply press the ON or HANDSFREE key. You can also press the CID key to access the following options ( DEL, OPT#, SAVE): DEL OPT# : Select this option to delete THIS or ALL records in Caller ID memory. : Select this option to display up to four possible dialing strings of the number stored in Caller ID memory. If a number is provided in the Caller ID data, the possible options to choose from will be either 7, 8, 10, or 11 digits.
Handset Settings From the Handset Settings menu you can select the following options to modify: • RINGER VOLUME scroll Select this option to adjust the ringer volume. Use the keys to adjust the volume up or down. A Handset will display a graphic indicator of the selected volume setting. Press OK to confirm your selection and return to the Handset Settings menu. Basic Operation • RINGER MELODY Select this option to adjust the ringer melody or tone.
Range Extender To select the Range Extender setting, follow the procedure listed below: • In the idle(OFF) mode, press MENU and use the scroll keys to select RANGE EXTENDER, then press OK. • There are 3 option settings in the RANGE EXTENDER menu: 1. Select OFF to disable RANGE EXTENDER 2. Select ON to enable RANGE EXTENDER. An "E" icon will appear in the upper left corner of Handset display, indicating that RANGE EXTENDER is ON. 3.
MEM (Memory) The QW2432 can store up to 50 names/numbers in memory. Each memory location can hold up to 32 digits and up to 16 characters for the name. Basic Operation When prompted to ENTER NAME, use the digit keys to 'spell' the name. Each press of a particular key causes characters to be displayed in the following order: Number Key 1 2 3 4 5 6 7 8 9 0 Characters (in order) & ' , .
MEM (Memory) 20 • Starting from the idle screen, enter the number you want to store in memory. • Be sure to include long distance codes and pauses (using the PAUSE softkey) if necessary. Press the MEM softkey. • You will then be prompted to ENTER NAME Use the digit keys to 'spell' the name. If you make a mistake, press the CLR softkey. To enter a space press . When finished, press SAVE. • If there is space available in memory, the number/name will be saved and the Handset will return to idle mode.
MEM (Memory) Basic Operation To Search For and Dial a Number/ Name: • Starting from the idle screen, press the MEM softkey to review memory contents. • Using the softkeys scroll through the memory contents in alphabetical order. • Or, you can press the FIND softkey, enter the first few chararcters of the name and then press FIND to search. If you make a mistake, press CLR softkey. The closest match, in alphabetical order, will be displayed.
MEM (Memory) • Press the DEL softkey. Handset will display: • To delete the displayed records, press THIS. To delete all records, press ALL. • To confirm the deletion of ALL records, press YES. To exit without deleting press NO. Basic Operation The To Edit a Name or a Number 22 • Using the steps from 1 to 3 in To Search For and Dial a Number/ Name, locate the entry you want to edit. • Press the EDIT softkey twice.
Base Settings The QW2432 Base unit has several settings that can be adjusted according to your preference and system requirements. Basic Operation Select Base Ringer Melody: • The phone must be off. • Press the star key three times ( ). The Base will emit a happy tone and the Power and Line In Use LEDs will flash rapidly. • Press the 1,2,3,4,5, or 6 keys to select the Ringer Melody. After each key press, the Base will emit a 1-second preview of the selected ringer.
Handset and Base Operation Making Calls From the Handset • Press ON (or, HANDSFREE to use the Handset Speakerphone feature).Dial the phone number. -OR- • • Dial the phone number first; then press ON (or HANDSFREE). Press OFF to end your call. Answering Calls • • Press any key except OFF and the softkey. Press OFF to end your call. Making Calls From the Base Unit • • Press SPEAKERPHONE. Dial the phone number. Press SPEAKERPHONE to end your call.
Handset and Base Operation Mute Function During an active call pressing either the MUTE soft key on the Handset or the MUTE key on the Base (when in speakerphone mode), will disable the microphone. Press MUTE key again to return to normal 2-way conversation. Hold Function From the Handset : • Press the HOLD soft key to place a call on hold. To return to the call press the ON or HANDSFREE key. From the Base : Advanced Operations l • During an active call, press the HOLD key to place a call on hold.
Handset and Base Operation Page/Intercom From Base to ALL Handsets : To page all Handsets from the Base press the PAGE/ INTERCOM key. This will cause all Handsets linked with this Base to ring. • Each Handset will display GLOBAL CALL FROM BASE. • Any Handset can then answer the PAGE, and enter INTERCOM mode with the Base by pressing the INTERCOM key. • To end an intercom call, press OFF on the Handset or PAGE/ INTERCOM on the Base.
Handset and Base Operation Handsfree Speakerphone Operation Your QW2432 handset has a built-in handsfree speakerphone. This feature allows you to stand the Handset upright on a table or desktop and have handsfree conversations. For more information, refer to MAKING CALLS in HANDSET AND BASE OPERATION. Base Speakerphone Operation The Base of your QW2432 is equipped with a full duplex speakerphone. This is a very useful feature for handsfree conversations or conference calls at the base unit.
Handset and Base Operation Message Waiting Indication The QW2432 is compatible with optional voicemail service provided by some local telephone companies. If you subscribe to this service, and you have new, unplayed messages in your voicemail, a Visual Message Waiting Indicator (VMWI) signal is transmitted by your local telephone company. The QW2432 will detect a VMWI signal and activate a the Message Waiting light on the Base and the Message Waiting light on the Handset.
Handset and Base Operation Announced Transfer: You can perform an announced transfer (call and advise another extension) of an active call by doing the following steps: • Handset or Base must be on an active call. Place the active call on HOLD. • Press the INTERCOM key followed by the number of the Handset (1,2,3,4) or Base (0) that you wish to transfer the call to. • When the other extension answers the intercom call, explain they have an active call waiting.
Network Service Features Additional Base Features CANCEL CALL WAITING will deactivate Call Waiting before placing an important call. Press this key before dialing. During that call, there will be no interruption from Call Waiting. After you hang up, Call Waiting will be reactivated for your next call. 3-WAY CALLING allows you to talk with 2 separate parties from a single line. 1) 2) 3) 4) Call your first party. Wait for the first party to answer. Press 3-WAY CALLING. Wait for dial tone.
Headset Operation Your QW2432 cordless telephone is equipped with a 2.5mm Headset Jack for use with an optional accessory Headset for hands-free operation. To purchase a Headset, call 800-244-1111. Once you have a compatible 2.5mm Headset, locate the Headset Jack on the Handset. Connect the plug on the Headset cord to the jack on the cordless Handset. The plug should fit securely. Do not force the connection.
Maintenance Taking Care Of Your Telephone Your QW2432 cordless telephone contains sophisticated electronic parts, so it must be treated with care. Avoid rough treatment Place the Handset down gently. Save the original packing materials to protect your telephone if you ever need to ship it. Avoid water Your telephone can be damaged if it gets wet. Do not use the Handset outdoors in the rain, or handle it with wet hands. Do not install your Base Unit near a sink, bathtub or shower.
In Case Of Difficulty If you have difficulty operating your phone, the suggestions below should solve the problem. If you still have difficulty after trying these suggestions, call the Customer Service at 800-651-6791. The Phone Doesn't Work At All • • • Make sure the Power Cord is plugged in. Make sure the telephone line cord is plugged firmly into the Base Unit and the telephone wall jack. Make sure the batteries are properly charged.
In Case Of Difficulty You Hear Other Calls While Using Your Phone • Disconnect your Base Unit from the telephone jack, and plug in a regular telephone. If you still hear other calls, the problem is probably in your wiring or local service. Call your local telephone company. You Hear Noise In The Handset, And None Of The Keys Or Buttons Work • Make sure the power cord is plugged in.
Warranty Statement WHAT DOES OUR WARRANTY COVERS? • Any defect in material or workmanship. FOR HOW LONG AFTER THE ORIGINAL PURCHASE? • To the original purchaser only - ONE YEAR. WHAT WILL WE DO? • At our option, repair or replace your unit. WARRANTY RETURNS? • In the Qwest region, call Customer Service for Return Authorization at: 800-651-6791 • Properly pack your unit. Include any cables & accessories that were originally provided with the product.
FCC Regulations This equipment complies with Parts 15 of the Federal Communications Commission (FCC) rules for the United States. It also complies with regulations RSS210 and CS-03 of Industry and Science Canada. Operation is subject to the following two conditions: (1) this device may not cause interference, and (2) this device must accept any interference, including interference that may cause undesired operation of the device.
FCC Regulations FCC Part 68 The FCC requires that you connect your cordless telephone to the nationwide telephone network through a modular telephone jack (USOC RJ11C, RJ11W or RJ14). Your telephone company may discontinue your service if your equipment causes harm to the telephone network. They will notify you in advance of disconnection, if possible. During notification, you will be informed of your right to file a complaint with the FCC.
Technical Specifications FREQUENCY CONTROL WEIGHT Crystal controlled PLL synthesizer Handset : Base : 2401.056 - 2482.272 MHz POWER REQUIREMENTS Handset : 800mAh NiCd Battery Pack or 1500mAh NiMH Battery Pack CHANNELS Base : 7 VDC @ 900mA 95 Channels MEMORY NOMINAL EFFECTIVE RANGE Speed Dial: 50 Memory locations, into 32 digits per location. Maximum power allowed by FCC. Actual operating range may vary according to environmental conditions at the time of use. CID : RECEIVE FREQUENCY 2401.
Table Of Contents 1. I m p o r t a n t Safety Instructions 25. Advanced Operations Setup Installation of Battery Pack in Handset 9. Spare Battery Charger/Power Backup Function 10. Charging Of Handset Battery Pack 11. Wall Mounting 12. Registration and Operation 25. Handsfree and Base Operation 25. Making Calls 25. Answering Calls 25. Redial from Base Unit 26. Mute Function 26. Hold Function 26. Flash Function 26. Volume Control 27. Page/Intercom 28. Handsfree Speakerphone Operation 28.
91-5366-10-00 ISSUE 0