Congratulations on your purchase of this VTech product NEED HELP? Our representatives are here to help you with any questions concerning the operation of this product, available accessories, or any other related issues. Call Toll Free: 1-800-595-9511 In Canada, Call: 1-800-267-7377 or visit our website at www. vtechphones. com 1 2450a.
Important Safety Instructions When using your telephone equipment, basic safety precautions should always be followed to reduce the risk of fire, electric shock and injury, including the following: 1. Read and understand all instructions. 2. Follow all warnings and instructions marked on the product. 3. Unplug this product from the wall outlet before cleaning. Do not use liquid or aerosol cleaners. Use a damp cloth for cleaning. 4.
Important Safety Instructions 13. Avoid using a telephone (other than cordless) during an electrical storm. There is a remote risk of electric shock from lightning. 14. Do not use the telephone to report a gas leak in the vicinity of the leak. 15. Only put the handset of your telephone next to your ear when it is in normal talk 3 2450a.
Before You Begin Enhanced 2.4GHz Technology - Dual band transmission combines the best of 2.4GHz and 900MHz technologies, providing enhanced performance over standard cordless telephones. 4 2450a.
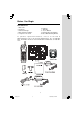
Before You Begin Parts Check List 1. Base Unit 2. Handsets 3. Handset Charger 4. Base AC Power Adaptor 5. Telephone Line Cord 6. Batteries 7. Belt Clips 8. User’s Manual 9. Charger AC Power Adaptor 10. Base Wall Mounting Bracket T o p u r c h a s e r e p l a c e m e n t b a t t e r i e s , visit us on the web at www.vtechphones.com or call VTech Communications, Inc. at 1-800-5959511. In Canada, call VTech Telecommunications Canada Ltd. at 1-800-2677377. 5 2450a.
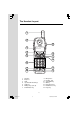
The Handset Layout 1 2 9 3 4 5 10 11 12 6 13 7 8 1. 2. 3. 4. 5. 6. 7. 14 Antenna Earpiece LCD up and down Arrow Keys Hold Key Dialing Keys (0-9,*,#) Chan/Delete Key 8. 9. 10. 11. 12. 13. 14. Microphone Headset Jack Sel/X-FER Key Off Key Phone/flash Key Redial/Pause Key Prog Key 6 2450a.
13 2450a.pmd 7 THIS DEVICE COMPLIES WITH PART 15 OF THE FCC RULES. OPERATION IS SUBJECT TO THE FOLLOWING TWO CONDITIONS: 1)THIS DEVICE MAY NOT CAUSE HARMFUL INTERFERENCE; AND 2) THIS DEVICE MUST ACCEPT ANY INTERFERENCE RECEIVED, INCLUDING INTERFERENCE THAT MAY CAUSE UNDESIRED OPERATION. PRIVACY OF COMMUNICATIONS MAY NOT BE ENSURED WHEN USING THIS PHONE. MODEL: 2450 VTECH TELECOMMUNICATIONS LTD. MANUFACTURED IN CHINA COMPLIES WITH 47 CFR PART 68 HAC FCC ID: EW780-5298-B00 REGISTRATION NO.
Getting Started Installation Before You Install 1. Choose a location for the base near an electrical outlet and a telephone jack. This phone requires a modular telephone jack and a standard electrical outlet (110v AC) not controlled by a wall switch. 2. Install the handset battery. Use only VTech batteries. a ) . Remove battery compartment cover by pressing on the indentation and sliding downwards. b). Align the two holes in the plug with the socket pins, then snap the plug into place. c).
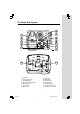
Table/Desk Installation Connect the power cord. Connect the telephone line cord TEL LINE 9V DC CORDLESS TELEPHONE VTECH TELECOMMUNICATIONS LTD. DC 9V 300mA CLASS 2 POWER SOURCE ONLY VTech Customer Service 1-800-595-9511 www.vtechphones.com 1. Check for Dial Tone After the batteries are charged, pick up the handset and press PHONE, you should hear a dial tone. 2. Set Time and Date If you subscribe to caller ID service, the date and time will be set automatically with the first incoming call.
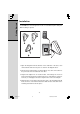
Getting Started Installation Your t 2450 base unit is designed to mount on a standard telephone wall plate. Wall mounting is optional. 1 2 3 1. Open the hinged wall mount bracket on the underside of the base, then swivel it down and lock it into place as shown in the diagram above. 2. Run the power and telephone cords through the slot, then connect them to the jacks located on the underside of the base. 3. Plug the AC adapter into an electrical outlet.
Telephone Operation Answer a Call Press any key except OFF. Hold Press to put a call on hold. Press again to release hold. -ORLift the handset of an extension. Select Use SELECT in conjunction with PROG during handset programming. Make a Call Press PHONE, then dial the number. -ORDial the number (use to backspace and correct digits), then press PHONE to call. End a Call Press OFF -ORPlace handset in base or chager.
Telephone Operation Page Basic Operation Press to page the handset for up to 60 seconds. Press again or, press OFF on handset or place handset in base or charger to cancel the page. In Use/Charging •Flashes in unison with the ring of an incoming call. slowly when the handset is in use. •Flashes rapidly when a call is on hold. •Flashes •Glows steadily when the handset is charging. Charging Glows steadily when the handset is charging. 12 2450a.
Telephone Operation Handset Ringer Style/Battery Save You can select from four different handset ringer styles, or turn the ringer off and extend the battery life. 1. Make sure the handset is idle. 2. Press PROG. 3. Press until the screen displays RINGER: and the current setting. 4. Press SELECT. The current setting blinks, and you will hear a sample of the ring. 5. Press or to select RINGER:1, 2, 3, 4 or OFF. You will hear a sample of each ring. 6. Press SELECT to choose the displayed ringer setting.
Telephone Operation Display Screen Messages Basic Operation Screen Displays: When: ** RINGING ** There is a call coming in. CONNECTING... The handset is waiting for a dial tone. PHONE The handset is in use. ON SCANNING... The handset is changing to more clear channel. ** PAGING ** The base is paging the handset. HOLD There is a call on hold. BATTERY NO LOW The battery needs to be recharged. CONNECT 1. When one handset is on a call, press PHONE on the other handset.
Telephone Memory You can store up to nine telephone numbers with names (up to 15 characters, 24 digits each location) you dial frequently into the speed dial memory locations you assign (1-9) in each handset. These numbers can be dialed only by pressing two buttons. You can also store telephone numbers with names alphabetically in the directory. See Telephone Directory for instructions. NOTES: 1. The entries you store in speed dial memory will be marked with 01 through 09 and also stored in the directory.
Telephone Memory — OR— Press REDIAL/PAUSE to display the last number (up to 24 digits long) dialed from this phone. 7. Press SELECT or PROG to store your entry. The screen displays DISTINCT RING? and the current setting. 8. Press or to change the setting. Choose Y (yes) if you wish the phone to alert you that the calls from this number by a distinctive ringer after the first ring. Choose N for a normal ringer. 9. Press SELECT or PROG to confirm your selection.
Telephone Memory Reassign Locations in Memory 1. 2. Press and hold the memory location key (1-9) of the entry you wish to reassign. When the screen displays the entry you want to reassign, press SELECT. Then press until SPEED flashes. SPEED EDIT ERASE 8005959511 01 Press SELECT. The screen displays ENTER 1-9. Press the keys (1-9) to reassign this entry into another memory location. You will hear a confirmation beep. Basic Operation 3. 4. 17 2450a.
Telephone Directory Your t 2450 can store 30 (including the nine speed dial entries) telephone numbers with names (up to 15 characters for the name and 24 digits for the number in each location) in each handset. NOTE: Press OFF at any time to exit the directory. Store a Number/Name in the Directory 1. Press PROG. The screen displays DIRECTORY. 2. Press SELECT. The screen displays ENTER NAME. 3. Using the chart below, enter up to 15 characters for the name you’re storing with the number.
Telephone Directory 8. to alert you that the calls from this number by changing to a distinctive ringer after the first ring. Choose N for a normal ringer. Press SELECT or PROG to confirm your selection. If you chose Y in Step 7, a D will be displayed with the directory entry. NOTE: When the memory is full the screen will display MEMORY FULL, an error tone sounds and you will not be able to store a new number until you delete a stored number to make room for another entry.
Telephone Directory Move a Number/Name to the Memory 1. Press (DIR). The screen displays DIRECTORY. 2. Press or to scroll alphabetically through entries stored in directory. — OR— Press the dial pad key for the first letter of the entry you want to move. 3. When the screen displays the entry you want to move, press SELECT. Then press until SPEED flashes. SPEED EDIT ERASE 8005959511 Basic Operation 4. 5. Press SELECT. The screen displays ENTER 1-9.
Caller ID Operation Caller’s name Long distance call * VTech L 800-595-9511 EW 5/01 5:40 AP MM NOLD 28 Date of call Time of call Party has called two or more times Caller’s telehone number Position of call in call history Your t 2450 can store up to 90 calls in its caller ID memory. When the memory is full, the oldest call will be deleted to make room for new incoming call information.
Caller ID Operation Dial a Displayed Number 1. 2. Locate the record in call history that you want to dial. If you wish to change how the number is dialed, press #. The screen displays any alternate dialing sequences available for this call (area code + number; 1 + area code + number; number only; 1+ number). 3. Press SELECT. Press until DIAL flashes. DIAL PROGRAM 800-595-9511 5/01 5:40PM Press SELECT again. The number is automatically dialed.
Caller ID Operation Store a Call History Record in the Directory 3. Locate the record in the call history you want to store in the directory. If you wish to change how the number is stored, press #. The screen displays any alternate dialing sequences available for this call (area code + number; 1 + area code + number; number only; 1+ number). Press SELECT, then press until PROGRAM flashes. DIAL PROGRAM 8005959511 5/01 5:40PM 4. OLD 28 Press SELECT three times.
Answering System Operation Audible Indicators Your t 2450 gives you voice prompts for feature operations and voice confirmations when you press a button or complete an operation. Setting the Clock 1. Make sure the answering system is ON. 2. Press TIME/SET. The system announces the clock setting, then announces: “To Set Day and Time, press TIME/SET.” 3. Press TIME/SET. 4. Press CHANGE until the system announces the correct day, then press TIME/SET. 5.
Answering System Operation Turn answering system on or off Delete outgoing announcements, messages and memos Enter answering system feature setup and choose a feature to set..... Record outgoing announcement s , and memos. Record Your Announcement NOTE: If you have assigned different mailboxes to different people, be sure to tell callers in your announcement to press 1 , 2, or 3 to leave a message in the appropriate mailbox. For example: “Thank you for calling. To leave a message for Bob, press 1 now.
Answering System Operation Setting Up Your Answering System You can set up one feature at a time, or you can set up a feature and then move on to set up another feature. 1. Make sure the answering system is ON. 2. Press MENU until the system announces the feature you want to set. Refer to the Feature Summary below for a description of the features and your choices. 3. Press CHANGE until the system announces the desired setting. 4. Press TIME/SET to confirm your selection. 5.
Answering System Operation Listen to, Save & Delete Messages The system automatically saves your messages until you delete them, and can store approximately 15 minutes of messages, memos, and announcements (up to a maximum of 99 messages). Your caller can leave a message of up to four minutes in length. Before playing a message, the system announces the day and time it was received. While the message plays, the message window displays the number of the message.
Answering System Operation Call Screening/Intercept 1. Make sure the answering system is ON, and set the message playback volume is set above level one so you can hear the caller’s message. 2. If you decide to take the call, press PHONE on the handset. 3. If you pick up an extension phone during the announcement and the announcement does not stop right away, press and release the telephone switchhook.
Answering System Operation Connect with the Answering System From a Remote Location You can access many features of this system remotely from a touch tone phone. 1. Dial your telephone number. 2. When the system answers, enter your remote access code (preset to 50). The system beeps once and then announces the number of new messages. 3. Enter a remote command (see Remote Access Commands). 4. Press * 0 to exit remote operation. Voice Menu The system has voice prompts to help you with remote operation.
Answering System Operation Remote Access Commands (continued) Function: Function: Command: Command: Turn system off Press #0; the system announces, “Answering machine off.” Press #0 again to turn the system back on. Turn system on When system is off, it answers after 10 rings and announces, “Please enter your security code.” Enter your remote access code. Basic Operation NOTE: If no key is pressed within 10 seconds of entering remote access, the voice menu will be announced.
Batteries CAUTION: To reduce the risk of fire or injury to persons or damage to the telephone, read and follow these instructions carefully: Charge the battery provided with or identified for use with this product only in accordance with the instructions and limitations specified in this user’s manual. Replacing the Handset Battery 1. Remove the battery compartment cover on the handset by pressing on the indentation and sliding the cover downward. 2. Lift out the old battery and disconnect. 3.
Headset Operation Headset Jack Basic Operation You can use this telephone handsfree when you install any VTech 2.5mm headset, purchased separately. Plug the headset into the jack located on the right side of the handset (under the small rubber flap). Do not force the connection, but make sure the plug fits securely. Belt Clip Attach the belt clip to the cordless handset (optional). 32 2450a.
In Case of Difficulty If you have difficulties in operating your phone, the suggestions below should solve the problem. If you still have difficulties after trying these suggestions, call VTech Communications at 1-800-595-9511. In Canada, call VTech Telecommunications Canada Ltd. at 1-800-267-7377. The phone doesn’t work at all • • • Make sure the power cord is plugged in. Make sure the telephone line cord is plugged firmly into the base unit and the telephone wall jack.
In Case of Difficulty You hear noise in the handset, and none of the keys or buttons work • Make sure the power cord is plugged in. Common cure for electronic equipment If the unit does not seem to be responding normally, then try putting the handset in its base. If it does not seem to respond, do the following (in the order listed): 1. Disconnect the power to the base. 2. Disconnect the handset battery. 3. Wait a few minutes. 4. Connect power to the base. 5. Reinstall the battery. 6.
Maintenance Taking Care Of Your Telephone Your cordless telephone contains sophisticated electronic parts, so it must be treated with care. Avoid rough treatment Place the handset down gently. Save the original packing materials to protect your telephone if you ever need to ship it. Avoid water Your telephone can be damaged if it gets wet. Do not use the handset outdoors in the rain, or handle it with wet hands. Do not install your base unit near a sink, bathtub or shower.
Warranty Statement What does this limited warranty cover? • The manufacturer of this VTech product, VTech Communications, warrants to the holder of a valid proof of purchase (“Consumer” or “you”) that the product and all accessories provided by VTech in the sales package (“Product”) are free from material defects in material and workmanship, pursuant to the following terms and conditions, when installed and used normally and in accordance with operation instructions.
Warranty Statement 7. 8. but not limited to Products used for rental purposes); or Product returned without valid proof of purchase (see 2 below); or Charges for installation or set up, adjustment of customer controls and installation or repair of systems outside the unit. How do you get warranty service? • • • To obtain warranty service in the United States of America, call 1-800-5959511 for instructions regarding where to return the Product. Before calling for service, please check the user’s manual.
Warranty Statement Additional Information • not allow limitations on how long an implied warranty lasts, so the above limitation may not apply to you. In no event shall VTech be liable for any indirect, special, incidental, consequential, or similar damages (including, but not limited to lost profits or revenue, inability to use the product, or other associated equipment, the cost of substitute equipment, and claims by third parties) resulting from the use of this product.
FCC, ACTA and IC Regulations This equipment complies with Parts 15 of the Federal Communications Commission (FCC) rules for the United States. It also complies with regulations RSS210 and CS-03 of Industry and Science Canada. Operation is subject to the following two conditions: (1) this device may not cause interference, and (2) this device must accept any interference, including interference that may cause undesired operation of the device.
FCC, ACTA and IC Regulations 1. Product identifier and REN information The label on the back or bottom of this equipment contains, among other things, an identifier indicating product approval and the Ringer Equivalence Number (REN). This information must be provided to your local telephone company upon request. For equipment approved prior to July 23, 2001, the product identifier is preceded by the phrase “FCC Reg No.” and the REN is listed separately.
FCC, ACTA and IC Regulations 5. Hearing aid compatibility If this product is equipped with a corded or cordless handset, it is hearing aid compatible. 6. Programming/testing of emergency numbers If this product has memory dialing locations, you may choose to store police, fire department and emergency medical service telephone numbers in these locations.
FCC, ACTA and IC Regulations Repairs to certified equipment should be made by an authorized Canadian maintenance facility designated by the supplier. Any repairs or alterations made by the user to this equipment, or equipment malfunctions, may give the telecommunications company cause to request the user to disconnect the equipment.
The RBRC® Seal The RBRC® Seal on the nickel-cadmium battery indicates that VTech Communications, Inc. is voluntarily participating in an industry program to collect and recycle these batteries at the end of their useful lives, when taken out of service within the United States and Canada. The RBRC® program provides a convenient alternative to placing used nickelcadmium batteries into the trash or municipal waste, which may be illegal in your area.
Technical Specifications FREQUENCY CONTROL WEIGHT Crystal controlled PLL synthesizer Handset: Base: Charger: TRANSMIT FREQUENCY POWER REQUIREMENTS Base: 2410.2 - 2418.9 MHz Handset: 912.75 - 917.10 MHz Handset: 3.6V 400mAh Ni-Cd Battery RECEIVE FREQUENCY Base: Charger: 9V DC @ 300mA 6V DC @ 200mA Base: 912.75 - 917.10 MHz Handset: 2410.2 - 2418.9 MHz 106 grams MEMORY CHANNELS 30 Channels NOMINAL RANGE 188 grams 345 grams EFFECTIVE Maximum power allowed by FCC and IC.
Table Of Contents Important Safety Instructions.................................................................2 Before You Begin...............................................................................................................4 Parts Check List......................................................................................................5 The Handset Layout......................................................................................................6 The Base Unit Layout.......
Table Of Contents Call Screening/Intercept ................................................................................28 Record a Memo ................................................................................................28 Message Window Display .........................................................................28 Connect with the Answering System From a Remote Location................29 Voice Menu.........................................................................................
VTECH TELECOMMUNICATIONS LTD. A member of THE VTECH GROUP OF COMPANIES. Distributed in the U.S.A. by VTech Communications, Inc. Beaverton, Oregon, 97008 Distributed in Canada by VTech Telecommunications Canada Ltd. 7671 Alderbridge Way, Richmond, B.C. V6X 1Z9. Copyright 2004 for VTECH TELECOMMUNICATIONS LTD. Printed in China 91-005650-040-000 ISSUED 0 2450a.