User’s manual IS741 DECT 6.0 accessory doorbell for use with VTech models IS7121/IS7121-2/IS7121-22 Congratulations on purchasing your new VTech product. Before using this product, please read Important safety instructions on page 13 of this manual. This manual has instructions on how to set up and register your new doorbell. For more information, see the Installation guide and Abridged user’s manual that came with your telephone base.
Parts checklist Your telephone package contains the following items. Save your sales receipt and original packaging in the event warranty service is necessary.
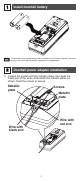
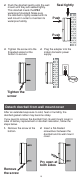
1 Install doorbell battery • The doorbell can be supported by either AA batteries or AC power. However, you need to plug in AC power during doorbell registration or deregistration. 2 Doorbell power adapter installation 1. Loosen the screws and the metallic plates, then slide the metal part of the wires underneath the metallic plates as shown. Twist the screws to secure.
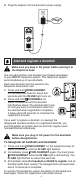
2. Plug the adapter into the domestic power supply. Plug! 3 Add and register a doorbell Make sure you plug in AC power before pairing it to the telephone base. You can add another new doorbell (purchased separately) to your IS7121 telephone system. This telephone system accommodates up to two doorbells. Each new doorbell must be paired to the telephone base before use. 1. Press and hold /FIND HANDSET on the telephone base for about four seconds until the IN USE light turns on. 2.
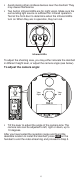
4 Doorbell location testing Before mounting the doorbell on a wall, make sure you test if the location you install the doorbell is in range, and adjust the camera angle to best suit your needs. You may unplug the AC power first so that you can move around more conveniently to make the tests. To test the location for installation: Hold the doorbell in the location where you want to install the doorbell, then follow the steps below to test the reception range and video capture angle. 1. 2. 3. 4.
• • Avoid placing other cordless devices near the doorbell. They may cause interference. Two built-in infrared LEDs are for night vision. Make sure the surrounding light source is sufficient for infrared operation. Test at the front door to determine when the infrared LEDs turn on. When they are in operation, they turn red. Infrared LEDs To adjust the shooting area, you may either relocate the doorbell in different height level, or adjust the camera angle (see below).
5 Install the doorbell wall mount cover Make sure you have done Doorbell location testing above before you mount the doorbell on the wall. There are two ways to position the wall mount cover and manage the power adapter cord. Option 1: Install the doorbell wall mount cover without the wall mount plate 1. Use the two holes on the doorbell wall mount cover to mark the exact location of the screw holes on the wall. 2. If you drill the holes into a stud, go to Step 3.
Option 2: Install the doorbell wall mount cover with the wall mount plate 1. Use the two holes on the doorbell wall mount cover to mark the exact location of the screw holes on the wall. Mark an extra mark for routing the power cord through the wall. 2. Stick the double-sided adhesive tapes onto the wall mount plate as specified. Stick here An extra mark 3. Align and place the wall 4. If you drill the holes into a mount cover onto the wall stud, go to Step 5. mount plate.
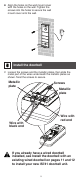
6. Align the holes on the wall mount cover with the holes on the wall. Tighten the screws into the holes to secure the wall mount cover onto the wall. 6 Install the doorbell 1. Loosen the screws and the metallic plates, then slide the metal part of the wires underneath the metallic plates as shown. Twist the screws to secure.
2. Push the doorbell gently onto the wall mount until they are sealed tightly. This doorbell meets the IPX4 waterproof standard. Make sure the doorbell is tightly sealed with its wall mount in order to maintain its waterproof ability. Seal tightly Push Push 3. Tighten the screw into the threaded socket at the bottom to secure. 4. Plug the adapter into the indoor domestic power supply.
3. Pry the doorbell off. Pry off the doorbell Install the doorbell with an existing wired doorbell (optional) If you already have a wired doorbell installed, follow the instructions below to install your new IS741 doorbell unit. 1. Turn off the power supply to the existing wired doorbell. 2. Follow instructions in Install the doorbell wall mount cover section. 3.
4. Using another wire, slide one end of the metal part underneath the metallic plate on the doorbell, then connect the other end to the Trans terminal of your chime/buzzer unit of the wired doorbell. View View Angle Adjustment Right Left Option 1: Ring the front doorbell of the existing wired doorbell and the IS7121 doorbell simultaneously.
Important safety instructions When using your telephone equipment, basic safety precautions should always be followed to reduce the risk of fire, electric shock and injury, including the following: 1. Read and understand all instructions. 2. Follow all warnings and instructions marked on the product. 3. Unplug this product from the wall outlet before cleaning. Do not use liquid or aerosol cleaners. Use a damp cloth for cleaning. 4.
Cleaning your telephone Your telephone has a durable plastic casing that should retain its luster for many years. Clean it only with a soft cloth slightly dampened with water or mild soap. Do not use dampened cloth or cleaning solvents of any kind. Remember that electrical appliances can cause serious injury if used when you are wet or standing in water. If the telephone base should fall into water, DO NOT RETRIEVE IT UNTIL YOU UNPLUG THE POWER CORD AND TELEPHONE LINE CORD FROM THE WALL.
For C-UL compliance only Mesures de sécurité importantes Afin de réduire les risques d’incendie, de blessures corporelles ou d’électrocution, suivez toujours ces mesures préventives de base lorsque vous utilisez votre téléphone : . Lisez et comprenez bien toutes les instructions. . Observez toutes les instructions et mises en garde inscrites sur l’appareil. 3. Débranchez ce téléphone de la prise murale avant de le nettoyer. N’utilisez pas de nettoyeurs liquides ni en aérosol.
Limited warranty What does this limited warranty cover? The manufacturer of this VTech Product warrants to the holder of a valid proof of purchase (“Consumer” or “you”) that the Product and all accessories provided in the sales package (“Product”) are free from defects in material and workmanship, pursuant to the following terms and conditions, when installed and used normally and in accordance with the Product operating instructions.