Go to businessphones.vtech.com to register your product for enhanced warranty support and latest VTech product news.
Congratulations on your purchase of this VTech product. Before using this product, please read the Important safety information. This abridged user’s manual provides you with the basic installation and setup instructions. You may refer to the online complete user’s manual for complete installation and operation instructions at businessphones.vtech.com. For customer service or product information, visit our website at businessphones.vtech.com or call 1 (800) 595-9511. In Canada, please dial 1 (800) 267-7377.
Important safety information This symbol is to alert you to important operating or servicing instructions that may appear in this user’s manual. Always follow basic safety precautions when using this product to reduce the risk of injury, fire, or electric shock. Safety information • • • • • • • • Read and understand all instructions in the user’s manual. Observe all markings on the product. Avoid using a telephone during a thunderstorm. There may be a slight chance of electric shock from lightning.
Important safety information Especially about cordless telephones • Privacy: The same features that make a cordless telephone convenient create some limitations. Telephone calls are transmitted between the telephone base and the handset by radio waves, so there is a possibility that your cordless telephone conversations could be intercepted by radio receiving equipment within range of the cordless handset.
Important safety information Precautions for users of implanted cardiac pacemakers Cardiac pacemakers (applies only to digital cordless telephones): Wireless Technology Research, LLC (WTR), an independent research entity, led a multidisciplinary evaluation of the interference between portable wireless telephones and implanted cardiac pacemakers. Supported by the U.S.
Parts checklist Your telephone package contains the following items. Save your sales receipt and original packaging in the event warranty service is necessary. Go to businessphones.vtech.com to register your product for enhanced warranty support and latest VTech product news. UP407 4-Line Office Phones Cordless Handset BC 1(( +06 %#0%'.
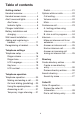
Table of contents Getting started Handset overview......................... 1 Handset screen icons................... 4 Alert tones and lights.................... 5 Alert tones................................. 5 Indicator lights........................... 5 Charger installation....................... 6 Battery installation and charging.................................... 7 Wall mount installation.................. 9 Adding and registering a handset...................................
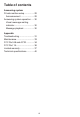
Table of contents Answering system Private mailbox setup................. 29 Announcement........................ 29 Answering system operation...... 30 Visual message waiting indicator................................... 30 Message playback................... 30 Appendix Troubleshooting.......................... 31 Maintenance............................... 33 FCC Part 68 and ACTA.............. 34 FCC Part 15................................ 36 Limited warranty.........................
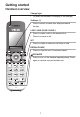
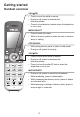
Getting started Handset overview Charge light • On when the handset is charging in the charger. Softkeys (2) • Press to select a menu item displayed above the key. LINE 1/LINE 2/LINE 3/LINE 4 • Press to make a call on the desired line. • Press to answer a call. INT • Press to make an intercom call when in idle. REDIAL/PAUSE • Press to view the last 10 numbers dialed. /SPEAKER +06 1(( %#0%'. • Press to turn on the handset speakerphone. Press again to resume normal handset use.
Getting started Handset overview VOL/ DIR • Press to scroll up while in menus. • During a call, press to increase the listening volume. • Press to show directory entries when the telephone is not in use. MENU/SELECT • Press to enter the menu. • While in a menu, press to select an item or save an entry or setting. OFF/CANCEL • While using menus, press to return to idle mode. • During a call, press to hang up. VOL/ CID +06 1(( • Press to scroll down while in menus. %#0%'.
Getting started Handset overview Belt clip Main menu Main menu • Ringers • Phone Settings Ringers Phone Phone settings BACK +06 SELECT 1(( %#0%'. Using menus • Press MENU/SELECT or MENU to show the first menu item, Ringers. • Press or to scroll through menu items. • Press MENU/SELECT or SELECT to select or save changes to a highlighted menu item. • Press OFF/CANCEL or BACK to cancel an operation, exit the menu display or return to the idle screen.
Getting started Handset screen icons L1 L2 L3 L4 Telephone lines - On steadily when line 1, line 2, line 3, or line 4 is in use on this handset, or flashes when there is an incoming call. Ringer off - On steadily when the ringer volume is set to OFF. Headset - On steadily when using a corded headset. Speakerphone - On steadily when using the speakerphone. MUTE NEW Mute - Microphone is muted. New caller ID log - Missed and new calls.
Getting started Alert tones and lights Alert tones One beep There is an incoming call waiting. Five beeps The telephone has completed the command successfully. Indicator lights Charge light • On when the handset is charging in the charger. Large Lighted Display LINE 1/LINE 2/LINE 3/LINE 4 • On when the telephone line is in use. • Flashes when there is an incoming call. +06 1(( %#0%'. Backlight (lighted display and dial pad) • On when the handset is lifted from the charger.
Getting started Charger installation The power adapter is intended to be correctly oriented in a vertical or floor mount position. The prongs are not designed to hold the plug in place if it is plugged into a ceiling, under-the-table or cabinet outlet. Install the charger as shown below. Plug the power adapter into an electrical outlet not controlled by a wall switch. NOTE: Use only the power adapter supplied with this product. To order a replacement power adapter, visit our website at businessphones.
Getting started Battery installation and charging Install the battery as shown on the next page. Once you have installed the battery, the screen indicates the battery status (see the table below). If necessary, place the handset in the charger to charge the battery. For best performance, keep the handset in the charger when not in use. The battery is fully charged after 11 hours of continuous charging. See the table on the Technical specification on page 40 for battery operating times.
Getting started Battery installation and charging Install the battery as shown below. 1. Plug the battery connector securely into the socket inside the handset battery compartment. Insert the supplied battery with the label THIS SIDE UP facing up as indicated. 2. Align the cover flat against the battery compartment, then slide it upwards until it clicks into place. 3. Charge the handset by placing it face forward in the charger. The charge light is on when charging. 1 2 3 The charge light turns on.
Getting started Wall mount installation The charger is ready for tabletop use. If you want to mount the charger on a wall, use two 10mm screws and wall anchors (not provided) to hold the charger in place. The screws and wall anchors are available for purchase in many hardware or consumer electronics retailers. You might need a professional to install the charger. To mount the charger on the wall 1.
Getting started Wall mount installation 3. Insert the screws (not provided) into the holes and tighten them until only 1/4 inch of the screws are exposed. 4. Align the holes at the back of the charger with the screws on the wall and slide the charger down until it locks into place.
Getting started Adding and registering a handset You must register this UP407 cordless handset with the UP416 console or UP406 deskset before use. Each UP416 or UP406 supports only one cordless handset. When first purchased, the handset shows Choose Handset in Registration at base menu. Put handset on cradle to register.
Getting started Adding and registering a handset To register a handset to your UP416 console 1. Make sure the cordless handset is out of the charger and the screen shows Choose Handset in Registration at base menu. Put handset on cradle to register. 2. On the UP416 console, press MENU/SELECT. 3. Press or to scroll to Registration, then press MENU/SELECT or /SKIP. 4. Press MENU/SELECT again or press /SKIP to select Handset. The UP416 console screen shows Registering handset...
Getting started Adding and registering a handset To register a handset to your UP406 deskset 1. Make sure the cordless handset is out of the charger and the screen shows Choose Choose Handset in Registration Handset in Registration at base menu. at base menu. Put handset on cradle to register. Put handset on cradle to 2. On the UP406 deskset, press MENU/SELECT. register 3. Press or to scroll to Registration, then press MENU/SELECT or /SKIP. 4.
Getting started Deregistering a handset You may need to deregister your cordless handset when you have a registered handset and need to replace one. Please read all the instructions on this page before beginning the deregistration process. Please make sure the telephone system is not in use before deregistration. To deregister the cordless handset from the UP416 console 1. On the console, press MENU/SELECT. 2. Press or to scroll to Registration, then press MENU/SELECT or /SKIP. 3.
Getting started Deregistering a handset To deregister the cordless handset from the UP406 deskset 1. On the deskset, press MENU/SELECT. 2. Press or to scroll to Registration, then press MENU/SELECT or /SKIP. 3. Press or to scroll to Deregistration, then press MENU/SELECT or /SKIP. 4. The screen shows Deregister all devices? Press ‘SELECT’ to confirm. Press MENU/SELECT to confirm. 5. The process up to 10 seconds to complete the deregistration. The deskset shows Handset deregistered.
Telephone settings Telephone setup Ringer volume Use this feature to set the ringer volume to one of six levels or turn the ringer off. When the ringer is off, the icon appears on the handset screen. The handset stores the volume setting for all lines. 1. When the handset is idle, press MENU/SELECT or MENU. 2. Press MENU/SELECT or SELECT to select Ringers. 3. Press MENU/SELECT or SELECT again to select Ringer volume. 4.
Telephone settings Telephone setup Ringer tone Use this feature to choose one of the ten ringer tones. You can choose different ringer tones for different lines so you can easily identify which line is calling. 1. When the handset is idle, press MENU/SELECT or MENU. 2. Press MENU/SELECT or SELECT to select Ringers. 3. Press DIR or CID to scroll to Ringer tone, then press MENU/SELECT or SELECT. 4.
Telephone settings Telephone setup LCD Language This feature allows you to change the language used for handset displays. By default, the language is set to English. 1. When the handset is idle, press MENU/SELECT or MENU. 2. Press DIR or CID to scroll to Phone Settings, then press MENU/SELECT or SELECT. 3. Press MENU/SELECT or SELECT again to select LCD Language. 4. Press DIR or CID to scroll to English, Français or Español. 5. Press MENU/SELECT or SELECT to save the setting and return to the previous menu.
Telephone settings Telephone setup Key tone The handset is set to beep with each key press. If you turn off the key tone, there are no beeps when you press keys. 1. When the handset is idle, press MENU/SELECT Phone Settings or MENU. LCD Language 2. Press DIR or CID to scroll to Phone Settings, Home Area Code Key Tone then press MENU/SELECT or SELECT. LCD Contrast 3. Press DIR or CID to scroll to Key Tone, then press MENU/SELECT or SELECT. BACK SELECT 4. Press DIR or CID to scroll to On or Off. Key Tone 5.
Telephone operation Telephone operation Making and ending a call To make a call: 1. Press the desired line key (LINE 1-LINE 4). 2. Wait for a dial tone, then enter the telephone number. The screen displays the elapsed time as you talk (in hours, minutes and seconds). To end a call: • Press OFF/CANCEL or return the handset to the charger to hang up. -OR• Press the corresponding line key (LINE 1-LINE 4) to hang up.
Telephone operation Telephone operation Answering a call To answer a call: Press any line key (LINE 1-LINE 4). -ORPress /SPEAKER on the cordless handset to answer using the speakerphone. Temporary ringer silencing Press SILENCE while the telephone is ringing to silence the ringer temporarily on the handset only. This turns off the ringer without disconnecting the call. The next incoming call rings normally at the preset volume.
Telephone operation Options while on calls Call waiting If you subscribe to call waiting service with your telephone service provider, you hear a beep if someone calls while you are on a call. • Press FLASH to put your current call on hold and take the new call. • Press FLASH at any time to switch back and forth between calls. Volume control Use this feature to set the listening volume to one of six levels for the handset and speakerphone. While on a call, press VOL or VOL to adjust the listening volume.
Telephone operation Conference call Conference calls The handset can support 3-way conference with a maximum of one outside call and two system extensions (including the initiating party), or two outside calls and the handset itself. The outside call must be established first because an intercom call cannot be placed on hold. There are two ways to establish a conference call. A.
Telephone operation Conference call A. Inviting parties using Intercom 1. Make or answer an outside call. 2. Press another available line key to make another outside call. The original outside call is put on hold. When the external party picks up, you can have a private conversation with that party. -ORPress INT. The outside call is put on hold. Press or to scroll to the desired extension, then press MENU/SELECT or SELECT. The called extension picks up the intercom call.
Telephone operation Intercom You can use the intercom feature for conversations between the handset and a console or a deskset. The console and each deskset in the telephone system MUST be assigned a unique extension number for the intercom feature to work. The assignment is done when the console or deskset is initially set up. The cordless handset shares the same extension as its registered console or deskset. Make an intercom call to an extension 1. Press INT on the handset when it is idle. 2.
Directory Create directory entries Create a new directory entry Use the following steps to store a name and number in the directory. 1. When the handset is idle, press VOL/ DIR. 2. The handset displays Directory XXX entries. Press ADD NEW to add an entry. 3. The screen displays Enter Name. Use the +06 dialing keys to enter the name (up to 15 characters). • Press MUTE/DELETE or CLEAR to delete a character. • 1(( %#0%'. Press 0 to add a space. 4. Press MENU/SELECT or NEXT to proceed.
Directory Search directory Search by name Follow the steps below to search for directory entries on the handset. 1. When the handset is idle, press VOL/ DIR. 2. Press REVIEW, then press DIR or CID to browse through the directory. 3. When a name appears, press the dial pad keys (2-9) to start a name search. The directory shows the first name beginning with the first letter associated with the dial pad key, if there is an entry in the directory beginning with that letter.
Caller ID Caller ID operation Review the caller ID information 1. When the handset is idle, press VOL/ CID. 2. The handset displays Call History New Calls: XX and Total Calls: XX. Press REVIEW. 3. Press DIR or CID to review the caller ID information. The caller ID history entries are stored in reverse chronological order, starting with the most recent entry. 4. To exit without making changes, press OFF/CANCEL. +06 1(( %#0%'. Dial a call history entry 1.
Answering system Private mailbox setup Announcement The system plays an outgoing announcement to the caller when the call is answered by the private mailbox. The system has a default announcement, “Hello, please leave a message after the tone.” You can use this announcement or record your own. You can record an announcement up to 150 seconds. To record the announcement: 1. When the handset is idle, press ANS SYS. 2. Press DIR or CID to scroll to Private Mailbox, then press MENU/SELECT or SELECT. 3.
Answering system Answering system operation Visual message waiting indicator The handset displays XX New message(s) when there are new messages and/or memos in the central and private mailbox of its registered console, or in the private mailbox of its registered deskset. Message playback From the handset, you can play the messages in the private mailbox. You can choose to listen to the new messages or all messages recorded in the private mailbox. All messages are played in chronological order.
Appendix Troubleshooting If you have difficulty with your telephone, please try the suggestions below. For customer service, visit our website at businessphones.vtech.com or call 1 (800) 595-9511. In Canada, dial 1 (800) 267-7377 The handset registration is unsuccessful. • Follow the handset registration instructions to register the handset again (see To register a handset to your UP416 console or To register a handset to your UP406 deskset). My telephone doesn’t work at all.
Appendix Troubleshooting There is no dial tone. • Try all the suggestions above. • Move the cordless handset closer to the console or deskset. You may have moved out of range. • If the previous suggestions do not work, disconnect the telephone line from the console and connect it to a different phone. If there is no dial tone on that phone either, the problem is in your wiring or telephone service. Contact your telephone service provider. • Your line cord may be defective. Try installing a new line cord.
Appendix Maintenance Taking care of your telephone • Your cordless telephone contains sophisticated electronic parts, so you must treat it with care. • • • Avoid rough treatment. Place the corded handset down gently. Save the original packing materials to protect your cordless telephone if you ever need to ship it. Avoid water • You can damage your cordless telephone if it gets wet. Do not use the corded handset in the rain, or handle it with wet hands.
Appendix FCC Part 68 and ACTA This equipment complies with Part 68 of the FCC rules and with technical requirements adopted by the Administrative Council for Terminal Attachments (ACTA). The label on the back or bottom of this equipment contains, among other things, a product identifier in the format US:AAAEQ##TXXXX. This identifier must be provided to your telephone service provider upon request.
Appendix FCC Part 68 and ACTA If this product is equipped with a corded or cordless handset, it is hearing aid compatible. If this product has memory dialing locations, you may choose to store emergency telephone numbers (e.g., police, fire, medical) in these locations. If you do store or test emergency numbers, please: Remain on the line and briefly explain the reason for the call before hanging up. Perform such activities in off-peak hours, such as early morning or late evening.
Appendix FCC Part 15 This equipment has been tested and found to comply with the requirements for a Class B digital device under Part 15 of the Federal Communications Commission (FCC) rules. These requirements are intended to provide reasonable protection against harmful interference in a residential installation. This equipment generates, uses and can radiate radio frequency energy and, if not installed and used in accordance with the instructions, may cause harmful interference to radio communications.
Appendix Limited warranty 1. What does this limited warranty cover? The manufacturer of this VTech product warrants to the holder of a valid proof of purchase (“CONSUMER” or “you”) that the product and all accessories provided in the sales package (“PRODUCT”) are free from defects in material and workmanship, pursuant to the following terms and conditions, when installed and used normally and in accordance with the PRODUCT operating instructions.
Appendix Limited warranty 4.
Appendix Limited warranty 6. What must you return with the PRODUCT to get warranty service? You must: • Return the entire original package and contents including the PRODUCT to the service location along with a description of the malfunction or difficulty; and • Include a “valid proof of purchase” (sales receipt) identifying the PRODUCT purchased (PRODUCT model) and the date of purchase or receipt; and • Provide your name, complete and correct mailing address, and telephone number. 7.
Appendix Technical specifications RF frequency band 1921.536MHz - 1928.448MHz Channels 5 Operating temperature 32°F - 122°F 0°C - 50°C Handset voltage 2.4V 550mAh Ni-MH battery Charger voltage 6VAC @300mA (AC adapter output) Operation Operating time* Talk time (cordless handset) Up to seven hours Talk time (cordless handset speakerphone) Up to five hours Standby Up to seven days * Operating times vary depending on your actual use and the age of the battery. DECT 6.
Designed to fit your home. And your life. VTech Communications, Inc. A member of THE VTECH GROUP OF COMPANIES. VTech is a registered trademark of VTech Holdings Limited. Specifications are subject to change without notice. © 2014 VTech Communications, Inc. All rights reserved. 04/14. UP407_ACIB_V1.