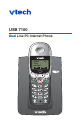
USB 7100 Dual Line PC Internet Phone 05:00PM VTECH 8883472005 EDIT 1/19 DELETE
Important! Before using this telephone, you must: Install and charge batteries ........................................................................See page 5 Install software ..........................................................................................See page 9 Read important safety instructions ..........................................................
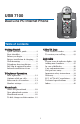
USB 7100 Dual Line PC Internet Phone Table of contents Getting Started Caller ID Logs Quick reference guide ..................2 Parts checklist ...............................3 Before you begin...........................4 Battery installation & charging......5 Wall mounting ..............................6 Telephone base installation ..........7 Belt clip & optional headset..........8 Software installation & use ...........9 How Caller ID works ..................22 To review your call log ...............
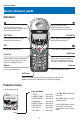
Getting Started Quick reference guide Handset V ^ Press to scroll up in menus. While entering names or numbers, press to move the cursor to the right. Press to scroll down in menus. While entering names or numbers, press to move the cursor to the left. SOFTKEY SOFTKEY Press a softkey to select an option displayed just above the key. SOFTKEY SOFTKEY Press a softkey to select an option displayed just above the key. CID Press to display Phonebook entries. Press to display Caller ID log.
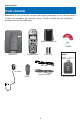
Getting Started Parts checklist Remember to save your sales receipt and original packaging in case you ever need to ship your telephone for warranty service.
Getting Started Before you begin Internet calling About Caller Identification To make and receive Internet calls, you must use the enclosed CD-ROM to install the required software on to your computer (see page 9). You may also be required to establish a Skype Out account to make Internet calls to standard telephones. There may be fees for this service. For more information, please visit www.skype.com.
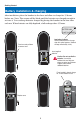
Getting Started Battery installation & charging After installation, place the handset in the base and allow to charge for 15 hours before use. Note: The screen will be blank until the batteries are charged enough to activate it. You can keep batteries charged by placing the handset in the base after each use. When batteries are fully depleted, a full recharge takes 15 hours. BATTERY LOW PLACE IN CHARGER Low battery indicator Return handset to base or charger when this symbol appears.
Getting Started Wall mounting The telephone base can be installed on any standard wall-phone outlet as shown below. Choose a location away from electronic equipment, such as television sets or microwave ovens. Avoid excessive heat, cold, dust or moisture.
Getting Started Telephone base installation Install the base as shown below. Choose a location away from electronic equipment, such as television sets or microwave ovens. Avoid excessive heat, cold, dust or moisture. NOTE: It is recommended that you keep the base connected to a single computer. Moving the base from one computer to another could corrupt the Caller ID List and Redial functionality of your handsets.
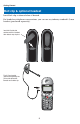
Getting Started Belt clip & optional headset Install belt clip as shown below if desired. For hands-free telephone conversations, you can use any industry standard 2.5 mm headset (purchased separately). Insert belt clip tabs into notches on back of handset, then rotate to snap in place. Plug 2.5 mm headset (purchased separately) into jack on side of handset, beneath small rubber cap.
Getting Started Software installation & use To make and receive Internet calls, you must install onto your computer Vtech™ and Skype™ software. Use the CD-ROM included with your telephone to download and install the latest version of software. Insert CD-ROM and wait for opening screen to be displayed. Click to begin, then follow the instructions on screen to complete the software installation. NOTE: At the pop-up screen after software installation, click “Allow this program to use Skype,” then click OK.
Getting Started Software installation & use Status screen Shows whether the software is running properly. Shows whether the USB cable to the PC is connected and running properly. Shows whether the audio connection to the PC is running properly. Help & support (see below) Shows whether the Skype™ software is running (must be installed and configured to allow access by the Phone Suite software).
Getting Started Software installation & use Options screen Select the country code to be prefixed when making a SkypeOut call. Dialing options (do not change unless directed to do so by a Vtech Customer Care representative). About screen Phone Suite software version Skype™ software version Telephone firmware version NOTE: The telephone will be reprogrammed automatically if the firmware does not match the Phone Suite software version.
Telephone Operation Type of call Elapsed time Basic operation IN USE INTERCM 01:23 MUTE Making and answering calls To answer a call, press the flashing CALL button. If Auto Answer is activated, the call will be answered when you lift the handset from the base (see page 16).
Telephone Operation Volume level (1-4) Options while on calls VOLUME **__ Volume controls Listening volume: Press VOLUME repeatedly to adjust volume. You’ll hear 3 beeps at maximum volume; the next button press returns to minimum volume. Ringing volume (temporary): While the phone is ringing, press VOLUME to adjust ringer volume, or press OFF to silence the ringer. (See page 15 to change this setting permanently.) Mute MICROPHONE MUTED INTERCM MUTE Select MUTE to silence the microphone during a call.
Telephone Operation Intercom and call transfers VTECH INTERCM MENU Some features described on this page are available only if you have purchased and registered optional expansion handsets (see page 25). Paging and intercom calls 2 > LIVING ROOM 3 BEDROOM OK Shortcut: Press Intercom, enter number of handset (or * to select all), then press OK to page. The intercom allows you to communicate with expansion handsets without using an outside line. Select INTERCM to see a list of active handsets.
Telephone Operation Press MENU to begin Handset settings VTECH INTERCM MENU Highlighted menu item 1> TONES 2 HANDSET NAME OK RINGER LEVEL ***___ OK 1> 2 OK 3 > KEY BEEP 4 CONTACT ALRT OK 4 > CONTACT ALRT 1 RING LEVEL OK HANDSET NAME PAT _ At the feature menu you can change settings to customize how your handset works. Select MENU, then use the V ^ buttons to scroll to the feature you want to change. As you scroll, the top menu item is always highlighted with a > character.
Telephone Operation Handset settings 3 Auto answer 3 > AUTO ANSWER 4 LANGUAGE OK When on, incoming calls will be answered automatically when you lift the handset from the base. Select OK to toggle Auto Answer on or off (a checkmark appears when on). Press OFF to save & exit. 4 Language 1 > ENGLISH 2 SPANISH At this menu you can select the language used in all menus and screen displays. Use the V ^ buttons to highlight English, Spanish or French, then select OK to save your preference.
Telephone Operation Handset settings > shows current net status when you first enter the menu (before scrolling) 1 > OFFLINE 2 ONLINE 7 Net status At this menu you can log on, log off, or change how you are identified to the network of other Skype™ users when you are online. Use the V ^ buttons to highlight one of the status options listed below, then select OK to save your preference. OK 1 Offline: You cannot make or receive Skype™ calls. 2 Online: You are logged in and available for calls.
Phonebook PAT WILLIAMS 5551234 EDIT DELETE Shared phonebook directory The phonebook directory is stored in the base, and is shared by all handsets. Changes made at any handset will be reflected in all handsets. If you have multiple handsets, only one person at a time can use the phonebook. If a person using another handset attempts to use the phonebook, an error tone will be heard. The phonebook can store up to 160 entries.
Phonebook VTECH INTERCM MENU New phonebook entries To create a new phonebook entry Phonebook button PHONEBOOK NEW PREVIEW Press the PHONEBOOK button, then select NEW to add a new entry. Use the dial pad to enter up to 24 digits, then select OK. (Numbers must be entered as they will be dialed, including the area code and “1” prefix if required.) See page 12 to add a number from your redial list. See page 23 to add a number from your call log.
Phonebook VTECH INTERCM MENU Phonebook button REVIEW ANDREW 5556789 EDIT Press the PHONEBOOK button, then select REVIEW to display the first entry in the phonebook. You can then press V or ^ to browse through the phonebook (see below to search by name). Press OFF at any time to exit the directory. To browse through the directory PHONEBOOK NEW Phonebook search DELETE To browse, press V or ^ to scroll through all entries one by one.
Phonebook VTECH INTERCM MENU To dial, edit or delete entries See page 20 to find and display an entry you want to dial, edit or delete. To dial a number Phonebook button PHONEBOOK NEW REVIEW ANDREW 5556789 EDIT If you have established a Skype Out account, you can press LIST/CALL to make an Internet call to the number (a “+” prefix will be added to the number). To delete an entry DELETE EDIT NUMBER 5556789_ OK When any phonebook entry is displayed, press CALL/FLASH to dial the displayed number.
Caller ID Logs NEW 08:15AM 02/14 How Caller ID works If you subscribe to Caller ID service provided by your local phone company, information about each caller will be displayed after the first or second ring. PAT WILLIAMS 5551234 Time & date of call Entry number Screen shows number of calls after a new call is received NEW VTECH 34 CALLS / 1 NEW INTERCM MENU Note:The phone cannot keep track of the number of received calls if you do not subscribe to Caller ID.
Caller ID Logs VTECH INTERCM MENU To review your call log To review your call log Call log button NEW 08:15AM 02/14 34 OF 34 PAT WILLIAMS 5551234 STORE DELETE V 08:09AM 02/14 33 OF 34 CHRIS THOMPSON 5554321 STORE DELETE Press CID to review your call log. The most recent call is displayed first. Use the arrow buttons to scroll through the list as shown at left.
Appendix Screen icons and indicator lights Handset screen icons Telephone line Internet line MUTE NEW Intercom Low battery (place handset in base or charger to recharge) Dial pad locked (to unlock, select MENU then press * ) MUTE Microphone is muted (select MUTE to resume conversation) NEW New calls (press CID to review call log) Status symbols for Internet calls Online/SkypeMe ? X Away/Status Unknown Not Available/Do Not Disturb/Invisible/Offline Indicator lights INTERNET LINE On when Internet li
Appendix Adding new handsets NOT REGISTERED MENU Your telephone can accommodate up to 4 cordless handsets. You can add new handsets (sold separately) at any time. Before using a new handset, you must first install and charge the batteries for 15 hours (see page 7). After the batteries are fully charged, follow the procedure below to register the handset to the base. Press MENU to begin 1 > REGISTER 2 DEREGISTER OK 2 Highlight "Register," then select OK. The screen will display, "Search Base".
Appendix In case of difficulty If you have difficulty with your phone, please try the suggestions below. For customer service, please visit our Web site at www.vtechphones.com, or call 1-888-347-2005 (USA) or 1-888-211-2005 (Canada). Problems making or receiving calls Problems with Internet line Call transfer immediately displays “Ring Back’’ • Make sure batteries are installed and charged correctly (see page 7).
Appendix In case of difficulty Handset displays “No VoIP Clients Running” No audio on Internet calls Problems using SkypeOut Problems checking Net Status on handset Launch your Skype™ software and follow the steps below: • Click Tools > Options > Privacy Menu > Related Tasks. • Click Manage other programs’ access to Skype. • Select Vtech, then click the Change button. • Click Allow this program to access Skype, then click OK.
Appendix In case of difficulty If you hear noise or interference during a call • You may be out of range. Move the handset closer to the base. • Appliances plugged into the same circuit as the base can cause interference. Try moving the appliance or base to another outlet. • The layout of your home or office might be limiting the operating range. Try moving the base to another location, preferably on an upper floor.
Appendix In case of difficulty Manual handset registration If the error message “Not Registered” is displayed, return the handset to the base. After 60 seconds the handset should beep to indicate that registration is completed. If registration fails, follow the steps below to deregister and reregister your handset: 1 Select MENU. 2 Press V until “Registration” is displayed, then select OK. 3 Press V until “Deregister” is highlighted, then select OK.
Appendix Care and maintenance Your cordless telephone contains sensitive electronic parts, so it must be treated with care. Avoid rough treatment: Place the handset down gently. Save the original packing materials to protect your telephone if you ever need to ship it. Avoid water: Your telephone can be damaged if it gets wet. Do not use the handset outdoors in the rain, or handle it with wet hands. Do not install your base unit near a sink, bathtub or shower.
Appendix Dial pad text entry To enter text, press dial pad buttons once for the first letter, twice for the second, three times for the third, etc. See chart below for full character set. Example: Press once to enter “A” (5 times for “a”) 2 Press twice to enter “B” (6 times for “b”) Press 3 times to enter “C” (7 times for “c”) Press 4 times to enter “2” Number of button presses 1 2 3 4 5 6 7 1 space & ‘ , .
Appendix Important safety instructions When using your telephone equipment, basic safety precautions should always be followed to reduce the risk of fire, electric shock and injury, including the following: 1 Read and understand all instructions. 2 Follow all warnings and instructions marked on the product. 3 Unplug this product from the wall outlet before cleaning. Do not use liquid or aerosol cleaners. Use a damp cloth for cleaning.
Appendix Important safety instructions 12 Unplug this product from the wall outlet and refer servicing to an authorized service facility under the following conditions: • When the power supply cord or plug is damaged or frayed. • If liquid has been spilled onto the product. • If the product has been exposed to rain or water. • If the product does not operate normally by following the operating instructions.
Appendix Warranty What does this limited warranty cover? What is not covered by this limited warranty? The manufacturer of this VTech product, VTech Communications, warrants to the holder of a valid proof of purchase (“Consumer” or “you”) that the product and all accessories provided by VTech in the sales package (“Product”) are free from material defects in material and workmanship, pursuant to the following terms and conditions, when installed and used normally and in accordance with operation instruct
Appendix Warranty in the transport of Product(s) to the service location. VTech will return repaired or replaced product under this limited warranty to you, transportation, delivery or handling charges prepaid. VTech assumes no risk for damage or loss of the Product in transit. • one is authorized to make modifications to this limited warranty and you should not rely on any such modification.
Appendix FCC, ACTA and IC regulations This equipment complies with Parts 15 of the Federal Communications Commission (FCC) rules for the United States. It also complies with regulations RSS210 and CS-03 of Industry and Science Canada. Operation is subject to the following two conditions: (1) this device may not cause interference, and (2) this device must accept any interference, including interference that may cause undesired operation of the device.
Appendix FCC, ACTA and IC regulations 2. Connection and use with the nationwide telephone network If this product is equipped with a corded or cordless handset, it is hearing aid compatible. The plug and jack used to connect this equipment to the premises wiring and the telephone network must comply with the applicable Part 68 rules and technical requirements adopted by ACTA. A compliant telephone cord and modular plug is provided with this product.
Appendix FCC, ACTA and IC regulations IC (Industry Canada) designated by the Supplier. Any repairs or alterations made by the user to this equipment, or equipment malfunctions, may give the telecommunications company cause to request the user to disconnect the equipment. This telephone is registered for use in Canada. The term “IC:” before the radio certification number only signifies that Industry Canada technical specifications were met.
Appendix Technical specifications RF Frequency Band (Handset to Base) 2400 MHz — 2483 MHz RF Frequency Band (Base to Handset) 2400 MHz — 2483 MHz Channels 95 Channel Spacing 864 KHz Output Power 23 dBm Sensitivity -93 dBm Modulation GFSK (20dB BW < 864 KHz) Operating Temperature 32°F — 122°F 0°C — 50°C Base Unit Voltage (AC Voltage, 60Hz) 96 — 144 Vrms Base Unit Voltage (AC Adapter Output) 7 Vdc @500 mA (nominal) Handset Voltage 2.
Appendix Index A AC adapter, 5 Adding new handsets, 25 Answering calls, 12 Auto answer, 16 Low battery, 7 M Making calls, 12, 21 Mute, 13 N Names, enter into phonebook, 19 search for, 20 Net status, 17 B Battery charging, 7 Battery installation, 7 Belt clip, 8 C Call logs, 22 Caller ID, 22 add entries to phone directory, 23 delete entries, 23 dial entries, 23 CID, 22 O Operating range, 39 P Paging, 14 Phonebook, dial number, 21 edit entries, 21 name search, 20 new entries, 19 Problems, 26 D Delete Call
www. vtechphones .com www. vtechcanada .com Distributed in the U.S.A. by VTech Communications, Inc. Beaverton, Oregon, 97008 1-888-347-2005 Distributed in Canada by VTech Telecommunications Canada Ltd. 200-7671 Alderbridge Way, Richmond, B.C. V6X 1Z9 1-888-211-2005 © 2005 VTech Telecommunications Ltd. All rights reserved. VTech brand and logo are trademarks of VTech Telecommunications Ltd. Issue 1.17 VTech 12/29/05.