ErisStation TM Conference Phone with Wireless Mics Wireless Conference System User’s manual Model: VCS704A
TABLE OF CONTENTS 1. 1.1. 1.2. 1.3. 2. 2.1. 2.2. 2.3. 3. 3.1. 3.2. 4. IMPORTANT SAFETY INSTRUCTIONS...........................................1 About ErisStation Conference Phone with Wireless Mics.................................3 Package Contents.............................................................................................3 Location............................................................................................................4 SET UP YOUR PHONE.............................
5.3. 5.4. 5.5. 5.6. 5.7. 6. 6.1. 6.2. 6.3. 6.4. 6.5. 6.6. 7. 7.1. 7.2. 7.3. 7.4. 7.5. 7.6. 7.7. 7.8. 7.9. 7.10. 7.11. Dial a Phonebook Entry...................................................................................15 Edit a Phonebook Entry...................................................................................15 Delete a Phonebook Entry...............................................................................15 Delete all Phonebook Entries.........................................
1. IMPORTANT SAFETY INSTRUCTIONS When using your conference phone, basic safety precautions should always be followed to reduce the risk of fire, electric shock and injury, including the following: . . 3. 4. 5. 6. 7. 8. 9. 0. . . 3. 4. 5. 6. Read and understand all instructions. Follow all warnings and instructions marked on the product. Unplug this product from the wall outlet before cleaning. Do not use liquid or aerosol cleaners. Use a damp cloth for cleaning.
Disposal warning . When this crossed-out wheeled bin symbol is attached to a product, it means the product is covered by the European Directive 2012/19/EU. . All electrical and electronic products/battery should be disposed of separately from the municipal waste stream via designated collection facilities appointed by the government or the local authorities. 3. The correct disposal of your old appliance/battery will help prevent potential negative consequences for the environment and human health.
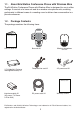
1.1. About ErisStation Conference Phone with Wireless Mics The ErisStation Conference Phone with Wireless Mics is designed for use in office settings. It consists of a base unit and four wireless microphone units, enabling participants in different areas of a meeting room to deliver clear conversation in a phone conference. 1.2. Package Contents The package contains the following items. User’s manual User’s manual X1 Base unit X1 Wireless microphone unit X4 3.
1.3. Location For maximum coverage and reduce the interference, here are some guidelines you should consider when you place the base unit: - place it away from electronic appliances such as televisions, microwave ovens, radios, personal computers, wireless devices, or other cordless phones. - avoid facing radio frequency transmitters, such as external antennas of mobile phone cell stations.
2. 2.1. SET UP YOUR PHONE Connect the Base Unit . Plug one end of the DC power cable into the base unit, and plug the other end into the To PHONE jack of the power adapter. Route the cord through the slots. . Plug one end of the telephone line cord into the From WALL jack of the power adapter, and plug the other end into a wall jack. 3. Plug the small end of the AC power cord into the power jack of the adapter, and plug the large end into the wall outlet. Note Always use the cables provided in the box.
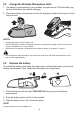
2.2. Charge the Wireless Microphone Units 1. The battery is pre-installed in your wireless microphone unit. Pull the battery tap off from the battery door before charging. 2. Place the wireless microphone unit into the charging cradles at the base unit until they are flush. NoteS • • • Charge the battery for 8 hours before use. The LED light on the wireless microphone unit turns orange when charging, and turns off when the wireless microphone unit is fully charged.
If you have a Broadband Line If you connect your telephone to a line with a broadband connection, you will need to insert a micro-filter between the telephone and the telephone line. Otherwise, there may be interference between the telephone and the broadband, which could cause problems. In a fixed line with broadband, every telephone must have a micro-filter connected, not just the one at the telephone point that your modem is connected to.
3. 3.1. GETTING TO KNOW YOUR PHONE Base Unit Overview 13 1 12 2 11 3 10 4 9 5 8 6 1. 7 ( ) • In menu mode: Press to scroll up the menu items. • In idle mode: Press to access the call list. • While entering names or numbers in the phonebook: Press to move the cursor to the right. 2. ( ) • In menu mode: Press to scroll down the menu items. • In idle mode: Press to access the phonebook. • While entering names or numbers in the phonebook: Press to move the cursor to the left. 3.
4. • In Idle mode: Press to access the redial list. 5. • During a call: Press to mute/unmute all microphones in the system. 6. • Press to insert a space when entering names. 7. • Press and hold to insert a dialing pause when entering numbers. 8. • Press to make, answer, or end a call. 9. • Press to decrease ringer or speaker volume. 10. • Press to increase ringer or speaker volume. 11. • Press to go back or delete a character. • Press and hold to delete all characters. 12.
3.2. Wireless Microphone Unit Overview 1 2 3 (x4) (x4) 1. • Press the position, and then lift the wireless microphone unit from the base during a call. 2. Microphone • Press to mute or unmute all microphones. • Muted when the wireless microphone units are al on the base unit charging u n a m cradles. User’s 3. LED Light • Green when the wireless microphone units are lifted from the base unit charging cradles during a call. • Red when charging, or when all microphones are muted.
4. 4.1. USING YOUR PHONE Set Date and Time You should set the correct time and date before use. . Press on the base unit in idle mode to enter the main menu. . Press or to select Set date/time, and then press 3. Press or to select the day, and then press 4. Press or to select the month, and then press 5. Press or to select the year, and then press . 6. Press or to select the hour, and then press . 7. Press tone. or to select the minutes, and then press 4.2. Make a Call 4.2.
4.5.2. Dial a Redial Entry 1. Repeat steps 1 and 2 in section 4.6.1. 2. Press . 4.5.3. Save a Redial Entry to the Phonebook . Repeat steps 1 and 2 in section 4.6.1. . Press twice. 3. The base unit displays EDIT NUMBER. Use the dialing keys to edit the number. 4. Press , the base unit displays ENTER NAME. Use the dialing keys to input name. 5. Press , and then Saved displays. You hear a confirmation tone. 4.5.4. Delete a Redial Entry . Repeat steps 1 and 2 in section 4.6.1. to select Delete. .
4.8. Page All Microphones You can page the wireless microphone units to help you relocate them. . Press in idle mode. . Press or to select Find All Mics, and then press . 3. All registered wireless microphone units that are outside charging cradles and within range will beep for 60 seconds. 4. To stop the paging beep, press on the wireless microphone unit or place it back to the base unit charging cradles. 4.9.
5. PHONEBOOK The phonebook stores up to 50 entries, with up to 30 digits for each phone number and 15 characters for each name. • When there are no records in the phonebook, the screen displays Phonebook empty, and then Add Contacts?. • When the phonebook is full and you try to save an entry, the screen displays Phonebook full. • When you try to add an entry already stored in the phonebook, the base unit displays Number already saved. 5.1. Add a New Phonebook Entry .
5.3. Dial a Phonebook Entry . Search for the desired entry in the phonebook. . Press 5.4. . Edit a Phonebook Entry . Search for the desired entry in the phonebook, and then press . The screen displays Edit Contact. Press . . 3. The screen displays EDIT NUMBER. Edit the number, and then press 4. The screen displays EDIT NAME. Edit a name, and then press . . 5. The screen displays Saved. You hear a confirmation tone. 5.5. Delete a Phonebook Entry .
5.8. Speed Dial You can assign 5 of your phonebook entries to a speed dial location (1, 2, 3, 4, and 5). 5.8.1. Set a Speed Dial Number . Press in idle mode to select Phonebook, and then press . Press to select Speed dial, and then press 3. Press or . to select an empty slot (1-5), and then press 4. The screen displays Copy from Phonebook, and then press desired phonebook. 5. When the desired entry appears, and then press tone. . Press or to select Speed dial, and then press 3.
6. CALLER DISPLAY (NETWORK DEPENDENT) This feature is available if you have subscribed the Caller ID service with your telephone service provider. Note VCS704A does not display caller number during call waiting. Your phone can store up to 50 received calls with date/time information in the call list. The number will be shown on the screen when the phone is ringing.
6.3. Store a Call List Number into the Phonebook 1. Select a desired entry in the call list, and then press Store to PB. 2. Press . The screen displays EDIT NUMBER. 3. Edit the number, and then press 4. Edit the name, and then press hear a confirmation tone. 6.4. . The screen displays EDIT NAME to confirm. The screen displays Saved. You Delete an Entry in the Call List 1. Select a desired entry in the call list. 2. When the desired entry is displayed, press 3. Press to select Delete, and press entry.
7. 7.1. PHONE SETTINGS Set Ringer Volume . In idle mode, press . Press or . to select Ringers, and then press . 3. Press to select Ringer volume. 4. Press or to adjust the ringer volume. You hear a sample of each volume level while adjusting. 5. Press to save. You hear a confirmation tone. OR Select Ringer off to turn off, and then press to save. You hear a confirmation tone. 7.2. Set Ringer Melody . In idle mode, press . Press or 3. Press 4. Press 5. Press or or 7.3. .
7.5. Set Key Tone It is set to beep with each key press if you turn on the beep tone. . In idle mode, press . . Press or to select Settings, and then press . 3. Press or to select Key tone, and then press . 4. Press or to adjust the key tone volume. You hear a sample of each key tone volume while adjusting. Press to save your preference. OR Select Off to turn off, and then press to save. You hear a confirmation tone. 7.6. Change the Flash Time . In idle mode, press . .
7.9. Reset Your Phone You can reset your phone to the default settings. After reset, all your customized settings will be deleted, but your phonebook and speed dial entries will remain unchanged. . In idle mode, press . . Press or to select Settings, and then press . 3. Press or to select Reset, and then press . The screen displays Reset to default?. 4. Press to confirm. You hear a confirmation tone. 7.10.
8. TROUBLESHOOTING If you have difficulty with your phone, please try the suggestions listed below. As a general rule, if a problem occurs, remove the batteries from all the wireless microphone units in your installation for about 1 minute, and then disconnect and reconnect the power supply to the base and reinstall the batteries carefully. The conference phone doesn’t work. • Make sure all cables are plugged in correctly and the batteries are installed and charged.
9. TECHNICAL SPECIFICATIONS Indoor Range (wireless microphone unit) Up to 30 metres* Battery Life (wireless microphone unit) (average values) Up to 5 hours talk time** Up to 70 hours standby** Number of Wireless microphone units connected to the base unit Up to 4 Electrical Connection/Base Mains Adaptor Base main adaptor (interface module): Model No.: S018AGP0900200 Input: 100-240 V/50-60 Hz/500mA Output: 9VDC/2A Only use the adaptor supplied with telephone.
10. CARE AND MAINTENANCE Take care of your conference phone • Your conference phone contains sophisticated electronic parts, so you must treat it with care. • Avoid rough treatment. • Place the wireless microphone unit down gently. • Save the original packing materials to protect your conference phone if you ever need to ship it. Avoid water • You can damage your conference phone if it gets wet. Do not use the wireless microphone unit in the rain, or handle it with the wet hands.
Designed to fit your home. And your life. VTech Telecommunications Ltd. A member of THE VTECH GROUP OF COMPANIES. VTech is a registered trademark of VTech Holdings Limited. ErisStationTM and Orbitlink Wireless TechnologyTM are trademarks of VTech Communications Inc., registered in the United States. Specifications are subject to change without notice. © 2014 for VTech Telecommunications Ltd. All rights reserved. Version 1 05/14.