® Safe & Sound Video and audio monitor TM User’s manual w w w. b a b y m o n i t o r s .v t e c h .
Congratulations on purchasing your new VTech product. Before using this product, please read Important safety instructions on page iii of this manual. This manual has all the feature operations and troubleshooting necessary to install and operate your new VTech product. Please review this manual thoroughly to ensure proper installation and operation of this innovative and feature rich VTech product. For support, shopping, and everything new at VTech, visit our website at www.babymonitors.vtech.com.
Product introduction VM321 is a video and audio monitor which consists of one parent unit (VM321 PU) and one baby unit (VM321 BU). VM321-2 is a video and audio monitor which consists of one parent unit (VM321-2 PU) and two baby units (VM321-2 BU). The parent unit may be shipped with a protective sticker covering the display. Remove the protective sticker before use.
Important safety instructions When using your equipment, basic safety precautions should always be followed to reduce the risk of fire, electric shock and injury, including the following: 1. Follow all warnings and instructions marked on the product. 2. Adult setup is required. 3. This product is intended as an aid. It is not a substitute for responsible and proper adult supervision and should not be used as such. 4. This product is not intended for use as a medical monitor. 5.
Important safety instructions (continued) 18. To reduce the risk of electric shock, do not disassemble this product, but take it to an authorized service facility. Opening or removing parts of the product other than specified access doors may expose you to dangerous voltages or other risks. Incorrect reassembling can cause electric shock when the product is subsequently used. 19. You should test the sound reception every time you turn on the units or move one of the components. 20.
Table of contents Getting started................................1 Parts checklist...................................1 Baby unit battery installation.............2 Baby unit installation.........................3 Baby unit installation options.............4 Tabletop to wall mount installation..................................4 Parent unit battery installation.........10 Parent unit installation.....................12 Parent unit battery charging............13 Baby unit overview..........................
Getting started Parts checklist Check to make sure the package contains the following items. Save your sales receipt and original packaging in the event warranty service is necessary.
Getting started Baby unit battery installation You can power up the baby unit by connecting it to AC power or to four AA alkaline batteries. Even if the baby unit is connected to AC power, we recommend you also install four AA alkaline batteries. This guarantees continual operation in case of a power outage. Install four AA alkaline batteries (not supplied) into the battery compartment, matching the polarity markings (+ and -) inside the battery compartment.
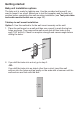
Getting started Baby unit installation Install the baby unit as shown below. Make sure that the power outlet is not controlled by a wall switch. Bundle the power cord neatly with the self-adhesive strap. Power outlet not controlled by a wall switch Raise the antenna for better reception. Baby unit power adapter Self-adhesive strap Baby unit • Use only the baby unit power adapters supplied with this product. To order a replacement, visit our website at www.babymonitors.vtech.com or call 1 (800) 595-9511.
Getting started Baby unit installation options The baby unit is ready for tabletop use. Use the provided wall mount if you want to mount it on a wall. Make sure to test the reception and the baby unit position before completing the wall mounting installation (see Test your video and audio monitor before use on page 20). Tabletop to wall mount installation Option 1: Use this method to fix the wall mount securely on the wall. 1.
Getting started Baby unit installation options (continued) 3. Align the wall mount and screws with the holes in the wall as shown. Make sure to attach the screw in the middle hole first so that the wall mount position is fixed. Then attach the other screw in the top hole. 4. Place the baby unit on the wall mount and tighten the screw into the threaded socket at the bottom to secure the baby unit.
Getting started Baby unit installation options (continued) 5. Bundle the power cord neatly with the self-adhesive strap. Make sure to keep the power adapter cord away from children’s reach.
Getting started Baby unit installation options (continued) Option 2: Use this method so that you can relocate the baby unit with the wall mount easily. 1. Place the wall mount on a wall and then use a pencil to mark the top and the bottom holes as shown. Then remove the wall mount and drill two holes in the wall (7/32” drill bit). Check for reception strength and camera angle before drilling the holes. 2. If you drill the holes into a stud, go to step 3.
Getting started Baby unit installation options (continued) 3. Insert the screws into the holes and tighten the screws until only 1/4 inch of the screws are exposed. 4. Place the baby unit on the wall mount and tighten the screw into the threaded socket at the bottom to secure the baby unit. Align the holes on the wall mount with the screws on the wall and slide the wall mount down until it locks into place.
Getting started Baby unit installation options (continued) 5. Bundle the power cord neatly with the self-adhesive strap. Make sure to keep the power adapter cord away from children’s reach.
Getting started Parent unit battery installation You can power up the parent unit by connecting it to AC power or to the rechargeable battery provided. Even if the parent unit is connected to AC power, we recommend you also install the battery. This guarantees continual operation in case of a power outage. Install the battery as shown below. 1. With the label THIS SIDE UP facing up, insert the small tabs of the battery into the slots inside the battery compartment.
Getting started Parent unit battery installation (continued) To replace the battery, press down on the large tab of the battery and pull it out of the battery compartment, then follow the steps on page 10 to install the battery. • The operating time for using the rechargeable battery is short. If you want to monitor your baby for a long time, we recommend you connect the parent unit to AC power.
Getting started Parent unit installation Install the parent unit as shown below. Make sure that the power outlet is not controlled by a wall switch. Bundle the adapter cord neatly with the attached self-adhesive strap. Raise the antenna for better reception. Power outlet not controlled by a wall switch Parent unit power adapter If the battery is installed, the light on the parent unit turns on while charging.
Getting started Parent unit battery charging Once you have installed the parent unit (see page 12) and its battery (see page 10), press for 2 seconds to turn it on. The battery icon indicates the battery status (see the table below). The parent unit battery is fully charged after 12 hours of continuous charging.
Getting started Baby unit overview 5 12 6 1 7 2 3 14 15 8 9 4 13 16 10 11 1 _ Camera 2 _ Infrared LEDs 10 _ Backup light for night vision (page 29). 3_ 11 _ Threaded socket (1/4 in) For installation of the provided wall mount (page 4) or a tripod (not provided). _ 12 Camera angle adjustment tab (On/off) Press and hold to turn on or off (page 29). 4 _ Microphone 5 _ Antenna Tilt to adjust camera angle. _ 13 Speaker 6 _ Light sensor 7_ (Skip) Press to skip to the next lullaby (page 29).
Getting started Baby unit lights (On/off) On in red when the baby unit is powered by batteries. On in green when the baby unit is powered by AC power. On in orange when the baby unit is not paired to the parent unit. Flashes in red when the baby unit battery is low. Flashes alternately in red and green when the baby unit is in pairing mode.
Getting started Parent unit overview 5 6 7 1 2 3 4 8 9 8_ 10 11 12 1_ (On/off) Press and hold to turn on or off (page 30). 2_ (Zoom) While viewing in single-CAM mode, press to zoom in or out (page 30). 3_ (View) Press repeatedly to view an individual camera or all cameras at the same time (page 31). Press and hold to turn off the screen, or press to turn it on (page 31). /VOL+ Press to increase the speaker volume (page 30). While in a menu, press to scroll up.
Getting started Parent unit overview (continued) Pull the adjustable stand out to stand on a flat surface. Parent unit lights LINK On when strong signal strength is detected between the parent unit and the selected baby unit. Flashes when the parent unit cannot link to the selected baby unit. Off when the parent unit is turned off. On when the parent unit battery is being charged. Flashes when the parent unit battery is low and needs charging.
Getting started Parent unit display screen icons Connection status displays when strong signal strength is detected between the baby unit and the parent unit. - or displays when moderate signal strength is detected between the baby unit and the parent unit. - displays when the link between the baby unit and the parent unit is lost. Zoom - Displays when the camera at the selected baby unit has zoomed in. Lullaby - Displays when a lullaby is playing at the selected baby unit.
Getting started Positioning and operating range Position the video and audio monitor Place the parent unit within the operating range (see below) of the baby unit. We recommend the parent unit is at least 3 feet away from the baby unit to avoid audio feedback. If you still experience audio feedback, move the parent unit and the baby unit farther apart. At least 3 feet For better image quality, do not place the baby unit too far away from your baby.
Getting started Test your video and audio monitor before use It is important to test the video and audio monitor when it is installed initially, and at regular times thereafter. Test your parent unit and baby units if they have not been used for a long time or you suspect they are defective. To test your video and audio monitor: 1. Place the parent unit and the baby units in the same room to test the product. Make sure the baby units are at least 3 feet away from the parent unit. 2.
Parent unit settings Using the menu To enter the parent unit menu: 1. Press MENU/SELECT when the parent unit is not in use. 2. Press or until the desired feature is highlighted on the left side. Press MENU/SELECT or to enter that feature menu. 3. Press or until the desired feature or option is highlighted on the right side. Press MENU/SELECT or to enter that feature menu, or press MENU/SELECT to confirm your selection. You hear a confirmation tone. To return to the previous menu, press /BACK.
Parent unit settings Alert tone (continued) No link alert You can set whether the parent unit beeps whenever the link between the parent unit and the baby unit is lost. The no link alert is preset to On. To set the no link alert of the parent unit: 1. Press MENU/SELECT when the parent unit is not in use. 2. Press or to choose ALERT TONE, then press MENU/SELECT or . 3. Press or to choose No Link Alert, then press MENU/SELECT or . 4.
Parent unit settings Sensitivity You can use the parent unit to change the sound sensitivity level of the baby units from Level 1 to Level 5 (Maximum). The higher the sound sensitivity level is set, the more sensitive the baby unit is in detecting sounds for transmitting to the parent unit. The sensitivity level is preset to Level 3.
Parent unit settings Temperature Minimum temperature You can set the desired minimum room temperature of the baby unit. The minimum temperature can be set between 52 oF (11 oC) and 69 oF (20 oC). The minimum temperature is preset to 57 oF (14 oC). To set the minimum temperature of the baby unit: 1. Press MENU/SELECT when the parent unit is not in use. 2. Press or to choose TEMPERATURE, then press MENU/SELECT or . 3. Press MENU/SELECT or again to choose Minimum. 4.
Parent unit settings Temperature (continued) Temperature alert You can set whether the parent unit beeps whenever the temperature is out of the preset temperature range. The temperature alert is preset to Off. To set the temperature alert of the baby unit: 1. Press MENU/SELECT when the parent unit is not in use. 2. Press or to choose TEMPERATURE, then press MENU/SELECT or . 3. Press or to choose Alert, then press MENU/SELECT or . 4.
Parent unit settings Vibration You can set whether the parent unit vibrates whenever there is any sound detected from the baby units. The vibration setting is preset to On if speaker is off. To change the vibration setting: 1. Press MENU/SELECT when the parent unit is not in use. 2. Press or to choose VIBRATION, then press MENU/SELECT or . 3. Press or to choose On if speaker is off, Always on or Off, then press MENU/SELECT to confirm your selection. You hear a confirmation tone.
Parent unit settings Pair/unpair CAM Pair new CAM The baby units and parent unit provided are already paired. You can add or replace baby units (VM301, purchased separately) to your video and audio monitor system. You can pair a maximum of four baby units to your parent unit. Each new baby unit must be paired to the parent unit before use. Make sure you power on the baby unit (see page 29) and the parent unit (see page 30) before pairing. To pair a baby unit: 1. On the idle parent unit, press MENU/SELECT.
Parent unit settings Pair/unpair CAM (continued) Unpair CAM Make sure you power on the baby unit and the parent unit before unpairing the baby unit. To unpair a baby unit: 1. On the idle parent unit, press MENU/SELECT. 2. Press or to choose PAIR/UNPAIR CAM, then press MENU/SELECT or . 3. Press or to choose Unpair CAM, then press MENU/SELECT or . 4. Press or to choose a desired baby unit, then press MENU/SELECT. 5. Press when the screen displays To unpair CAM # from the system, press [zoom] key. 6.
Baby unit operation Power on or off the baby unit • Press and hold for 2 seconds to turn on the baby unit. The light turns on. • Press and hold for 2 seconds again to turn off the baby unit. The light turns off. Speaker volume You can change the speaker volume from Level 1 to Level 5. The preset volume is Level 3. Changing the speaker volume also changes the lullaby playback volume. To adjust the speaker volume: • Press + or - on the baby unit at any time.
Parent unit operation Power on or off the parent unit • Press and hold for 2 seconds to turn on the parent unit. The display screen turns on. • Press and hold for 2 seconds again to turn off the parent unit. The display screen turns off. Speaker volume You can change the speaker volume from Volume 1 to Volume 7, or turn it off. The speaker volume is preset to Volume 4. When the speaker volume is set to off, and the light turns on.
Parent unit operation View You can change the screen to view images from different baby units, or you can turn off the screen. To view different baby units: Press to scroll to the desired baby units. They are shown in chronological order: CAM 1, CAM 2, CAM 3, CAM 4 and multi-CAM. When there is only one paired baby unit, multi-CAM mode is not available. To turn the screen on or off: • Press and hold for 2 seconds to turn off the screen. • When the screen is turned off, press any key to turn it on.
Appendix Parent unit display screen messages Battery low at CAM # When the baby unit is powered by batteries, the stated baby unit batteries need to be changed. It will be powered off after 30 seconds automatically. Battery low at Parent Unit When the parent unit is powered by the rechargeable battery and the battery level is low, it needs to be recharged. Battery empty at Parent Unit When the parent unit is powered by the rechargeable battery and it is almost depleted, it needs to be recharged.
Appendix Parent unit battery It takes up to 12 hours for the battery to be fully charged. The standby time varies depending on the sensitivity level you set, your actual use and the age of the battery. The battery needs charging when: • A new battery is installed in the parent unit. • The parent unit beeps. • The battery is properly installed and no battery icon displays on the screen. • Battery low at Parent Unit and displays on the parent unit. • The light flashes on the parent unit.
Appendix Troubleshooting If you have difficulty with your video and audio monitor, please try the suggestions below. For customer service, visit our website at www.babymonitors.vtech.com or call 1 (800) 595-9511. In Canada, go to www.vtechcanada.com or call 1 (800) 267-7377. My video and audio monitor does not work at all. • Make sure the baby units, parent unit and the batteries are installed and charged correctly (pages 2 to 12). For optimum daily performance, charge the parent unit when it is not in use.
Appendix Troubleshooting (continued) The parent unit plays any sounds from the baby unit and I think it is too noisy. • You may have set the sensitivity level to Level 5 (Maximum). If you do so, the baby unit will transmit any sounds detected to the parent unit. You may need to adjust the sensitivity level to a lower level (page 23). • You may need to adjust the speaker volume on the parent unit (page 30). The parent unit does not play any sound when there is noise from the baby unit.
Appendix Troubleshooting (continued) The battery does not charge in the parent unit or the parent unit battery does not accept charge. • Make sure the battery is installed in the parent unit battery compartment correctly. The light on the parent unit should be on when charging. • Remove the battery and then install it again, then charge for up to 12 hours. • If the battery icon and the light on the parent unit are not on, refer to The light on the parent unit is off below.
Appendix Troubleshooting (continued) Common cure for electronic equipment. • If the video and audio monitor is not responding normally, try the following (in the order listed): 1. Disconnect the power to the baby units and the parent unit. 2. Remove the batteries in the baby units and the parent unit. Then install the batteries again. 3. Wait a few minutes before connecting power back to the baby units and the parent unit. 4. Turn on the baby units and the parent unit. 5.
Appendix Operating range This product operates with the maximum power allowed by the Federal Communications Commission (FCC). Even so, this baby unit and parent unit can communicate over only a certain distance - which can vary with the locations of the baby unit, the parent unit, the weather, and the layout of your home. When the parent unit is out of range, the parent unit displays Waiting for linking... To improve reception, move closer to the baby unit (but not less than 3 feet).
Appendix Precautions for users of implanted cardiac pacemakers Cardiac pacemakers (applies only to digital cordless devices): Wireless Technology Research, LLC (WTR), an independent research entity, led a multidisciplinary evaluation of the interference between portable wireless devices and implanted cardiac pacemakers. Supported by the U.S. Food and Drug Administration, WTR recommends to physicians that: Pacemaker patients • Should keep wireless devices at least six inches from the pacemaker.
Appendix Limited warranty What does this limited warranty cover? The manufacturer of this VTech Product warrants to the holder of a valid proof of purchase (“Consumer” or “you”) that the Product and all accessories provided in the sales package (“Product”) are free from defects in material and workmanship, pursuant to the following terms and conditions, when installed and used normally and in accordance with the Product operating instructions.
Appendix Limited warranty (continued) How do you get warranty service? To obtain warranty service in the United States of America, visit www.babymonitors.vtech.com or call 1 (800) 595-9511. In Canada, go to www.vtechcanada.com or call 1 (800) 267-7377. NOTE: Before calling for service, please review the user’s manual - a check of the Product’s controls and features may save you a service call.
Appendix FCC and IC regulations FCC Part 15 This equipment has been tested and found to comply with the requirements for a Class B digital device under Part 15 of the Federal Communications Commission (FCC) rules. These requirements are intended to provide reasonable protection against harmful interference in a residential installation.
Appendix Technical specifications Frequency control Crystal controlled PLL synthesizer Transmit frequency Baby unit: 2402 - 2478.5 MHz Parent unit: 2402 -2478.5 MHz Channels 52 LCD 2.8” Color LCD (QVGA 320x240 pixel) Nominal effective range Maximum power allowed by FCC and IC. Actual operating range may vary according to environmental conditions at the time of use. Power requirements Baby unit: 4 x AA alkaline batteries Parent unit: 3.
Index A M Add a baby unit 27 Alert 21, 22, 25 Alert tone 21 Audio settings 19 Maintenance 38 Maximum temperature 24 Menu 21 Minimum temperature 24 Multi-CAM mode 30 B N Baby unit battery installation 2 Baby unit installation 3 Baby unit installation options 4 Baby unit lights 15 Baby unit operation 29 Baby unit overview 14 Battery 33 Battery charging 13 Battery installation 2, 10–11 Brightness 26 Night vision 29 Noise sensitivity 23 No link alert 22 O Operating range 19, 38 Operation 29–31 Overview
Index S Safety instructions iii–iv Screen icons 18 Screen messages 32 Self-adhesive strap 3, 12 Sensitivity 23 Settings 21–28 Single-CAM mode 30 Sound-activated screen 26 Sound sensitivity 23 Speaker volume 29, 30 T Talk to the baby unit 31 Technical specifications 43 Temperature 24–25 Temperature alert 25 Temperature format 25 Temperature scale 25 Test your video and audio monitor 20 Troubleshooting 34–37 Turn off the baby unit 29 Turn off the parent unit 30 Turn on the baby unit 29 Turn on the parent u
VTECH TELECOMMUNICATIONS LTD. A member of THE VTECH GROUP OF COMPANIES. Distributed in the U.S.A. by VTech Communications, Inc., Beaverton, Oregon 97008. Distributed in Canada by VTech Technologies Canada Ltd., Richmond, B.C. V6W 1L5. VTech is the registered trademark of VTech Holdings Limited. Copyright © 2011 for VTECH TELECOMMUNICATIONS LTD. All rights reserved. Printed in China.