INTRODUCTION Congratulations! You have purchased one of the most sophisticated cordless telephones on the market! The VT 1962 has been designed to offer a new standard in cordless telephone technology. The VT 1962 also provides a oneway Page/Find. Pressing the Base PAGE key will cause the Handset to ring in a manner which distinguishes it from normal incoming ringing. This can be used to alert the Handset user, or to simply locate the Handset in the event that it is misplaced.
INTRODUCTION Special Features • • • • • • • • • • • • • • • • 900 MHz Operation. Fully Digital Link between Handset and Base with ADPCM voice coding. Digitally-Scrambled Voice Communication. Name / Number CID display. 2 row by 12 character 5x7 dot matrix alpha-numeric LCD. 50 CID memory locations. Backlit Handset display. 20 location Programmable Memory for 20 Digit Phone Number. 10 Channel Operation with auto channel selection. Out-of-Range indication while the Handset is in use or in standby mode.
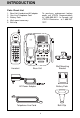
INTRODUCTION Parts Check List 1. 2. 3. 4. 5. To purchase replacement battery packs, call VTECH Communications at 1-800-595-9511. In Canada, call VTECH Electronics at 1-800-2677377.
FCC and IC Regulations This equipment complies with Parts 15 and 68 of the Federal Communications Commission (FCC) rules for the United States. It also complies with regulations RSS210 and CS-03 of Industry and Science Canada. Operation is subject to the following two conditions: (1) this device may not cause interference, and (2) this device must accept any interference, including interference that may cause undesired operation of the device.
FCC and IC Regulations FCC Part 68 This equipment may not be used on coin service provided by the phone company or Party Lines. The FCC requires that you connect your cordless telephone to the nationwide telephone network through a modular telephone jack (USOC RJ11C, RJ11W or RJ14). The REN is useful in determining the number of devices you may connect to your telephone line and still enable the devices to ring when you receive a call. The general rule is that the REN value should not exceed 5.
FCC and IC Regulations Before installing this equipment, users should ensure that it is permissible to be connected to the facilities of the local telecommunications company. The equipment must also be installed using an acceptable method of connection. The customer should be aware that compliance with the above conditions may not prevent degradation of services in some situations.
IMPORTANT SAFETY INSTRUCTIONS When using your telephone equipment, basic safety precautions should always be followed to reduce the risk of fire, electric shock and injury to persons, including the following: 1. Read and understand all instructions. 2. Follow all warnings and instructions marked on the product. 3. Unplug this product from the wall outlet before cleaning. Do not use liquid cleaners or aerosol cleaners. Use a damp cloth for cleaning. 4.
IMPORTANT SAFETY INSTRUCTIONS 12. Unplug this product from the wall outlet and refer servicing to a VTech authorized service facility under the following conditions: 13. Avoid using a telephone (other than a cordless type) during an electrical storm. There may be a remote risk of electric shock from lighting. A. When the power supply cord or plug is damaged or frayed. 14. Do not use the telephone to report a gas leak in the vicinity of the leak. B. If liquid has been spilled into the product. C.
REPLACING THE BATTERY PACK Alternatively, if you have purchased a spare battery pack and it has been charging in the Base Unit, simply exchange the drained Handset battery pack with the fully charged replacement battery pack from the Base charger. Place the drained Handset battery pack into the Base charger to recharge. Charging The Handset Battery Pack The Handset of your VT 1962 cordless telephone is powered by a rechargeable battery pack. It charges automatically whenever the Handset is in the Base.
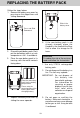
REPLACING THE BATTERY PACK Follow the steps below: 1. Remove the battery case cover by pressing on the ridged lines and sliding downward. Slide in the battery cover Press and Slide Downward 5. 2. Discard the old battery pack. Don't put the old battery pack in a trash compactor or a fire - it could burst. 3. Place the new battery pack in its housing with the metal contacts facing down.
REPLACING THE BATTERY PACK 4. Place a battery pack in the Spare Battery charger. Make sure the metal charging contacts on the underside of the battery pack are aligned with the charging contacts in the Spare Battery charger. Exercise care in handling batteries in order not to short the battery with conducting materials such as rings, bracelets, and keys. The battery or conductor may overheat and cause burns. To purchase replacement battery packs, call VTECH Communications at 1-800-595-9511.
REPLACING THE BATTERY PACK The RBRC TM Seal The RBRC Seal on the nickel-cadmium battery indicates that VTech Communications, Inc. is voluntarily participating in an industry program to collect and recycle these batteries at the end of their useful lives, when taken out of service within the United States and Canada. R R The RBRC program provides a convenient alternative to placing used nickel-cadmium batteries into the trash or municipal waste, which may be illegal in your area.
GETTING STARTED Setting Up Your VT 1962 Setting the Tone/Pulse Switch Choose an area near an electrical outlet and a telephone wall jack. The TONE/PULSE switch is located on the bottom of the Base Unit and is factory set to TONE. If you have touch tone service, do not change the switch setting. If you have rotary (Pulse) service, set the switch to PULSE. AC Power Adapter Plug the AC power adaptor into an electrical outlet and the DC connector to the back of the Base Unit.
GETTING STARTED Connect Telephone Line Cord CAUTION: Plug one end of the telephone cord into a wall jack and the other end into the back of the Base Unit. 1. Never install telephone wiring during a lightning storm. 2. Never install telephone jacks in wet locations unless the jack is specifically designed for wet locations. 3. Never touch uninsulated telephone wires or terminals unless the telephone line has been disconnected at the network interface. 4.
WALL MOUNTING 5. Using The Wall Mount Adapter 1. Choose a spot near an electrical outlet and a telephone jack. You phone requires a modular telephone jack and a standard electrical outlet (120v AC). The power cord is six feet long; make sure there is an electrical outlet within reach of the Base Unit. The outlet should not be controlled by a wall switch. If the switch is ever turned off, the phone will not operate. Position the wall mount bracket on the Base. TONE 2.
THE LCD DISPLAY LCD Display Messages is displayed when the Handset microphone has been muted. the PHONE ON indicator is displayed when the phone is in use. is displayed when the Handset ringer has been programmed off. shows the Handset volume setting. is displayed when the Handset has lost communication with the Base Unit and is attempting to reestablish a link by scanning all channels. is displayed when the unit is in a lowbattery condition.
THE HANDSET LAYOUT THE HANDSET FEATURES Antenna Headset Jack LCD Display Volume Up & Down Phone Key Off Key Hold Key Dialing Keys (0-9) Battery Compartment Caller ID Key Redial Key Mute Key Clear/Delete Key Program Key Microphone Charging Contacts Memory Key Tone (Temporary Tone) 17
THE BASE UNIT LAYOUT THE BASE UNIT FEATURES TONE PULSE AC Power Jack Phone Cord Jack Tone/Pulse Selector Antenna MEMO ANSWER ON/OFF SPARE BATTERY CHARGING 1 IN USE 2 MAIL BOX MAIL BOX 3 MAIL BOX PLAY/STOP DELETE TIME/SET SELECT SKIP/QUICK REPEAT/SLOW Memo Key Answer On/Off Key Handset Charge Indicator Spare Battery Indicator In Use Indicator Mail box 2 Indicator Mail box 3 Indicator MENU VOLUME Mail box 1 Indicator Select Key Menu Key Time/Set Key Volume Up/Down Key PAGE Page Key R
QUICK REFERENCE GUIDE Set-Up To Mute A Call • • • • • Plug AC adapter into a standard electrical outlet and Base Unit Set Dial Mode switch to PULSE or TONE. The unit is factory set to TONE. Let the Handset battery pack charge for 16 hours before first use. Connect telephone line cord to Base Unit and telephone jack. • To Page The Handset • • Making Calls • • Press MUTE to disable the Handset microphone. Press MUTE again to return to normal two way conuersation. Press the PHONE key.
QUICK REFERENCE GUIDE Memory Dialing (Speed Dialing): • To view the time and date of the call press and hold the (7) key. The time and date will be shown along with the phone number. You will see something like: Memory Dialing Press Press You will see As long as the key is held down • To view other calls, scroll backwards and forwards by using the ( ) and ( ) keys. • To view additional dlgits not shown on the display, press the (9) key • To exit press OFF .
BASIC OPERATION Making Calls FLASH You can make calls directly from the Handset whether you are at the Base or away from it. You can use your VT 1962 cordless phone with services such as Call Waiting. Simply press the PHONE key to FLASH the line. NOTE: There are two different ways to dial a number: 1. REDIAL To REDIAL the last number you dialed, press the PHONE key, then press REDIAL . The phone will automatically dial the number. The number will be shown on the display.
ADVANCED FUNCTIONS Call Waiting Temporary Tone While you are on a call, you will hear an alert signal, warning that a second caller is trying to reach you. CALL WAITING is a subscription service, available from most local telephone service providers. Contact your provider for details.
ADVANCED FUNCTIONS Changing Ringer Types Turning Off The Ringer To program, the Handset must be OFF.
ADVANCED FUNCTIONS CLR/DEL Key Function The CLEAR and DELETE functions can be accessed separately depending on how long the key is held down. For example, to clear the last digit entered on the display, press the CLR/DEL key for less than 1 second. Press and hold the CLR/DEL key for more than 1 second to completely clear the LCD. The DELETE function is also used to delete CID and memory dial records, see DELETING STORED NUMBERS, and DELETING NUMBERS.
MEMORY DIALING Unsuccessful programming can result from not correctly completing the programming sequence. For example, if after entering a number on the LCD and entering program mode, the OFF key were pressed instead of entering a valid memory location, the "PROGRAMMING INCOMPLETE" message would appear. If this message appears, simply repeat the programming sequence.
MEMORY DIALING Press PHONE , the number on the display will be dialed after a 2 second pause. • NOTE: Stored numbers are retained in memory even if the Base loses its power or the Handset battery is removed. NOTE: The ability to temporarily add memory contents to digits already entered on the display operates in the same way for CID and speed dial memories. Storing Special Codes To insert a pause in a phone number, press HOLD at the appropriate point when entering the number on the LCD.
CID-CALLER ID CID - Caller ID NOTE: You must be in an area where CID service is available and you must subscribe to it to use this feature. Your VT 1962 cordless phone is capable of displaying the name and/ or phone number of the person calling, before you answer the phone. Subscription to Caller ID service through your local phone company is required to utilize this feature.
CID-CALLER ID However, when you dial directly from CID memory, only the last 7 digits of the received telephone number will be used. Consequently, you would actually dial this: Special Message Indicators Out of Area Calls If for any reason the telephone number of the caller is unavailable, or if the caller is outside the CID service area, the message UNAVAILABLE is displayed on the LCD. The VT 1962 was designed to accommodate this situation.
CID-CALLER ID To find out the corresponding phone number as well as the date and time of the call, press and hold the 7 key. The date and time will be shown. Releasing the key will again show the caller's name. Reviewing Numbers Calls stored in memory can be reviewed by pressing CID . The display will show the number of the most recent (CALL #01).
CID-CALLER ID Deleting Numbers • Pressing any key other than CLR/DEL will cancel the operation. Pressing CLR/DEL will confirm the operation and the display will then show: • The message will remain on the display for 2 seconds. Pressing the CLR/DEL button deletes the CID number displayed. • • • While the phone is in CID mode, press the CLR/DEL key once to delete the current call and the display will show: The older CID records will be moved forward by one location .
ANSWERING SYSTEM SETUP Default Answering Settings : Set Outgoing Message (OGM) System Selecting Announcement There are 2 choices of announcements: Normal outgoing message & Outgoing message for Announce Only. The Answering System is preset to have the following default settings: Security Code: 19 Audible Message Alert: OFF Date & Time: Mon 12:00am Rings to answer: 4 Announce Only : OFF 1. Normal answering mode. (Announce Only : OFF) In this mode, the caller is able to leave his message.
ANSWERING SYSTEM SETUP Recording / Playing / Deleting the Outgoing Messages (OGM) Set Security Code The security code programmed into the Answering System is used to gain access to functions from remote locations. The security code default setting is 19.
ANSWERING SYSTEM SETUP Setting Day & Time MEMO ANSWER ON/OFF Press MENU Press SELECT Set Audible Message Alert (DAY) MEMO ANSWER ON/OFF Press SPARE BATTERY CHARGING Press IN USE CHARGING SPARE BATTERY 1 MAIL BOX IN USE Press MAIL BOX 1 MAIL BOX 2 MAIL BOX 3 Press SELECT (HOUR) MAIL BOX TIME/SET SELECT DELETE MENU Press SKIP/QUICK REPEAT/SLOW PAGE 2 MAIL BOX PLAY/STOP PLAY/STOP DELETE TIME/SET SKIP/QUICK REPEAT/SLOW Press SELECT MENU SELECT 3 Press TIME/SET T
ANSWERING SYSTEM SETUP Note: You can store one OGM for Announce Only mode, and a separate OGM for Normal (accept messages) mode. The appropriate OGM will be played based on how you set Announce Only. Set Number of Rings The Answering System has 4 ring type settings: 2 rings The incoming call is answered after 2 rings. 4 rings The incoming call is answered after 4 rings. Set Base Ringer On/Off The Base ringer can be turned ON or OFF. 6 rings The incomng call is answered after 6 rings.
ANSWERING SYSTEM OPERATIONS • Leaving a Message (Incoming Message) The Answering System will answer a call (according to the current ring selection), then play the OGM, followed by a beep to signal the start of recording. • • • Default mailbox is MAILBOX 1. If your want to record the incoming message in specific mailbox, press " x" ( 1, 2 or 3) during OGM playback. After desired mailbox is selected, "Mailbox X, now recording" will be announced, and incoming message recording starts after a beep.
ANSWERING SYSTEM OPERATIONS Deleting Messages • Turning the Answering Machine ON/OFF Press DELETE at any time during message playback to delete the current message. All old messages for a particular mailbox, can be deleted by pressing and holding the DELETE key for more than 2 seconds. The system will announce "Please select mailbox". Press the Mailbox X key to delete all the old messages in the selected mailbox.
ANSWERING SYSTEM OPERATIONS Call Screening • Call Screening allows you to listen to incoming messages through the Base unit as they are being recorded. • When the Answering System answers a call, the unit will let you listen to the voice on the line. If you want to answer the call at once, just pick-up the Handset, or an extension, and the Answering System will automatically stop recording. Press the and keys for the desired volume level. There are 8 volume levels.
ANSWERING SYSTEM OPERATIONS Memory Full • Power Failure When the Answering System has less than 30 seconds recording time remaining, or the total number of messages equal 99, the display shows "F" with the number of new messages to indicate memory full. If the Answering System memory is full, it will automatically default to Answering System OFF mode. The Answering System will answer a call after 10 rings and "Memory full, Please enter your security code" is announced.
ANSWERING SYSTEM OPERATIONS BASE UNIT MESSAGE WINDOW (LED) • The large Base Unit LED provides useful data on the status of your VT 1962 answering device.
REMOTE OPERATION OF ANSWERING SYSTEM Remote operation allows you to control the functions of the Answering System when you are away from the Base, and call from an outside telephone line. The Answering System cannot be accessed from another telephone on the same line. You can access many of the Answering System functons from a remote location, such as listening to messages, changing recorded announcements, and recording memos. 3. Enter # followed by your 2 digit security code during the announcement.
REMOTE OPERATION OF ANSWERING SYSTEM Repeat Messages During Playback 1. Press "#4" once during message playback to repeat the current message. 2. Press "#4" twice within 2 seconds to skip to the previous message. Change OGM Remotely 1. Enter " 7" to record a new OGM. You will hear, "Now recording", followed by a beep to signal start of recording. 2. Press "#5" to stop recording. Your new OGM will playback automatically. * Skip Messages During Playback 1.
REMOTE OPERATION OF ANSWERING SYSTEM The advanced voice menu is as follows: • Press "#7" to review outgoing message. • Press " 7" to record outgoing message. • Press " 8" to record memo. • Press "#4" twice to repeat previous message. • Press "#0" to turn the system on or off. • Press " 5" to return to the simple voice menu. * * * Pressing any function code will stop the voice menu, and perform the corresponding functions. Exiting Remote Operation 1.
ADDITIONAL OPERATING TIPS Noise Or Interference Your VT 1962 cordless telephone has auto-channel scan circuitry which will detect excess noise and change the channel of the phone to reduce it. This is done automatically. Out Of Range When Phone Is On If you are presently engaged in a phone conversation move closer to the Base. If the Base Unit does not communicate with the Handset within 25 seconds of losing contact, it will automatically hang up.
HEADSET OPERATION Your Vtech cordless phone is equipped with a 2.5mm Headset Jack for usse with an sptional accessory Headset for hands-free operation. If you choose to use the Headset option, you must obtain an optional accessory Headset, which is compatible with the Vtech cordless phone. For maximum sound quality, the flexible microphone should be positioned at the corner of your mouth, about one inch from your face. To purchase a Headset, call Vtech at 1-800-595-9511. Once you have a compatible 2.
MAINTENANCE Taking Care Of Your Telephone Cleaning your telephone Your VT 1962 cordless telephone contains sophisticated electronic parts, so it must be treated with care. Your telephone has a durable plastic casing that should retain its luster for many years. Clean it only with a soft cloth slightly dampened with water or a mild soap. Do not use excess water or cleaning solvents of any kind. Avoid rough treatment Place the Handset down gently.
IN CASE OF DIFFICULTY If you have difficulty operating your phone, the suggestions below should solve the problem. If you still have difficulty after trying these suggestions, call VTECH Communications at 1-800-595-9511. In Canada, call VTECH Electronics at 1-800-267-7377.
IN CASE OF DIFFICULTY Common Cure For Electronic Equipment Electronics, like people, can sometimes get confused. If the unit does not seem to be responding normally, then try putting the Handset in the cradle. If it does not seem to respond after trying this a few times, do the following (in the order listed): 1. Disconnect the power to the Base. 2. Disconnect the Handset battery, and spare battery pack, if applicable. 3. Wait a few minutes. 4. Connect power to the Base. 5.
WARRANTY STATEMENT WHAT DOES OUR WARRANTY COVER? • Any defect in material or workmanship. FOR HOW LONG AFTER THE ORIGINAL PURCHASE? • To the original purchaser only - ONE YEAR. WHAT WILL VTECH DO? • At our option, repair or replace your unit. HOW DO I SEND MY UNIT, IN OR OUT OF WARRANTY? • In the U.S. Call VTECH Communications customer service for Return Authorization at: 1-800-595-9511. In Canada, call Vtech Electronics at 1-800267-7377 • Properly pack your unit.
WARRANTY STATEMENT WHAT DOES OUR WARRANTY NOT COVER? • Batteries • Damage from misuse, neglect, or acts of nature (lightning, floods, power surges, etc.) • Products which may have been modified or incorporated into other products • Products purchased and/or operated outside the USA, its territories, or Canada.
TECHNICAL SPECIFICATIONS FREQUENCY CONTROL WEIGHT Crystal Controlled Dual PLL Synthesizer Handset : 295 grams Base : 470 grams TRANSMIT FREQUENCY POWER REQUIREMENTS Handset : 925.05 MHz to 927.75 MHz ( All ten channels within this range) Handset : Self-contained nickelcadmium rechargeable battery supply, 3.6V nominal, 600mAh capacity. Base : 902.3 MHz to 905.0 MHz (All ten channels within this range) Base : 9VDC @ 500mA RECEIVE FREQUENCY MEMORY Handset : 902.3 MHz to 905.
TABLE OF CONTENTS Page INTRODUCTION .................................................................................................. 1 Special Features ................................................................................................................... 2 Parts Check List .................................................................................................................... 3 FCC AND IC REGULATIONS ..............................................................................
VTECH COMMUNICATIONS LTD. Is a trademark of VTECH COMMUNICATIONS LTD., a member of THE VTECH GROUP OF COMPANIES. Distributed in the U.S.A. by VTECH Communications, 11035 SW 11th Street Bdlg . B, Suite 207, Beaverton, Oregon, 97005 Distributed in the Canada by Vtech Electronics Canada Ltd., Suite 200-7671 Alderbridge Way Richmond, B.C. V6X 1Z9. Copyright 1999 for VTECH COMMUNICATIONS LTD..